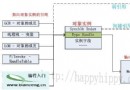
對於希望對WCF的消息交換有一個深層次了解的讀者來說,tcpTracer絕對是一個不可多得好工具。我們將tcpTracer置於服務和服務代理之間,tcpTracer會幫助我們接獲、顯示和轉發流經他的消息。
從本質上講,tcpTracer是一個路由器。當啟動的時候,我們需要設置兩個端口:原端口(source port)和目的端口(destination port),然後tcpTracer就會在原端口進行網絡監聽。一旦請求抵達,他會截獲整個請求的消息,並將整個消息顯示到消息面板上。隨後,tcpTracer會將該消息原封不動地轉發給目的端口。在另一方面,從目的端口發送給原端口的消息,也同樣被tcpTracer截獲、顯示和轉發。
接下來我們我們通過下面的步驟演示如何通過tcpTracer在WCF中進行消息的路由。
步驟一、創建一個簡單的WCF應用
為了演示tcpTracer在WCF中的應用,我們需要先創建一個簡單的WCF服務的應用,為此我們創建一個簡單計算服務的例子。
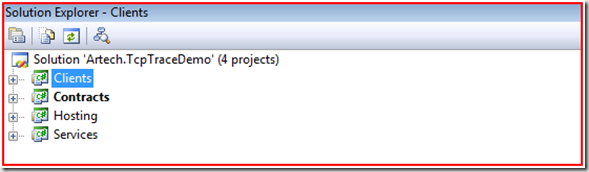
整個應用采用如下圖所示的四層結構:Contracts、Services、Hosting和Clients。
Contracts:class library項目,定義所有的契約,包括服務契約、數據契約、消息契約以及錯誤契約,剛項目同時被其他三個項目引用
Services:class library項目,實現了在Contracts中定義的服務契約
Hosting:控制台項目,同時引用Contracts和Services,實現對定義在Services項目的服務的寄宿
Clients:控制台項目,引用Contracts,模擬服務的調用者
服務契約:Artech.TcpTraceDemo.Contracts.ICalculate
//---------------------------------------------------------------

// EndpointAddress & WCF Addressing (c) by 2008 Jiang Jin Nan

//---------------------------------------------------------------

using System.ServiceModel;

namespace Artech.TcpTraceDemo.Contracts

{

  [ServiceContract]

  public interface ICalculate

  {

    [OperationContract]

    double Add(double x, double y);

  }

}
服務實現:Artech.TcpTraceDemo. Services. CalculateService
//---------------------------------------------------------------

// EndpointAddress & WCF Addressing (c) by 2008 Jiang Jin Nan

//---------------------------------------------------------------

using Artech.TcpTraceDemo.Contracts;


namespace Artech.TcpTraceDemo.Services

{

  public class CalculateService:ICalculate

  {

    #region ICalculate Members


    public double Add(double x, double y)

    {

      return x + y;

    }


    #endregion

  }

}
服務寄宿(代碼):Artech.TcpTraceDemo.Hosting. Program
//---------------------------------------------------------------

// EndpointAddress & WCF Addressing (c) by 2008 Jiang Jin Nan

//---------------------------------------------------------------

using System;

using System.ServiceModel;

using Artech.TcpTraceDemo.Services;


namespace Artech.TcpTraceDemo.Hosting

{

  class Program

  {

    static void Main(string[] args)

    {

      using (ServiceHost serviceHost = new ServiceHost(typeof(CalculateService)))

      {

        serviceHost.Opened += delegate

        {

          Console.WriteLine("The Calculate Service has been started up!");

        };

        serviceHost.Open();


        Console.Read();

      }

    }

  }

}
服務寄宿(配置):App.config
<?xml version="1.0" encoding="utf-8" ?>

<configuration>

  <system.serviceModel>

    <bindings>

      <customBinding>

        <binding name="SimpleBinding">

          <textMessageEncoding />

          <httpTransport />

        </binding>

      </customBinding>

    </bindings>

    <services>

      <service name="Artech.TcpTraceDemo.Services.CalculateService">

        <endpoint address="http://127.0.0.1:9999/calculateservice" binding="customBinding"          bindingConfiguration="SimpleBinding" contract="Artech.TcpTraceDemo.Contracts.ICalculate"/>

      </service>

    </services>

  </system.serviceModel>

</configuration>
注:由於本例僅僅用於模擬消息的路由,所以我們僅僅需要綁定提供的傳輸和編碼功能,所以在這裡我使用了自定義綁定,並且添加兩個BindElement:HttpTransport和TextMessageEncoding。
服務訪問(代碼):Artech.TcpTraceDemo.Clients.Program
//---------------------------------------------------------------

// EndpointAddress & WCF Addressing (c) by 2008 Jiang Jin Nan

//---------------------------------------------------------------

using System.ServiceModel;

using Artech.TcpTraceDemo.Contracts;

using System;

namespace Artech.TcpTraceDemo.Clients

{

  class Program

  {

    static void Main(string[] args)

    {

      using (ChannelFactory<ICalculate> channelFactory = new ChannelFactory<ICalculate>("calculateService"))

      {

        ICalculate calculator = channelFactory.CreateChannel();

        using (calculator as IDisposable)

        {

          Console.WriteLine("x + y = {2} where x = {0} and y = {1}",1,2,calculator.Add(1,2));

        }

      }


      Console.Read();

    }

  }

}
服務訪問(配置):App.config
<?xml version="1.0" encoding="utf-8" ?>

<configuration>

  <system.serviceModel>

    <bindings>

      <customBinding>

        <binding name="SimpleBinding">

          <textMessageEncoding />

          <httpTransport />

        </binding>

      </customBinding>

    </bindings>

    <client>

      <endpoint address="http://127.0.0.1:9999/calculateservice"

        binding="customBinding" bindingConfiguration="SimpleBinding"

        contract="Artech.TcpTraceDemo.Contracts.ICalculate" name="calculateService" />

    </client>

  </system.serviceModel>

</configuration>
步驟二、通過ClientViaBehavior實現基於tcpTracer的消息路由
在我們創建的WCF服務來說,整個服務訪問只涉及到兩方:服務(CalculateService)和服務的調用者(Client)。從消息交換的角度來看,服務的調用者調用者將請求消息直接發送到服務端,計算結果也以回復消息的形式直接返回到服務的調用者。
現在我們需要將tcpTracer作為一個路由器引入到服務(CalculateService)和服務的調用者(Client)之間,那麼我們需要解決的是:服務調用者發送的消息不能直接發送到服務端,而應該先發送給tcpTracer,再由tcpTracer轉發給服務。我們可以通過ClientViaBehavior實現邏輯地址和物理地址的分離——邏輯地址指向最終的服務,而物理地址則指向tcpTracer。
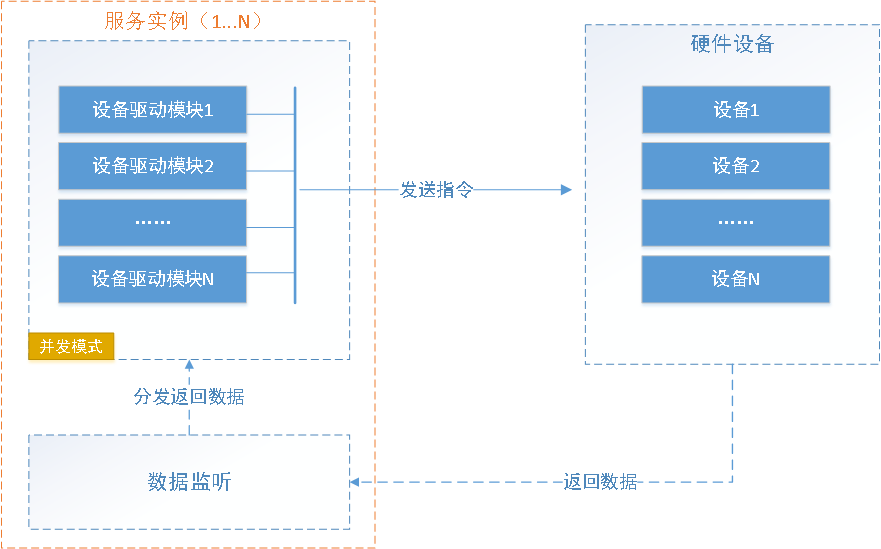
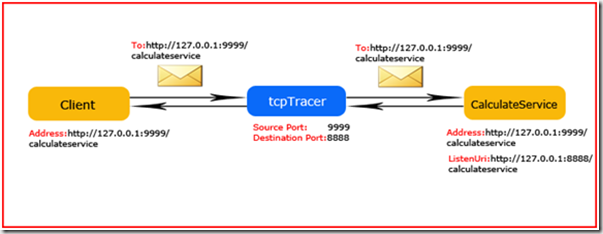
具體的原理如下圖所示:我們將tcpTracer的原端口(source port)和目的端口(destination port)設置成8888和9999(CalculateService地址所在的端口)。通過ClientViaBehavior將物理地址的端口設成8888(tcpTracer監聽端口)。
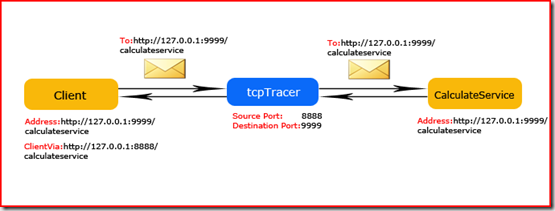
注:對於消息發送方來說,SOAP消息的To報頭對應的地址由發送端的終結點地址(邏輯地址)決定。
基於上面的實現原理,我們需要修改客戶端的配置,在<system.serviceModel>/<behaviors>/<endpointBehaviors>添加ClientViaBehavior,將viaUri的端口指定為8888:http://127.0.0.1:8888/calculateservice。並將該EndpointBehavior應用到終結點中。
<?xml version="1.0" encoding="utf-8" ?>

<configuration>

  <system.serviceModel>

    <behaviors>

      <endpointBehaviors>

        <behavior name="clientViaBehavior">

           <clientVia viaUri="http://127.0.0.1:8888/calculateservice" />

        </behavior>

      </endpointBehaviors>

    </behaviors>

    <bindings>

      <customBinding>

        <binding name="SimpleBinding">

          <textMessageEncoding />

          <httpTransport />

        </binding>

      </customBinding>

    </bindings>

    <client>

      <endpoint address="http://127.0.0.1:9999/calculateservice" behaviorConfiguration="clientViaBehavior"

        binding="customBinding" bindingConfiguration="SimpleBinding"

        contract="Artech.TcpTraceDemo.Contracts.ICalculate" name="calculateService" />

    </client>

  </system.serviceModel>

</configuration>
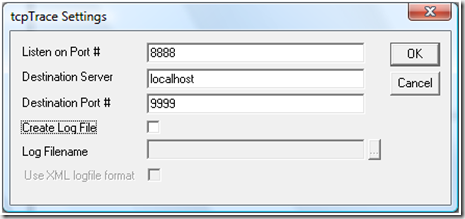
現在我們啟動tcpTracer,將Listen On Port#和Destination Port #設置為8888和9999。
接下來,我們分別啟動服務寄宿和服務訪問的控制台應用程序,請求消息和回復消息將會顯示到tcpTracer的消息顯示面板中,如下圖所示:
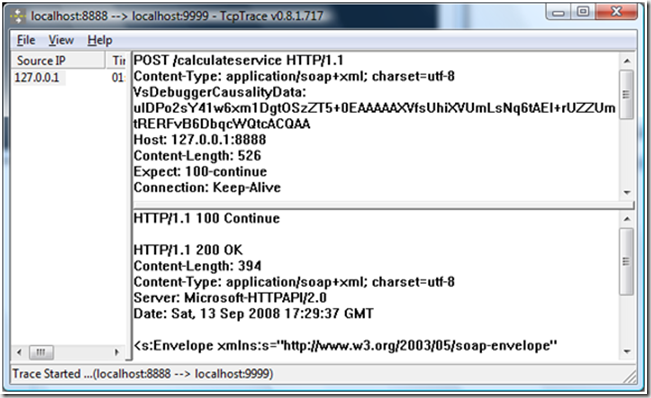
其中顯示在上面文本框中的請求消息的內容如下,可以看出是一個HttpRequest消息,SOAP消息作為HttpRequest消息的主體(body)。
POST /calculateservice HTTP/1.1
Content-Type: application/soap+xml; charset=utf-8

VsDebuggerCausalityData: uIDPo2sY41w6xm1DgtOSzZT5+0EAAAAAXVfsUhiXVUmLsNq6tAEl+rUZZUmtRERFvB6DbqcWQtcACQAA

Host: 127.0.0.1:8888

Content-Length: 526

Expect: 100-continue

Connection: Keep-Alive


<s:Envelope xmlns:s="http://www.w3.org/2003/05/soap-envelope" xmlns:a="http://www.w3.org/2005/08/addressing">

  <s:Header>

    <a:Action s:mustUnderstand="1">http://tempuri.org/ICalculate/Add</a:Action>

    <a:MessageID>urn:uuid:a63ec626-a350-4390-84c6-fb34be4ff208</a:MessageID>

    <a:ReplyTo>

        <a:Address>http://www.w3.org/2005/08/addressing/anonymous</a:Address>

    </a:ReplyTo>

    <a:To s:mustUnderstand="1">http://127.0.0.1:9999/calculateservice</a:To>

  </s:Header>

  <s:Body>

    <Add xmlns="http://tempuri.org/">

      <x>1</x>

      <y>2</y>

    </Add>

  </s:Body>

</s:Envelope>
相應地,現在在下面文本框中的回復消息是一個HttpResponse消息,主體部分仍然是一個SOAP消息,內容如下:
HTTP/1.1 100 Continue
HTTP/1.1 200 OK

Content-Length: 394

Content-Type: application/soap+xml; charset=utf-8

Server: Microsoft-HTTPAPI/2.0

Date: Sat, 13 Sep 2008 17:29:37 GMT


<s:Envelope xmlns:s="http://www.w3.org/2003/05/soap-envelope" xmlns:a="http://www.w3.org/2005/08/addressing">

  <s:Header>

    <a:Action s:mustUnderstand="1">http://tempuri.org/ICalculate/AddResponse</a:Action>

    <a:RelatesTo>urn:uuid:a63ec626-a350-4390-84c6-fb34be4ff208</a:RelatesTo>

  </s:Header>

  <s:Body>

    <AddResponse xmlns="http://tempuri.org/">

      <AddResult>3</AddResult>

    </AddResponse>

  </s:Body>

</s:Envelope>
步驟三、通過ListenUri實現基於tcpTracer的消息路由
對於路由的實現,本質上就是實現邏輯地址和物理地址的分離。通過前面的介紹,我們知道了,我們有兩種不同的方式實現這樣的目標。其中之一我們已經用過了,就是在步驟二種基於ClientViaBehavior的方式,如何說ClientViaBehavior是基於客戶端的實現的話,ListenUri就是基於服務端的實現方式。
通過ListenUri的實現的基本原理如下圖所示:客戶端保持不變,在對服務進行寄宿的時候,將ListenUri的端口設為8888,那麼服務實際的監聽地址的端口將從9999變成8888。由於客戶端保持不變,所以請求消息仍然發送到端口9999,為了實現tcpTracer對消息正常的路由,只需要將原端口和目的端口指定為9999(邏輯地址)和8888(物理地址)就可以了(和步驟二完全相反)。
為此,我們需要修改服務寄宿的配置,在終結點配置節中指定listenUri為http://127.0.0.1:8888/calculateservice。
<?xml version="1.0" encoding="utf-8" ?>

<configuration>

  <system.serviceModel>

    <bindings>

      <customBinding>

        <binding name="SimpleBinding">

          <textMessageEncoding />

          <httpTransport />

        </binding>

      </customBinding>

    </bindings>

    <services>

      <service name="Artech.TcpTraceDemo.Services.CalculateService">

        <endpoint address="http://127.0.0.1:9999/calculateservice" binding="customBinding"

          bindingConfiguration="SimpleBinding" contract="Artech.TcpTraceDemo.Contracts.ICalculate"

          listenUri="http://127.0.0.1:8888/calculateservice" />

      </service>

    </services>

  </system.serviceModel>

</configuration>
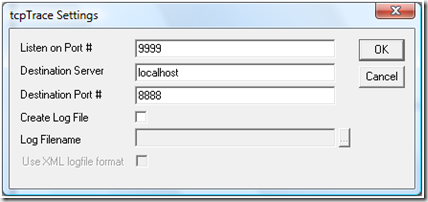
現在我們啟動tcpTracer,將Listen On Port#和Destination Port #設置為9999和8888。
當我們先後啟動服務寄宿和服務訪問的控制台應用程序,在tcpTracer中,我們可以得到和步驟二一樣的結果。