PPLiteSegIt is a real-time semantic segmentation algorithm developed by Baidu Feipu with both high precision and low latency,目前已經開源.
github地址:GitHub - PaddlePaddle/PaddleSeg: Easy-to-use image segmentation library with awesome pre-trained model zoo, supporting wide-range of practical tasks in Semantic Segmentation, Interactive Segmentation, Panoptic Segmentation, Image Matting, 3D Segmentation, etc.
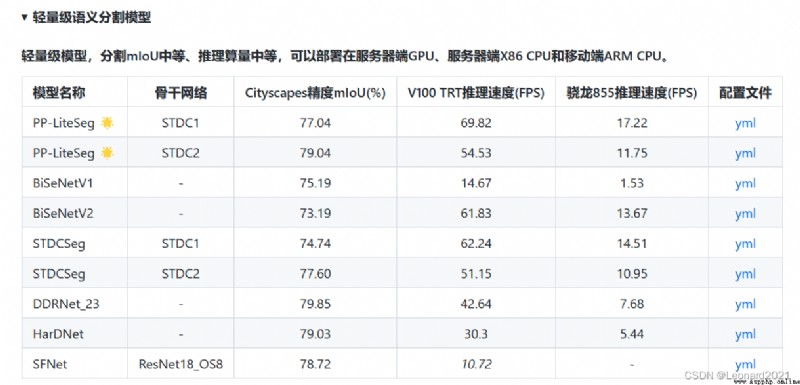
The field of real-time semantic segmentation pays more attention to the balance between operational flow and segmentation accuracy.
PP-LiteSeg It is a combination of precision and speed at the same time SOTA(業界最佳)語義分割模型.它基於 Cityscapes 數據集,在 1080ti 上精度為 mIoU 72.0 時,速度高達273.6 FPS(mIoU 77.5 時,FPS 為102.6),超越現有 CVPR SOTA 模型 STDC,真正實現了精度和速度的 SOTA 均衡.
更值得令人驚喜的是,PP-LiteSeg 不僅在開源數據集評測效果優秀,在產業數據集也表現出了驚人的實力!例如在質檢、遙感場景,PP-LiteSeg 的精度與高精度、大體積的 OCRNet 持平,而速度卻快了近7倍!!!
本人使用PP-LiteSeg The purpose is to try to combine semantic segmentation and object detection,to realize the visual part of autonomous driving.
由於PP-LiteSeg In the field of real-time semantic segmentation, the real-time detection process and segmentation accuracy are bothSOTA,Therefore, it is selected for training and deployment.
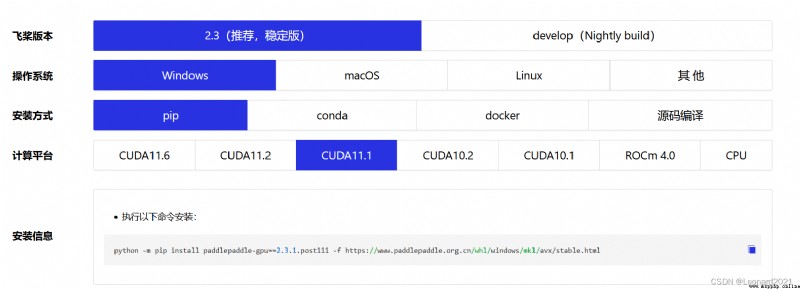
開始使用_飛槳-源於產業實踐的開源深度學習平台
Depends on your computer's graphics card、Install the graphics card driver paddlepaddle-gpu ,For example, my computer graphics card is Nvidia RTX 2060,CUDA是11.1,CUDNN是8.1,Select the corresponding version for command line download.
使用如下命令驗證PaddlePaddle是否安裝成功,並且查看版本.
# 在PythonThe following command is successfully executed in the interpreter
>>> import paddle
>>> paddle.utils.run_check()
# If the following prompt appears on the command line,說明PaddlePaddle安裝成功
# PaddlePaddle is installed successfully! Let's start deep learning with PaddlePaddle now.
# 查看PaddlePaddle版本
>>> print(paddle.__version__)
安裝完成後,安裝 PaddleSeg
pip install paddleseg首先,我使用的數據集是Kaggle上獲取的CARLAA dataset of self-driving car simulators,Subsequent attempts will be made to use real-world datasets for training and segmentation.
Semantic Segmentation for Self Driving Cars | Kaggle
CARLA Simulator
Its original dataset is divided into A、B、C、D、E五個部分,Each part contains1000張image和1000Zhang corresponds tomask.
The official tutorial for dataset processing:
https://github.com/PaddlePaddle/PaddleSeg/blob/release/2.6/docs/data/marker/marker_cn.md
code that may be needed, change_channel.py :
# 將三通道變成單通道.
import os
import os.path as osp
import sys
import numpy as np
from PIL import Image
input = 'data/dataA_B/annotations'
# os.walk()方法用於通過在目錄樹中游走輸出在目錄中的文件名
for fpath, dirs, fs in os.walk(input):
print(fpath)
for f in fs:
try:
path = osp.join(fpath, f)
# _output_dir = fpath.replace(input, '')
# _output_dir = _output_dir.lstrip(os.path.sep)
image = Image.open(path)
image,_,_ = image.split()
image.save(path)
except:
continue
print("已變為單通道!")
possible command lines:
# becomes a pseudo-color image
python gray2pseudo_color.py /CARLA_data/annotations /CARLA_data/annotations
# 數據劃分
python split_dataset_list.py CARLA_data images annotations --split 0.9 0.1 0 --format png pngI put together the original dataset,And renaming and dataset partitioning were done,方便操作.免費提供給大家:
鏈接:https://pan.baidu.com/s/1dzQw8XD-URdBiEq8XArDdw
提取碼:8888
整體架構:
CARLA_data-
-annotations
---000000.png
---000001.png
---**********
-images
---000000.png
---000001.png
---**********
-test.txt
-train.txt
-val.txtBaidu Feiyu official tutorial:https://github.com/PaddlePaddle/PaddleSeg/blob/release/2.6/docs/whole_process_cn.md
PaddleSeg動態圖API使用教程 - 飛槳AI Studio
我使用的是API的簡易版本,具體如下:
建立一個 train.py 文件
from paddleseg.models import PPLiteSeg
from paddleseg.models.backbones import STDC1
import paddleseg.transforms as T
from paddleseg.datasets import Dataset
from paddleseg.models.losses import CrossEntropyLoss
import paddle
from paddleseg.core import train
backbone = STDC1()
#構建模型
model = PPLiteSeg(num_classes=13,
backbone= backbone,
arm_out_chs = [32, 64, 128],
seg_head_inter_chs = [32, 64, 64],
pretrained=None)
# Build for trainingtransforms
transforms = [
T.ResizeStepScaling(min_scale_factor=0.5,max_scale_factor=2.5,scale_step_size=0.25),
T.RandomPaddingCrop(crop_size=[960,720]),
T.RandomHorizontalFlip(),
T.RandomDistort(brightness_range=0.5,contrast_range=0.5,saturation_prob=0.5),
T.Normalize()
]
# 構建訓練集
train_dataset = Dataset(
transforms = transforms,
dataset_root = 'CARLA_data',
num_classes= 13,
train_path = 'CARLA_data/train.txt',
mode='train'
)
# Build verificationtransforms
transforms = [
T.Normalize()
]
# 構建驗證集
val_dataset = Dataset(
transforms = transforms,
dataset_root = 'CARLA_data',
num_classes= 13,
val_path = 'CARLA_data/val.txt',
mode='val'
)
# 設置學習率
base_lr = 0.01
lr = paddle.optimizer.lr.PolynomialDecay(base_lr, power=0.9, decay_steps=1000, end_lr=0)
optimizer = paddle.optimizer.Momentum(lr, parameters=model.parameters(), momentum=0.9, weight_decay=4.0e-5)
#構建損失函數
losses = {}
losses['types'] = [CrossEntropyLoss()] * 3
losses['coef'] = [1]* 3
#設置訓練函數
train(
model=model,
train_dataset=train_dataset,
val_dataset=val_dataset,
optimizer=optimizer,
save_dir='output',
iters=10000,
batch_size=4,
save_interval=200,
log_iters=10,
num_workers=0,
losses=losses,
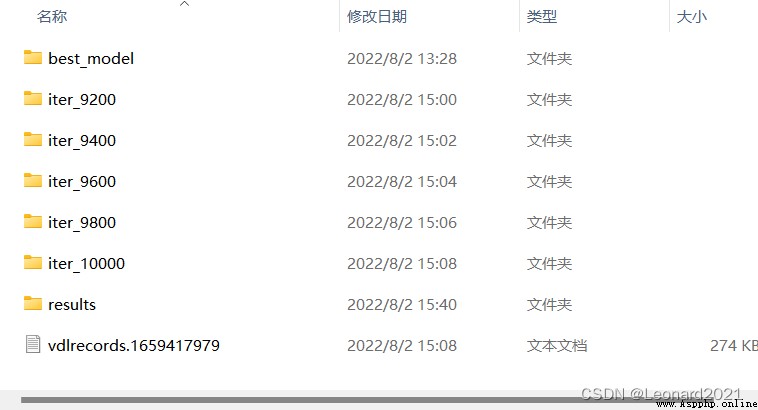
use_vdl=True)After the training is completed, it will be in the root directoryoutputThe trained model and logs of the training process are generated in the folder.
Identify and save image files or image files in a folder:建立 predict.py 文件
from paddleseg.models import PPLiteSeg
from paddleseg.models.backbones import STDC1
import paddleseg.transforms as T
import os
from paddleseg.core import predict
backbone = STDC1()
model = PPLiteSeg(num_classes=13,
backbone= backbone,
arm_out_chs = [32, 64, 128],
seg_head_inter_chs = [32, 64, 64],
pretrained=None)
transforms = T.Compose([
T.Resize(target_size=(512, 512)),
T.RandomHorizontalFlip(),
T.Normalize()
])
def get_image_list(image_path):
"""Get image list"""
valid_suffix = [
'.JPEG', '.jpeg', '.JPG', '.jpg', '.BMP', '.bmp', '.PNG', '.png'
]
image_list = []
image_dir = None
if os.path.isfile(image_path):
if os.path.splitext(image_path)[-1] in valid_suffix:
image_list.append(image_path)
elif os.path.isdir(image_path):
image_dir = image_path
for root, dirs, files in os.walk(image_path):
for f in files:
if os.path.splitext(f)[-1] in valid_suffix:
image_list.append(os.path.join(root, f))
else:
raise FileNotFoundError(
'`--image_path` is not found. it should be an image file or a directory including images'
)
if len(image_list) == 0:
raise RuntimeError('There are not image file in `--image_path`')
return image_list, image_dir
if __name__ == '__main__':
image_path = 'CARLA_data/image/000658.png' # You can also enter a directory containing images
image_list, image_dir = get_image_list(image_path)
predict(
model,
model_path='output/best_model/model.pdparams',
transforms=transforms,
image_list=image_list,
image_dir=image_dir,
save_dir='output/results'
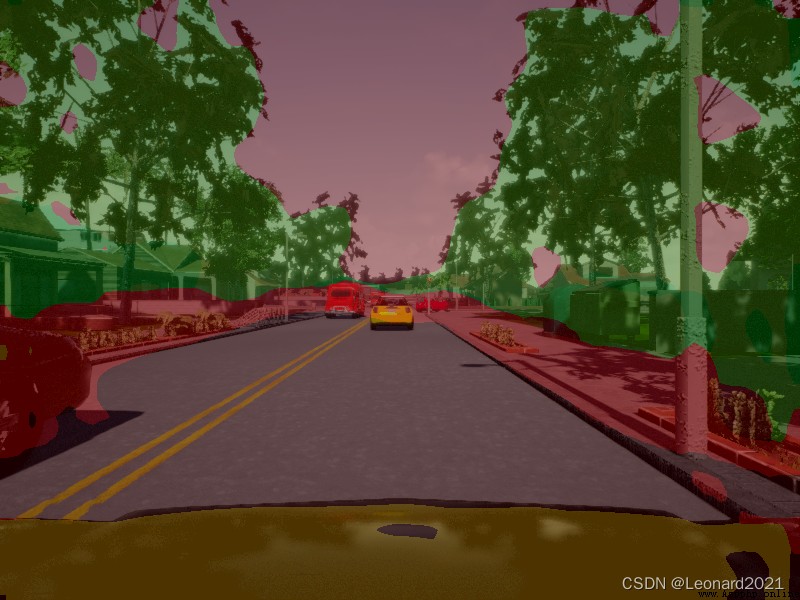
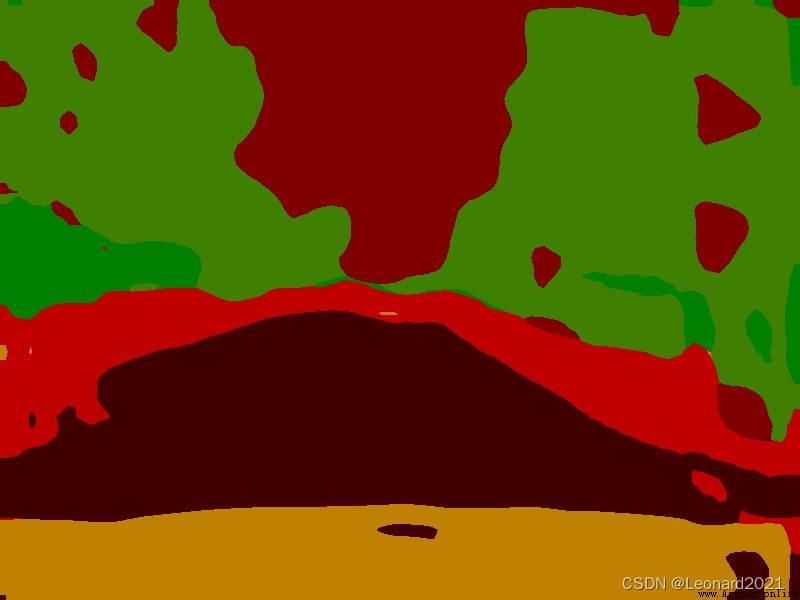
)The recognition result will be saved to the root directoryoutput文件夾內的 result文件夾內,This prediction method can only be used for images,Real-time detection is not possible,Very impersonal.
原始圖像:
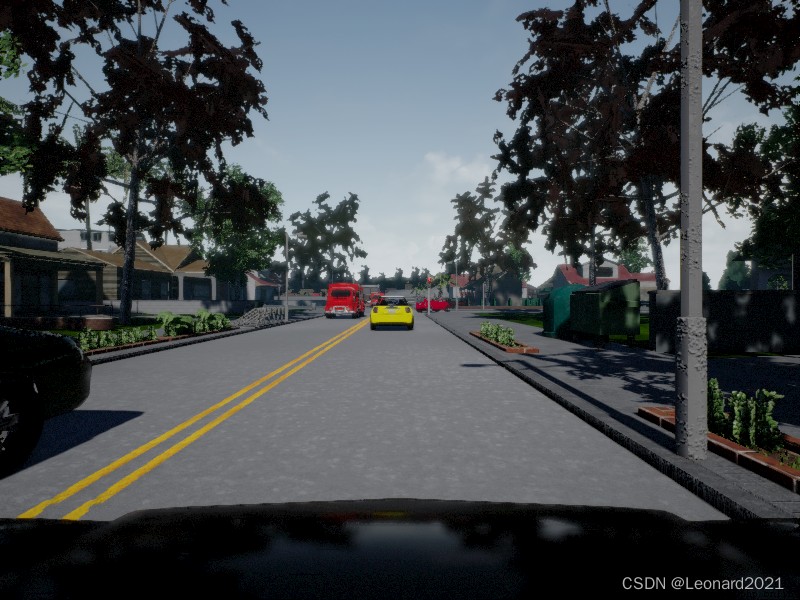
原始的paddleseg.core.py下的predictThe function input requires the address of a file,即要求:string格式的輸入,So directly change it to 0 to call the camera to get the image is completely infeasible,And the output only has the code saved to the specified address,There is no real-time identification and display code,There is also a lot of code to record the training process and code to write files in between.My overall idea is to change the input to :The program on the calling end obtains the camera image and then inputs itpredict函數中,predictThe function then makes real-time predictions and displays them on the screen,Delete other code for logging,Improve running smoothness.
根目錄下新建 visualize_myself.py :
# Copyright (c) 2020 PaddlePaddle Authors. All Rights Reserved.
#
# Licensed under the Apache License, Version 2.0 (the "License");
# you may not use this file except in compliance with the License.
# You may obtain a copy of the License at
#
# http://www.apache.org/licenses/LICENSE-2.0
#
# Unless required by applicable law or agreed to in writing, software
# distributed under the License is distributed on an "AS IS" BASIS,
# WITHOUT WARRANTIES OR CONDITIONS OF ANY KIND, either express or implied.
# See the License for the specific language governing permissions and
# limitations under the License.
import os
import cv2
import numpy as np
from PIL import Image as PILImage
def visualize(image, result, color_map, save_dir=None, weight=0.6):
"""
Convert predict result to color image, and save added image.
Args:
image (str): The path of origin image.
result (np.ndarray): The predict result of image.
color_map (list): The color used to save the prediction results.
save_dir (str): The directory for saving visual image. Default: None.
weight (float): The image weight of visual image, and the result weight is (1 - weight). Default: 0.6
Returns:
vis_result (np.ndarray): If `save_dir` is None, return the visualized result.
"""
color_map = [color_map[i:i + 3] for i in range(0, len(color_map), 3)]
color_map = np.array(color_map).astype("uint8")
# Use OpenCV LUT for color mapping
c1 = cv2.LUT(result, color_map[:, 0])
c2 = cv2.LUT(result, color_map[:, 1])
c3 = cv2.LUT(result, color_map[:, 2])
pseudo_img = np.dstack((c3, c2, c1))
#im = cv2.imread(image)
im = image.copy()
vis_result = cv2.addWeighted(im, weight, pseudo_img, 1 - weight, 0)
if save_dir is not None:
if not os.path.exists(save_dir):
os.makedirs(save_dir)
image_name = os.path.split(image)[-1]
out_path = os.path.join(save_dir, image_name)
cv2.imwrite(out_path, vis_result)
else:
return vis_result
def get_pseudo_color_map(pred, color_map=None):
"""
Get the pseudo color image.
Args:
pred (numpy.ndarray): the origin predicted image.
color_map (list, optional): the palette color map. Default: None,
use paddleseg's default color map.
Returns:
(numpy.ndarray): the pseduo image.
"""
pred_mask = PILImage.fromarray(pred.astype(np.uint8), mode='P')
if color_map is None:
color_map = get_color_map_list(256)
pred_mask.putpalette(color_map)
return pred_mask
def get_color_map_list(num_classes, custom_color=None):
"""
Returns the color map for visualizing the segmentation mask,
which can support arbitrary number of classes.
Args:
num_classes (int): Number of classes.
custom_color (list, optional): Save images with a custom color map. Default: None, use paddleseg's default color map.
Returns:
(list). The color map.
"""
num_classes += 1
color_map = num_classes * [0, 0, 0]
for i in range(0, num_classes):
j = 0
lab = i
while lab:
color_map[i * 3] |= (((lab >> 0) & 1) << (7 - j))
color_map[i * 3 + 1] |= (((lab >> 1) & 1) << (7 - j))
color_map[i * 3 + 2] |= (((lab >> 2) & 1) << (7 - j))
j += 1
lab >>= 3
color_map = color_map[3:]
if custom_color:
color_map[:len(custom_color)] = custom_color
return color_map
def paste_images(image_list):
"""
Paste all image to a image.
Args:
image_list (List or Tuple): The images to be pasted and their size are the same.
Returns:
result_img (PIL.Image): The pasted image.
"""
assert isinstance(image_list,
(list, tuple)), "image_list should be a list or tuple"
assert len(
image_list) > 1, "The length of image_list should be greater than 1"
pil_img_list = []
for img in image_list:
if isinstance(img, str):
assert os.path.exists(img), "The image is not existed: {}".format(
img)
img = PILImage.open(img)
img = np.array(img)
elif isinstance(img, np.ndarray):
img = PILImage.fromarray(img)
pil_img_list.append(img)
sample_img = pil_img_list[0]
size = sample_img.size
for img in pil_img_list:
assert size == img.size, "The image size in image_list should be the same"
width, height = sample_img.size
result_img = PILImage.new(sample_img.mode,
(width * len(pil_img_list), height))
for i, img in enumerate(pil_img_list):
result_img.paste(img, box=(width * i, 0))
return result_img
根目錄下新建 predict_with_api.py :
import cv2
import numpy as np
import paddle
from paddleseg.core import infer
from paddleseg.utils import visualize
import visualize_myself
def preprocess(im_path, transforms):
data = {}
data['img'] = im_path
data = transforms(data)
data['img'] = data['img'][np.newaxis, ...]
data['img'] = paddle.to_tensor(data['img'])
return data
def predict(model,
model_path,
transforms,
image_list,
aug_pred=False,
scales=1.0,
flip_horizontal=True,
flip_vertical=False,
is_slide=False,
stride=None,
crop_size=None,
custom_color=None
):
# 加載模型權重
para_state_dict = paddle.load(model_path)
model.set_dict(para_state_dict)
# 設置模型為評估模式
model.eval()
# 讀取圖像
im = image_list.copy()
color_map = visualize.get_color_map_list(256, custom_color=custom_color)
with paddle.no_grad():
data = preprocess(im, transforms)
# Whether to enable multi-scale flip prediction
if aug_pred:
pred, _ = infer.aug_inference(
model,
data['img'],
trans_info=data['trans_info'],
scales=scales,
flip_horizontal=flip_horizontal,
flip_vertical=flip_vertical,
is_slide=is_slide,
stride=stride,
crop_size=crop_size)
else:
pred, _ = infer.inference(
model,
data['img'],
trans_info=data['trans_info'],
is_slide=is_slide,
stride=stride,
crop_size=crop_size)
# Redundant channels are removed from the returned data,並轉為uint8類型,Easy to save as pictures
#pred_org =pred.clone()
pred = paddle.squeeze(pred)
pred = pred.numpy().astype('uint8')
# 保存結果
added_image = visualize_myself.visualize(image= im,result= pred,color_map=color_map, weight=0.6)
cv2.imshow('image_predict', added_image)
#cv2.waitKey(0)
#cv2.destroyAllWindows()
#return pred_org
根目錄下新建 detect_with_API.py,Call madeAPIto try to predict segmentation in real time using camera images:
import cv2
from predict_with_api import predict
from paddleseg.models import PPLiteSeg
from paddleseg.models.backbones import STDC1
import paddleseg.transforms as T
backbone = STDC1()
model = PPLiteSeg(num_classes=13,
backbone= backbone,
arm_out_chs = [32, 64, 128],
seg_head_inter_chs = [32, 64, 64],
pretrained=None)
transforms = T.Compose([
T.Resize(target_size=(512, 512)),
T.RandomHorizontalFlip(),
T.Normalize()
])
model_path = 'output/best_model/model.pdparams'
cap=cv2.VideoCapture(0)# 0
if __name__ == '__main__':
while True:
rec,img = cap.read()
predict(model=model,model_path=model_path, transforms=transforms,image_list=img)
#print("pred_org:", type(list), list)
if cv2.waitKey(1)==ord('q'):
break
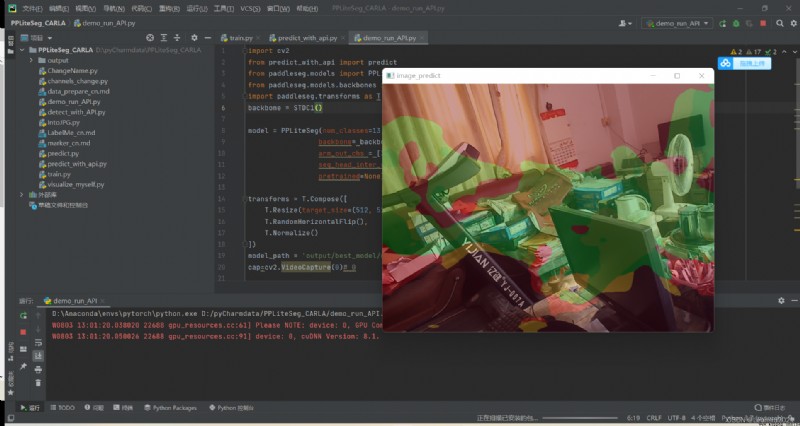
配置完成後,運行 detect_with_API.pyThe camera can be called to input into the trained model framework for prediction segmentation and output to the screen.
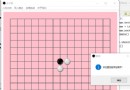
Since I am using a simulation dataset,There is no corresponding recognition environment when using camera recognition,So here I simply show the status of real-time recognition,The recognition effect is not evaluated.
My overall project framework:
PPLiteSeg_CARLA.zip-深度學習文檔類資源-CSDN下載
After collecting and training the road dataset in the real environment,Obtain real-time images through the camera and output the corresponding onesmask預測結果,比如:Semantic segmentation of lane lines and roads,Then use the Hough line transformation to find the position and angle of the lane line to control the steering of the unmanned vehicle,Enables autonomous driving along the road.It may be added later,敬請期待.
Combined with object detection,Realize the recognition of objects on the road,Returns the 2D coordinates of the target、目標種類、置信度,Targets can be trained by collecting data on their own,比如:車、紅綠燈、人、動物、綠植等,Set the corresponding logic through the returned information,比如:紅燈停、綠燈行、Stop by pedestrians.
爆改YOLOV7的detect.py制作成APIinterface for otherspython程序調用(超低延時)_Leonard2021的博客-CSDN博客
In this way, the visual recognition part of unmanned driving is completed as a whole.
後續再加上ROSThe lidar achieves obstacle avoidance and SLAM,A simple self-made version of the unmanned driving system is formed.
我的初步想法是 上位機使用Jeston Nano,下位機使用Arduino,以python為主要編程語言,pyserialThe library is used to realize the communication between the upper computer and the lower computer.
python與arduino通訊(windows和linux)_Leonard2021的博客-CSDN博客_python與arduino通信