備注
This article describes how to pass the Windows The centric approach sets up the environment to use Python Some useful libraries in ,These libraries automate tasks across platforms(Such as searching the file system、訪問 Internet、Analyze file types, etc). 對於特定於 Windows 的操作,請查看 ctypes(適用於 Python 的兼容 C 的外部函數庫)、winreg(向 Python 公開 Windows 注冊表 API 的函數)和 Python/WinRT(可用於從 Python 訪問 Windows 運行時 API).
使用 Python When writing scripts that perform file system operations,建議從 Microsoft Store 安裝 Python. 通過 Microsoft Store The installation will use Basic Python3 解釋器,But it will be set for the current user PATH 設置(避免需要管理員訪問權限),As well as providing automatic updates.
如果在 Windows 上將 Python 用於 Web 開發,建議使用適用於 Linux 的 Windows The subsystems are set differently. Walkthroughs can be found in our guide:開始在 Windows 上將 Python 用於 Web 開發. 如果不熟悉 Python,Please try our guide:開始在 Windows 上使用 Python(初學者). 對於某些高級方案(如需要訪問/修改 Python 的已安裝文件、創建二進制文件的副本或直接使用 Python DLL),Might want to consider direct from python.org 下載特定 Python version or consider installing替代實現,如 Anaconda、Jython、PyPy、WinPython、IronPython 等.Recommended only if you are more advanced Python This method should only be used by programmers who have a specific reason to choose an alternative implementation.
使用 Microsoft Store 安裝 Python:
轉到“開始” 菜單(左下方 Windows 圖標),輸入“Microsoft Store”,選擇用於打開應用商店的鏈接.
After the app store opens,Choose from the top right menu“搜索”,然後輸入“Python”. 在“應用”下,Select from the results to use Python 版本. We recommend using the latest version,除非有理由不這樣做(For example, to be consistent with the version used on pre-existing items that are planned to be processed). After deciding which version to install,請選擇“獲取”.
Python 完成下載和安裝過程後,使用“開始”菜單(左下方 Windows 圖標)打開 Windows PowerShell. PowerShell 打開後,輸入 Python --version to confirm that it is installed on your computer Python3.
Python 的 Microsoft Store 安裝包括 pip (標准包管理器). 通過 pip Can be installed and managed does not belong Python 標准庫的其他包. Also available for confirmation pip 安裝和管理包,請輸入 pip --version.
通過使用 VS Code 作為文本編輯器/集成開發環境 (IDE),可以利用 IntelliSense(Code completion assist)、Linting(Helps avoid errors in your code)、調試支持(Helps find bugs in code after running it)、代碼片段(小型可重用代碼塊的模板)以及單元測試(使用不同類型的輸入測試代碼的接口).
下載適用於 Windows 的 VS Code,並按照安裝說明進行操作:https://code.visualstudio.com.
需要安裝 Microsoft Python 擴展,才能利用 VS Code 支持功能. 了解詳細信息.
通過輸入 Ctrl+Shift+X 來打開 VS Code 擴展窗口(或使用菜單導航到“視圖” >“擴展” ).
在頂部的“Search for extensions in the marketplace”框中,輸入:“Python”.
找到“Python (ms-python.python) by Microsoft” 擴展,Then choose the green one“安裝” 按鈕.
VS Code 包含一個內置終端,使你可以使用 PowerShell 打開 Python 命令行,This creates a seamless workflow between the code editor and the command line.
在 VS Code 中打開終端,選擇“視圖” >“終端” ,或者使用快捷方式 Ctrl+' (使用反撇號字符).
備注
The default terminal should be PowerShell,But change it if needed,請使用 Ctrl+Shift+P 進入命令面板. 輸入“終端: 選擇默認 Shell”,A list of terminal options is displayed,其中包含 PowerShell、命令提示符、WSL 等.Select the terminal to use,然後輸入 Ctrl+Shift+' (使用反撇號)to create a new terminal.
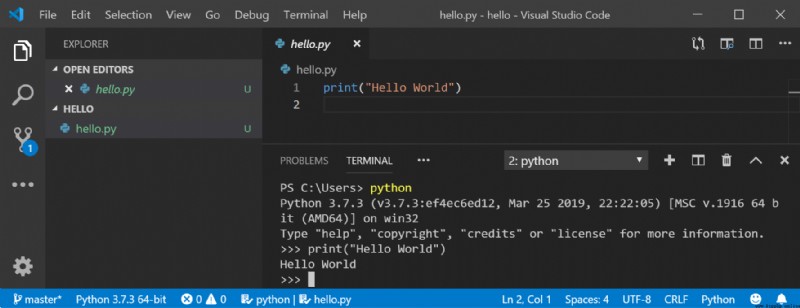
在 VS Code 終端中,Open by typing the following Python:python
Try it out by typing the following Python 解釋器:print("Hello World"). Python will return the statement“Hello World”.
若要退出 Python,可以輸入 exit()、quit() 或選擇 Ctrl-Z.
If planning to collaborate with others Python 代碼,Or at an open source site(例如 GitHub)Managed projects,則 VS Code 支持使用 Git 進行版本控制. VS Code 中的“源代碼管理”Tabs to track all changes,並直接在 UI Common built in Git 命令(add、commit、push、pull). 需要先安裝 Git,以便為“源代碼管理”Panel provides support.
從 git-scm 網站下載並安裝適用於 Windows 的 Git.
其中包含了一個安裝向導,The wizard will ask a series of related questions Git 安裝設置的問題. 建議使用所有默認設置,Unless there is a specific reason to change some settings.
If never used before Git,則 GitHub 指南可以幫助入門.
Common system administration tasks can take a significant amount of time,但是借助 Python 腳本,These tasks can be automated,So it doesn't take up any time at all. 例如,Python Can read the contents of a computer's file system and perform various operations(Such as printing outlines of files and directories、Move folders from one directory to another or rename hundreds of files). 通常,If you perform such tasks manually,they may take up a lot of time. 請改用 Python 腳本!
Let's start with a simple script,The script traverses the directory tree and displays the directory structure.
使用“開始” "菜單(左下方 Windows 圖標)打開 PowerShell.
為項目創建目錄:mkdir python-scripts,然後打開該目錄:cd python-scripts.
Create some directories to use with our sample scripts:
PowerShell復制
mkdir food, food\fruits, food\fruits\apples, food\fruits\oranges, food\vegetables
Create some files in these directories to use in our script:
PowerShell復制
new-item food\fruits\banana.txt, food\fruits\strawberry.txt, food\fruits\blueberry.txt, food\fruits\apples\honeycrisp.txt, food\fruits\oranges\mandarin.txt, food\vegetables\carrot.txt
在 python-scripts Create a new directory in the directory python 文件:
PowerShell復制
mkdir src
new-item src\list-directory-contents.py
By entering the following in VS Code 中打開項目:code .
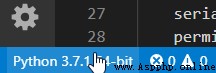
通過輸入 Ctrl+Shift+E 打開 VS Code 文件資源管理器窗口(或使用菜單導航到“視圖” >“資源管理器” ),然後選擇剛剛創建的 list-directory-contents.py 文件. Microsoft Python Extensions are loaded automatically Python 解釋器. 可以在 VS Code See the loaded interpreter at the bottom of the window.
備注
Python 是一種解釋型語言,This means it acts as a virtual machine,Thus simulating a physical computer. Different types can be used Python 解釋器:Python 2、Python 3、Anaconda、PyPy 等.若要運行 Python code and get Python IntelliSense,必須向 VS Code Tells which interpreter to use. 建議堅持使用 VS Code The interpreter selected by default(在我們的示例中為 Python 3),Unless there is a specific reason to choose another interpreter. 若要更改 Python 解釋器,Please select currently displayed on VS Code The interpreter in the blue bar at the bottom of the window,或打開“命令面板” (Ctrl+Shift+P),然後輸入命令“Python: 選擇解釋器”. 這會顯示當前已安裝的 Python 解釋器列表. 詳細了解如何配置 Python 環境.
將以下代碼粘貼到 list-directory-contents.py 文件中,然後選擇“保存” :
Python復制
import os
root = os.path.join('..', 'food')
for directory, subdir_list, file_list in os.walk(root):
print('Directory:', directory)
for name in subdir_list:
print('Subdirectory:', name)
for name in file_list:
print('File:', name)
print()
打開 VS Code 集成終端(Ctrl+' ,使用反撇號字符),Then enter just save in it Python 腳本的 src 目錄:
PowerShell復制
cd src
使用以下命令在 PowerShell 中運行腳本:
PowerShell復制
python3 .\list-directory-contents.py
You should see output like the following:
PowerShell復制
Directory: ..\food
Subdirectory: fruits
Subdirectory: vegetables
Directory: ..\food\fruits
Subdirectory: apples
Subdirectory: oranges
File: banana.txt
File: blueberry.txt
File: strawberry.txt
Directory: ..\food\fruits\apples
File: honeycrisp.txt
Directory: ..\food\fruits\oranges
File: mandarin.txt
Directory: ..\food\vegetables
File: carrot.txt
通過直接在 PowerShell 終端中輸入以下命令,使用 Python Print filesystem directory output to its own text file:python3 list-directory-contents.py > food-directory.txt
恭喜! You have just written an automated system administration script,The script reads the directories and files you create,並使用 Python Displays the directory structure and prints to its own text file.
備注
如果無法從 Microsoft Store 安裝 Python 3,請查看此問題,Learn how to handle paths to this sample script with an example.
This example uses the file and directory just created,Renames each file by adding the file's last modified date to the beginning of the filename.
在 python-scripts 目錄內的 src 文件夾中,Create new for the script Python 文件:
PowerShell復制
new-item update-filenames.py
打開 update-filenames.py 文件,Paste the following code into the file,並保存它:
備注
os.getmtime Returns a timestamp in clock cycles(It's not easy to understand). It must first be converted to a standard datetime string.
Python復制
import datetime
import os
root = os.path.join('..', 'food')
for directory, subdir_list, file_list in os.walk(root):
for name in file_list:
source_name = os.path.join(directory, name)
timestamp = os.path.getmtime(source_name)
modified_date = str(datetime.datetime.fromtimestamp(timestamp)).replace(':', '.')
target_name = os.path.join(directory, f'{modified_date}_{name}')
print(f'Renaming: {source_name} to: {target_name}')
os.rename(source_name, target_name)
測試 update-filenames.py 腳本,The specific way is to run it:python3 update-filenames.py,然後再次運行 list-directory-contents.py 腳本:python3 list-directory-contents.py
You should see output like the one below:
PowerShell復制
Renaming: ..\food\fruits\banana.txt to: ..\food\fruits\2019-07-18 12.24.46.385185_banana.txt
Renaming: ..\food\fruits\blueberry.txt to: ..\food\fruits\2019-07-18 12.24.46.391170_blueberry.txt
Renaming: ..\food\fruits\strawberry.txt to: ..\food\fruits\2019-07-18 12.24.46.389174_strawberry.txt
Renaming: ..\food\fruits\apples\honeycrisp.txt to: ..\food\fruits\apples\2019-07-18 12.24.46.395160_honeycrisp.txt
Renaming: ..\food\fruits\oranges\mandarin.txt to: ..\food\fruits\oranges\2019-07-18 12.24.46.398151_mandarin.txt
Renaming: ..\food\vegetables\carrot.txt to: ..\food\vegetables\2019-07-18 12.24.46.402496_carrot.txt
PS C:\src\python-scripting\src> python3 .\list-directory-contents.py
..\food\
Directory: ..\food
Subdirectory: fruits
Subdirectory: vegetables
Directory: ..\food\fruits
Subdirectory: apples
Subdirectory: oranges
File: 2019-07-18 12.24.46.385185_banana.txt
File: 2019-07-18 12.24.46.389174_strawberry.txt
File: 2019-07-18 12.24.46.391170_blueberry.txt
Directory: ..\food\fruits\apples
File: 2019-07-18 12.24.46.395160_honeycrisp.txt
Directory: ..\food\fruits\oranges
File: 2019-07-18 12.24.46.398151_mandarin.txt
Directory: ..\food\vegetables
File: 2019-07-18 12.24.46.402496_carrot.txt
通過直接在 PowerShell 終端中輸入以下命令,使用 Python Prints the new filesystem directory name prepended with the most recent modification timestamp to its own text file:python3 list-directory-contents.py > food-directory-last-modified.txt
Hope you learned something about using it Python Fun stuff for scripts to automate basic system administration tasks. 當然,There is still a lot to know,But we hope we can get you off to a good start. We've shared several other resources below,available for continued learning.