最近ppt排版太麻煩了,每次都要截圖貼上去,又不好對齊,看起來也很難受,一旦結果更新,又得重新截圖貼,覺得太麻煩了,之前有了解過這個python-pptx,我能否自動的對圖片進行排版呢,答案是可以的,下面是我的學習記錄,記錄一下
這個網上有很多教程,就不說了,
https://blog.csdn.net/weixin_42750611/article/details/108029796
https://zhuanlan.zhihu.com/p/344862384
from pptx import Presentation
ppt=Presentation()
ppt.slides.add_slide(ppt.slide_layouts[0])
ppt.save("測試1.pptx")
## 添加了一張換燈片
from pptx import Presentation
prs = Presentation('test_template.pptx')
for slide in prs.slides:
print(slide)
from pptx import Presentation
prs = Presentation('test_template.pptx')
for slide in prs.slides:
for shape in slide.shapes:
print(shape)
# 獲取所有Slide中的內容
from pptx import Presentation
prs = Presentation('test_template.pptx')
for slide in prs.slides:
for shape in slide.shapes:
if shape.has_text_frame:
text_frame = shape.text_frame
print(text_frame.text)
# 獲取某一頁Slide中的內容
from pptx import Presentation
prs = Presentation('test_template.pptx')
for i, slide in enumerate(prs.slides):
if i == 2:
for shape in slide.shapes:
if shape.has_text_frame:
text_frame = shape.text_frame
print(text_frame.text)
<pptx.slide.Slide object at 0x7fdd3d46b340>
<pptx.slide.Slide object at 0x7fdd3d3b5970>
<pptx.shapes.placeholder.SlidePlaceholder object at 0x7fdd3d3b5790>
<pptx.shapes.graphfrm.GraphicFrame object at 0x7fdd3d3b5b80>
<pptx.shapes.graphfrm.GraphicFrame object at 0x7fdd3d3b50d0>
<pptx.shapes.placeholder.SlidePlaceholder object at 0x7fdd3d3b5340>
<pptx.shapes.graphfrm.GraphicFrame object at 0x7fdd3d3b50a0>
<pptx.shapes.graphfrm.GraphicFrame object at 0x7fdd3d3b5130>
報告
報告
#!/usr/bin/env python3
# -*- coding: utf-8 -*-
from pptx import Presentation
prs = Presentation()
title_slide_layout = prs.slide_layouts[0]
slide = prs.slides.add_slide(title_slide_layout)
title = slide.shapes.title
subtitle = slide.placeholders[1]
title.text = "Hello, World!"
subtitle.text = "python-pptx 可以輕松制作powerpoint!"
prs.save('test1.pptx')
[外鏈圖片轉存失敗,源站可能有防盜鏈機制,建議將圖片保存下來直接上傳(img-u5hI1tJt-1657114192007)(attachment:image.png)]
from pptx import Presentation
prs = Presentation()
bullet_slide_layout = prs.slide_layouts[1]
slide = prs.slides.add_slide(bullet_slide_layout)
shapes = slide.shapes
title_shape = shapes.title
body_shape = shapes.placeholders[1]
title_shape.text = 'Adding a Bullet Slide'
tf = body_shape.text_frame
tf.text = 'Find the bullet slide layout'
p = tf.add_paragraph()
p.text = 'Use _TextFrame.text for first bullet'
p.level = 1
p = tf.add_paragraph()
p.text = 'Use _TextFrame.add_paragraph() for subsequent bullets'
p.level = 2
prs.save('test2.pptx')
[外鏈圖片轉存失敗,源站可能有防盜鏈機制,建議將圖片保存下來直接上傳(img-yZO45EeS-1657114192008)(attachment:image.png)]
from pptx import Presentation
from pptx.util import Pt,Cm
from pptx.dml.color import RGBColor
from pptx.enum.text import PP_ALIGN
from pptx.enum.shapes import MSO_SHAPE
ppt = Presentation(r'測試1.pptx')
slide = ppt.slides[0]#更改第一張
# 添加矩形
# 設置位置以及大小
left, top, width, height = Cm(0), Cm(0), Cm(2), Cm(2)
# 添加形狀
rectangle = slide.shapes.add_shape(MSO_SHAPE.RECTANGLE, left, top, width, height)
# 設置背景填充
rectangle.fill.solid()
# 設置背景顏色
rectangle.fill.fore_color.rgb = RGBColor(34, 134, 165)
# 設置邊框顏色
rectangle.line.color.rgb = RGBColor(34, 134, 165)
ppt.save('測試1.pptx')
[外鏈圖片轉存失敗,源站可能有防盜鏈機制,建議將圖片保存下來直接上傳(img-YkTq828L-1657114192008)(attachment:image.png)]
from pptx import Presentation
# ppt = Presentation(r'測試1.pptx')
# slide=ppt.slides.add_slide(ppt.slide_layouts[0])
# left = top = Cm(3)
# pic = slide.shapes.add_picture('./0.png',left,top)
ppt = Presentation(r'測試1.pptx')# 圖片太大了
slide = ppt.slides[1]#更改第一張
left = top = Cm(0)
pic = slide.shapes.add_picture('./0.png',left,top)
ppt.save("測試1.pptx")
## 添加了一張換燈片
############ 修改位置
from pptx import Presentation
# ppt = Presentation(r'測試1.pptx')
# slide=ppt.slides.add_slide(ppt.slide_layouts[0])
# left = top = Cm(3)
# pic = slide.shapes.add_picture('./0.png',left,top)
ppt = Presentation(r'測試1.pptx')# 圖片太大了
slide = ppt.slides[2]#更改第一張
left = top = Cm(0)
height=Cm(3)
pic = slide.shapes.add_picture('./0.png',left,top,height=height)
ppt.save("測試1.pptx")
## 添加了一張換燈片
from pptx import Presentation
ppt = Presentation(r'測試1.pptx')
slide=ppt.slides.add_slide(ppt.slide_layouts[0])
left = top = Cm(3)
width=Cm(5)
height=Cm(1)
pic = slide.shapes.add_picture('./0.png',left,top,width=width,height=height)
ppt.save("測試1.pptx")
ppt = Presentation(r'測試1.pptx')
slide=ppt.slides.add_slide(ppt.slide_layouts[0])
rows,cols = 4,2
left = top =Cm(5)
width = Cm(18)
height = Cm(3)
table = slide.shapes.add_table(rows,cols,left,top,width,height).table
# 可以修改列寬、行高
table.columns[0].width = Cm(6)
table.columns[1].width = Cm(4)
table.rows[0].height =Cm(2)
data = [
['姓名','成績'],
['李雷',99],
['韓梅梅', 92],
['馬東梅', 92],
]
for row in range(rows):
for col in range(cols):
table.cell(row,col).text =str(data[row][col])
ppt.save("測試1.pptx")
########################################################
ppt = Presentation(r'測試1.pptx')
slide=ppt.slides.add_slide(ppt.slide_layouts[0])
rows,cols = 4,2
left = top =Cm(5)
width = Cm(18)
height = Cm(3)
table = slide.shapes.add_table(rows,cols,left,top,width,height).table
# 可以修改列寬、行高
# table.columns[0].width = Cm(6)
# table.columns[1].width = Cm(4)
table.rows[0].height =Cm(2)
data = [
['姓名','成績'],
['李雷',99],
['韓梅梅', 92],
['馬東梅', 92],
]
for row in range(rows):
for col in range(cols):
table.cell(row,col).text =str(data[row][col])
ppt.save("測試1.pptx")
# 加載庫
import os
from pptx import Presentation
from pptx.util import Cm, Inches, Pt
from pptx.enum.text import PP_ALIGN
from pptx.dml.color import RGBColor
# 設置路徑
# 實例化 ppt 文檔對象
prs = Presentation()
# 插入幻燈片
blank_slide = prs.slide_layouts[6]
slide_1 = prs.slides.add_slide(blank_slide)
# 添加圖片
img_name = 'shenma.jpeg'
## 中央主圖
pic = slide_1.shapes.add_picture(image_file=img_name,
left=Inches(1),
top=Inches(1),
width=Inches(8),
height=Inches(5)
)
## 左上角小圖
slide_1.shapes.add_picture(image_file=img_name,
left=Inches(0.5),
top=Inches(0.5),
width=Inches(3),
height=Inches(1.5)
)
## 右上角小圖
slide_1.shapes.add_picture(image_file=img_name,
left=Inches(7.5),
top=Inches(0.5),
width=Inches(3),
height=Inches(1.5)
)
## 左下角小圖
slide_1.shapes.add_picture(image_file=img_name,
left=Inches(0.5),
top=Inches(5),
width=Inches(3),
height=Inches(1.5)
)
# 右下角小圖
slide_1.shapes.add_picture(image_file=img_name,
left=Inches(7.5),
top=Inches(5),
width=Inches(3),
height=Inches(1.5)
)
# 添加文本框
textbox= slide_1.shapes.add_textbox(left=Inches(1),
top=Inches(6),
width=Inches(8),
height=Inches(2)
)
## 向文本框加入文字
tf = textbox.text_frame
para = tf.add_paragraph() # 添加段落
para.text = '神馬都是浮雲!!!'
para.alignment = PP_ALIGN.CENTER # 居中
## 設置字體
font = para.font
font.size = Pt(36) # 大小
font.name = '華文彩雲' # 字體
font.bold = True # 加粗
font.italic = True # 傾斜
font.color.rgb = RGBColor(225, 225, 0) # 黃色
# 保存 ppt
prs.save('測試3.pptx')
[外鏈圖片轉存失敗,源站可能有防盜鏈機制,建議將圖片保存下來直接上傳(img-7zcwtkv4-1657114192008)(attachment:image.png)]
# 加載庫
import os
from pptx import Presentation
from pptx.util import Cm, Inches, Pt
from pptx.enum.text import PP_ALIGN
from pptx.dml.color import RGBColor
# 設置路徑
# 實例化 ppt 文檔對象
prs = Presentation()
# 插入幻燈片
blank_slide = prs.slide_layouts[6]
slide_1 = prs.slides.add_slide(blank_slide)
# 添加圖片
img_name = 'shenma.jpeg'
## 中央主圖
## 左上角小圖
slide_1.shapes.add_picture(image_file=img_name,
left=Cm(0),
top=Cm(0.5),
width=Cm(10),
height=Cm(3)
)
slide_1.shapes.add_picture(image_file=img_name,
left=Cm(0),
top=Cm(4),
width=Cm(10),
height=Cm(3)
)
slide_1.shapes.add_picture(image_file=img_name,
left=Cm(11),
top=Cm(0.5),
width=Cm(10),
height=Cm(3)
)
slide_1.shapes.add_picture(image_file=img_name,
left=Cm(11),
top=Cm(4),
width=Cm(10),
height=Cm(3)
)
# 添加文本框
# textbox= slide_1.shapes.add_textbox(left=Cm(0),
# top=Cm(0),
# width=Cm(10),
# height=Cm(0.5)
# )
## 向文本框加入文字
left = top = Cm(0)
width=Cm(10)
height=Cm(0.5)
txBox = slide_1.shapes.add_textbox(left, top, width, height)
tf = txBox.text_frame
p = tf.paragraphs[0]
run = p.add_run()
run.text = "Hello World"
font = run.font
#font.name = 'Calibri'
font.name="Times New Roman"
font.bold = True # 加粗
font.size = Pt(6)
left= Cm(11)
top = Cm(0)
width=Cm(10)
height=Cm(0.5)
txBox = slide_1.shapes.add_textbox(left, top, width, height)
tf = txBox.text_frame
p = tf.paragraphs[0]
run = p.add_run()
run.text = "Hello World2"
font = run.font
#font.name = 'Calibri'
font.name="Times New Roman"
font.bold = True # 加粗
font.size = Pt(6)
# 保存 ppt
prs.save('測試4.pptx')
import os
from pptx import Presentation
from pptx.util import Inches, Pt
prs = Presentation()
blank_slide_layout = prs.slide_layouts[6]
slide = prs.slides.add_slide(blank_slide_layout)
shapes = slide.shapes
left = top = Cm(0)
width=Cm(10)
height=Cm(0.5)
txBox = slide.shapes.add_textbox(left, top, width, height)
tf = txBox.text_frame
p = tf.paragraphs[0]
run = p.add_run()
run.text = "Hello World"
font = run.font
font.name = 'Times New Roman'
font.size = Pt(6)
prs.save('測試5.pptx')
# 加載庫
import os
from pptx import Presentation
from pptx.util import Cm, Inches, Pt
from pptx.enum.text import PP_ALIGN
from pptx.dml.color import RGBColor
# 設置路徑
# 實例化 ppt 文檔對象
prs = Presentation()
blank_slide = prs.slide_layouts[6]
ppt = prs.slides.add_slide(blank_slide)
# 模版圖片
img_name = 'shenma.jpeg'
######################### setting parmeters #######################
nrow=5
ncol=3
textbox_height=0.5
textbox_width=10
pic_height=10
pic_width=10
margin_width=1
margin_height=0.5
box_left=0
box_top =0
##############################################
text_list=["method"+str(i) for i in range(1,nrow*ncol+1)]
print(text_list)
for i in range(nrow):
for j in range(ncol):
ind=i*ncol+j
print(ind)
print("====================")
left=Cm(j*textbox_width+j*margin_width)
top=Cm(i*textbox_height+i*margin_height+i*pic_height)## 加入圖片的高度
width=Cm(textbox_width)
height=Cm(textbox_height)
txBox = ppt.shapes.add_textbox(left, top, width, height)
tf = txBox.text_frame
p = tf.paragraphs[0]
run = p.add_run()
run.text = "Hello World2"
font = run.font
#font.name = 'Calibri'
font.name="Times New Roman"
font.bold = True # 加粗
font.size = Pt(6)
# add picture
# ppt.shapes.add_picture(image_file=img_name,
# left=Cm(11),
# top=Cm(4),
# width=Cm(10),
# height=Cm(3)
# )
prs.save('測試文本框.pptx')
[外鏈圖片轉存失敗,源站可能有防盜鏈機制,建議將圖片保存下來直接上傳(img-x8aNqwLS-1657114192009)(attachment:image.png)]
# 加載庫
import os
from pptx import Presentation
from pptx.util import Cm, Inches, Pt
from pptx.enum.text import PP_ALIGN
from pptx.dml.color import RGBColor
# 設置路徑
# 實例化 ppt 文檔對象
prs = Presentation()
blank_slide = prs.slide_layouts[6]
ppt = prs.slides.add_slide(blank_slide)
# 模版圖片
img_name = 'shenma.jpeg'
######################### setting parmeters #######################
nrow=5
ncol=2
textbox_height=0.5
textbox_width=10
pic_height=3.2
pic_width=10
margin_width=0.5
margin_height=0
box_left=0
box_top =0
##############################################
text_list=["method"+str(i) for i in range(1,nrow*ncol+1)]
#print(text_list)
for i in range(nrow):
for j in range(ncol):
ind=i*ncol+j
left=Cm(j*textbox_width+j*margin_width)
top=Cm(i*textbox_height+i*margin_height+i*pic_height)## 加入圖片的高度
width=Cm(textbox_width)
height=Cm(textbox_height)
txBox = ppt.shapes.add_textbox(left, top, width, height)
tf = txBox.text_frame
p = tf.paragraphs[0]
run = p.add_run()
run.text = text_list[ind]
font = run.font
font.name="Times New Roman"
font.bold = True # 加粗
font.size = Pt(6)
#add picture
left=Cm(j*pic_width+j*margin_width)
top=Cm(i*pic_height+i*margin_height+(i+1)*textbox_height)## 加入圖片的高度
width=Cm(pic_width)
height=Cm(pic_height)
ppt.shapes.add_picture(image_file=img_name,
left=left,
top=top,
width=width,
height=height
)
prs.save('測試文本框和圖片.ppt')
## 為了在服務器上跑,記得保存成ppt形式,而不要存成pptx形式
## 我後面又做了測試,發現並不一定得保存成ppt格式,pptx也是可以的,不知道我做了什麼,我記得開始的時候
## 是不可以的,怎麼現在又可以了
## 的
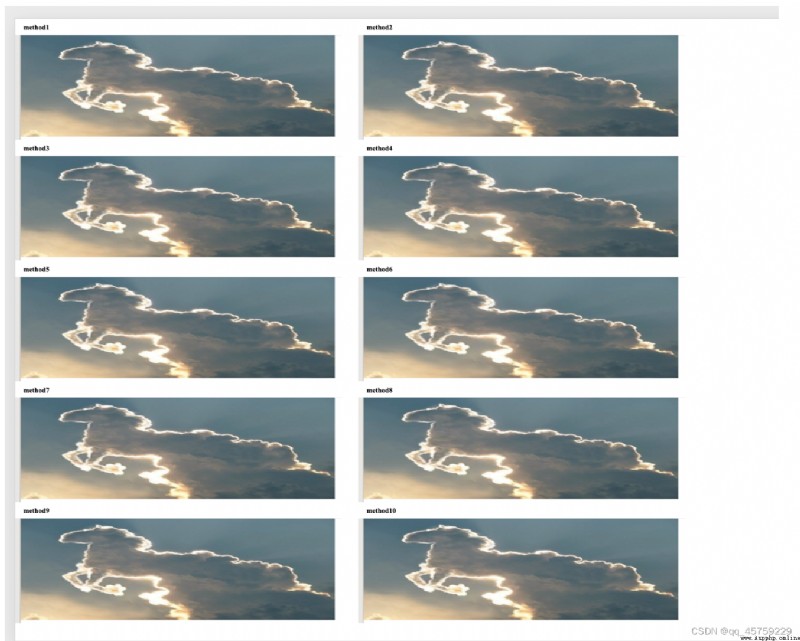
這個結果就是我想要的,很nice
在服務器上為了即時查看結果,需要將ppt文件轉換成pdf,轉換命令如下
soffice --headless --convert-to pdf 測試文本框和圖片.ppt
或者
soffice --headless --convert-to pdf 測試文本框和圖片.pptx
soffice --headless --convert-to pdf test.docx (word轉pdf)
soffice換成libreoffice也可以的