render_template Template page transfer parameters
@app.route('/index')
def index():
user = {
'username':'duke'}
# Transfer the data to be displayed to the template for display
return render_template('index.html',title=' my ',user=user)
<!DOCTYPE html>
<html>
<head>
<meta charset="UTF-8">
<title>{
{ title }} - Blog </title>
</head>
<body>
<h1> Hello ,{
{ user.username }} !</h1>
</body>
</html>
session Introduction of the mechanism :
RuntimeError: The session is unavailable because no secret key was set. Set the secret_key on the application to something unique and secret.
Running error : Session not available , Because the key is not set . The... On the application secret_key Set to something unique and secret .
from flask import Flask, request, session
app = Flask(__name__)
app.secret_key = "wristwaking"
@app.route("/")
def index():
session["login_user"] = " Wake up the wrist "
print(session.get("login_user"))
return "index"
request Introduction to the basic use of
TypeError: The view function for 'index' did not return a valid response. The function either returned None or ended without a return statement.
Wrong type :“ Indexes ” The view function of did not return a valid response . The function returns None Or not rerun sentence .
It's because there's no one here URL Found... In parameter infor, therefore request.args.get('infor') return Python Built in None, and Flask Return... Is not allowed None.
The solution is simple , Let's first judge whether it is None:
@app.route('/')
def hello_world():
data = request.args.get('infor')
if data==None:
# do something
return ''
return data
# Second option , Is to set the initial value
# data = request.args.get("infor") # Set the default value
Remember there was a request like this ? http://127.0.0.1:5000?infor=1&infor=2, Take a close look at ,infor There are two values .
@app.route('/')
def hello_world():
data = request.args.getlist('infor') # Return to one list
return str(data)
stay request In request , analysis POST data
# username = wristwaking password = 5201314
@app.route("/form", methods=["POST"])
def form():
print(request.form)
# Immutable Multi Dict Immutable multiple dictionaries
# ImmutableMultiDict([('username', 'wristwaking'), ('password', '5201314')])
print(request.stream)
# <werkzeug.wsgi.LimitedStream object at 0x000002A9AF2CE4F0>
print(request.args)
# ImmutableMultiDict([])
return "success"
We have to find a way to get what we want username、password extracted , How to do it? ? Write it yourself ? no need ,Flask The parser has been built in request.form
@app.route("/form", methods=["POST"])
def form():
print(request.stream.read())
# b'username=wristwaking&password=5201314'
print(request.stream.read())
# b'' The stream is only read once
return "success"
Explain why :request.stream.read() Read the byte stream , We decode , The rule is utf-8, The results are shown below :
@app.route("/form", methods=["POST"])
def form():
data = request.stream.read().decode(encoding="utf-8")
print(data)
# username=wristwaking&password=5201314
return "success"
@app.route('/register', methods=['POST'])
def register():
print(request.headers)
# print(request.stream.read()) # Do not use , Otherwise the following form No data
print(request.form)
print(request.form['name'])
print(request.form.get('name'))
print(request.form.getlist('name'))
print(request.form.get('nickname', default=' Wake up the wrist '))
return 'welcome'
Respond to JSON when , In addition to changing the response style to JSON Format , Of the response head Content-Type Also set it to application/json
@app.route('/add', methods=['POST'])
def add():
result = {
'sum': request.json['a'] + request.json['b']}
return Response(json.dumps(result), mimetype='application/json')
# Use jsonify Tool functions can be used
@app.route('/add', methods=['POST'])
def add():
result = {
'sum': request.json['a'] + request.json['b']}
return jsonify(result)
Flask in app and current_app The understanding of the
stay Flask Internal maintainer two thread isolated stack ,current_app Yes AppContext( Application context ) Stack top in .
Threads have a name called ThreadLocal Class , That is, the classes that usually implement thread isolation . and werkzeug I have implemented its thread isolation class :werkzeug.local.Local,LocalStack Just use Local Realized .
LocalStack yes flask Defined thread isolated stack storage objects , It is used to save the application and request context respectively . It is thread isolation, which means , For different threads , They access these two objects and see different results 、 Completely isolated . That's according to a pid Different implementations of , It's like a house number .
And each is passed on to flask Object , Are handled in different threads , And each thread only processes one request at a time . So for every request , They don't have to worry about the data in their own context being modified by other requests .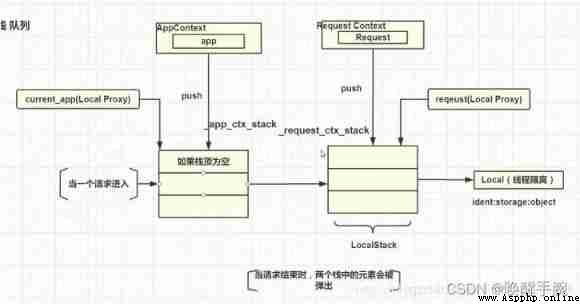
request Yes RequestContext( Request context ) To the top of the stack , When requesting entry ,Request Object is pushed onto the stack , thus request With the point processing request , The next step is to judge AppContext Whether the top of the stack is empty , If it is empty, a... Is pushed into the stack AppContext object , namely app
thus current_app There is a point , Therefore, there is no error report when we use it in the project , The code above is not implemented in the request , therefore AppContext The top of the stack is empty ,current_app It doesn't point to a AppContext object .
from flask import Flask, request
from werkzeug.utils import secure_filename
import os
app = Flask(__name__)
# File upload directory
app.config['UPLOAD_FOLDER'] = 'static/uploads/'
# Supported file formats
app.config['ALLOWED_EXTENSIONS'] = {
'png', 'jpg', 'jpeg', 'gif'} # Collection types
# Determine whether the file name is in the format we support
def allowed_file(filename):
return '.' in filename and \
filename.rsplit('.', 1)[1] in app.config['ALLOWED_EXTENSIONS']
@app.route('/')
def hello_world():
return 'hello world'
@app.route('/upload', methods=['POST'])
def upload():
upload_file = request.files['image']
if upload_file and allowed_file(upload_file.filename):
filename = secure_filename(upload_file.filename)
# Save file to static/uploads Catalog , The file name is the same as the file name used when uploading
upload_file.save(os.path.join(app.root_path, app.config['UPLOAD_FOLDER'], filename))
return 'info is '+request.form.get('info', '')+'. success'
else:
return 'failed'
if __name__ == '__main__':
app.run(port=5000, debug=True)
app.config Medium config It's a subclass of a dictionary , It can be used to set its own configuration information , You can also set your own configuration information . function allowed_file(filename) Used to determine filename Whether there is a suffix and whether the suffix is in app.config['ALLOWED_EXTENSIONS'] in .
The pictures uploaded by the client must be in image identification .upload_file Is the object corresponding to the uploaded file .
app.root_path obtain server.py The path to the file system is in the absolute directory .
upload_file.save(path) Used to put upload_file Saved in the file system of the server , The best parameter is the absolute path , Otherwise, an error will be reported ( Many codes on the Internet use relative paths , However, the author always reports an error when using the relative path , Said the path could not be found )
os.path.join() Used to combine paths using appropriate path separators .
We use it python Client side test :
import requests
file_data = {
'image': open('Lenna.jpg', 'rb')}
user_info = {
'info': 'Lenna'}
resp = requests.post("http://127.0.0.1:5000/upload", data=user_info, files=file_data)
print(resp.text)
To control the size of the production file , You can set the size of the request entity , for example :
app.config['MAX_CONTENT_LENGTH'] = 16 * 1024 * 1024 # 16MB
however , When processing uploaded files , Need to use try:... except:...
If you want to get the content of the uploaded file, you can :
file_content = request.files['image'].stream.read()
Cookie Is the data stored in the client to record the status of visitors . Specific principle , Please see http://zh.wikipedia.org/wiki/Cookie , Commonly used to record user login status session Mostly based on cookie Realized .
@app.route('/add')
def login():
resp = Response('add cookies')
resp.set_cookie(key='name', value=' Wake up the wrist ', expires=time.time()+6*60)
return resp
@app.route('/show')
def show():
return request.cookies.__str__()
@app.route('/delete')
def del_cookie():
resp = Response('delete cookies')
resp.set_cookie('name', '', expires=0)
return resp
You can see from above that , have access to Response.set_cookie Add and remove cookie,expires Parameter to set cookie Valid time , Its value can be datetime Object or unix Time stamp , I used unix Time stamp .
res.set_cookie(key='name', value='letian', expires=time.time()+6*60)
# above expire The value of the parameter indicates cookie From now on 6 It works for minutes .
When we crawl some websites , We often change IP To prevent the crawler from being blocked . These agents IP How to get the address ? It's very simple , At present, there are many on the network IP Agent , For example, DPCA , Apocalypse , Sesame, etc , These agents generally provide transparent agents , Anonymous proxy , High hiding agent . This article talks about various agents IP The principle behind it
agent IP Introduction to
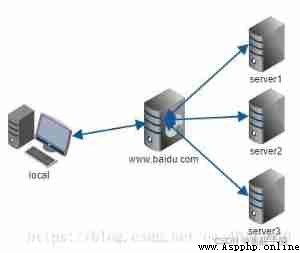
Proxy is actually a proxy server , English is called proxy server, It is the function of the network agent to get the information of the network .
Vividly speaking , It's a transit station for network information . When we normally request a website , Send a request to Web The server ,Web The server sends the response back to us .
If you set up a proxy server , It's actually a bridge between the local computer and the server , At this time, the machine is not directly to Web Server initiates request , Instead, make a request to the proxy server , The request is sent to the proxy server , Then the proxy server sends it to Web The server , Then the proxy server will send Web The response returned by the server is forwarded to the local machine .
In this way, we can also visit the website normally , But in the process Web The reality recognized by the server IP It's no longer our own IP 了 , And it's a success IP camouflage , This is the basic principle of agency .
Type of agency : Gao Yin > confusion > anonymous > transparent
agent IP It can be divided into 4 Types , In addition to the transparent proxy mentioned earlier IP, Anonymous proxy IP, High anonymity agent IP, Another is to confuse agents IP. From the perspective of basic security , Their order is high > confusion > anonymous > transparent .
Principle of agency
The type of proxy mainly depends on the configuration of the proxy server , Different configurations result in different proxy types . In the configuration , These three variables REMOTE_ADDR,HTTP_VIA,HTTP_X_FORWARDED_FOR Is the decisive factor .
( One )REMOTE_ADDR
REMOTE_ADDR Represents the IP, But its value is not provided by the client , It's based on the client's IP designated .
If you use a browser to access a website directly , So the website's web The server (Nginx、Apache etc. ) It will REMOTE_ADDR Set to client IP Address .
If we set up a proxy for the browser , Our request to visit the target website will go through the proxy server first , The proxy server then translates the request to the target site . So the website's web The proxy server will send REMOTE_ADDR Set as proxy server IP.
( Two )X-Forwarded-For(XFF)
X-Forwarded-For It's a HTTP Expand the head , Used to represent HTTP The request is true IP. When a client uses a proxy ,web The proxy server does not know the truth of the client IP Address . To avoid this situation , A proxy server is usually added with a X-Forwarded-For The header information , Put the client's IP Add it to the header .
X-Forwarded-For The request header format is as follows :
X-Forwarded-For: client, proxy1, proxy2
client Represents the IP Address ;proxy1 It is the device farthest from the server IP; proxy2 It is a secondary proxy device IP; From the format , It can be seen from client To server There can be multiple agents .
If one HTTP Before the request reaches the server , After three agents Proxy1、Proxy2、Proxy3,IP Respectively IP1、IP2、IP3, User reality IP by IP0, Then according to the XFF standard , The server will eventually receive the following message :
X-Forwarded-For: IP0, IP1, IP2
Proxy3 Direct connection server , It will give XFF Additional IP2, It means it's helping Proxy2 Forward the request . There is no IP3,IP3 You can use the server through Remote Address Field gets . We know HTTP The connection is based on TCP Connect ,HTTP There is no in the agreement IP The concept of ,Remote Address come from TCP Connect , Indicates the establishment of... With the server TCP Connected devices IP, In this case, it is IP3.
( 3、 ... and )HTTP_VIA
via yes HTTP One of the agreements header, Recorded once HTTP The proxy and gateway through which the request passes , after 1 Proxy servers , Just add a proxy server information , after 2 Just add 2 individual .
Forward agency and Reverse proxy : Principle introduction
Reverse proxy
1、 The user sends a request to the server ( You are actually accessing the reverse proxy server , But users don't know )
2、 The reverse proxy server sends the request to the real server
3、 The real server returns the data to the reverse proxy server
4、 The reverse proxy server returns the data to the user
What's the use of reverse proxy? Why do you do this :
effect : Too many user requests , The server will have a processing limit . So use a reverse proxy server to accept requests , Then load balancing is used to distribute the requests to multiple real servers . It can not only improve efficiency, but also have a certain degree of security .
purpose : If you don't use an agent , User IP、 The port number is directly exposed to Internet( Although address translation NAT), The external host can still be based on IP、 Port number to exploit host security vulnerabilities , So in the enterprise network , Generally, proxy servers are used to access the Internet .
The simplest difference between forward proxy and reverse proxy :
The forward proxy hides the user , What reverse proxy hides is the server
vue proxy Principle introduction
Browsers will cross domain because of the same origin policy , But the server does not prohibit ,npm run dev The server is running , All requests can be sent by the server ( Forward all requests to your own node The server then sends the request , namely agent )
Use Node Development http Forward proxy :
var http = require("http");
var url = require("url");
// Will create a http The server , And monitor 8080 port :
http.createServer(function(req,res){

console.log("start request:",req.url);
var option = url.parse(req.url);
option.headers = req.headers;
// When a request message is received , Get information from request hair and forward :
var proxyRequest = http.request(options, function(proxyResponse){

// The rest is information output , So that we can know whether the agency is effective 、 What is the content of the agency :
proxyResponse.on("data", function(chunk){

console.log("proxyResponse length",chunk.length);
});
proxyResponse.on("end", function(){

console.log("proxyed request ended");
res.end();
})
res.writeHead(proxyResponse.statusCode,proxyResponse.headers);
});
req.on("data",function(chunk){

console.log("in request length:",chunk.length);
proxyRequest.write(chunk,"binary");
})
req.on("end",function(){

console.log("original request ended");
proxyRequest.end();
})
}).listen(8080);
Personal summary , In the past, I didn't like to read the source code when learning something , Mainly English is not good , Later I realized the importance of source code , Learn to read the source code to really explore the underlying implementation , Moreover, many third-party libraries now clearly annotate the source code .
Flask.py File related bottom layer introduction 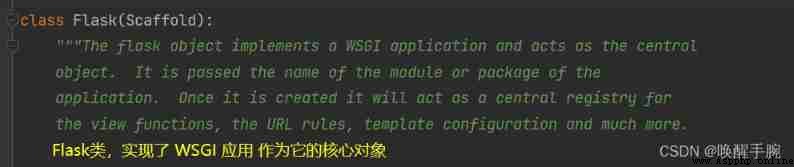
Source code Flask Class inherits Scaffold class ( The scaffold ), About Scaffold Class __init__ Exhibition :
def __init__(
self,
import_name: str,
#: The name of the package or module that this object belongs
static_folder: t.Optional[t.Union[str, os.PathLike]] = None,
static_url_path: t.Optional[str] = None,
template_folder: t.Optional[str] = None,
#: The path to the templates folder, relative to ···
root_path: t.Optional[str] = None,
):
:attr:root_path, to add to the template loader.
Flask Object implements a WSGI Applications , And as the central object . The name of the module or package that it is passed to the application . Once you create it , It will be used as a view function 、URL The rules 、 Central registry for template configuration, etc .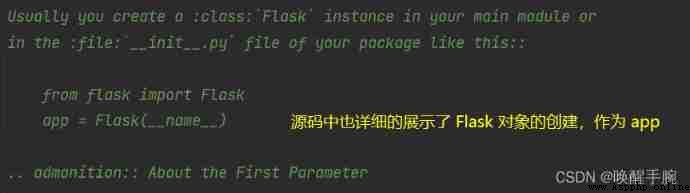
Decorator @route, Decoration view function :
Underlying principle :@app.route("/") def index(): -> app.add_url_rule("/", view_func=index)
Project start app.run(), The source code is introduced
 def run(
self,
host: t.Optional[str] = None,
# host: the hostname to listen on. Set this to ``'0.0.0.0'`` to have the server available externally as well.
# Host name to listen to . Set it to ``‘0.0.0.0’``, To make the server available externally .
port: t.Optional[int] = None,
# the port of the webserver. Defaults to ``5000`` or the port defined in the ``SERVER_NAME`` config variable if present.
# webserver The port of . The default is ``5000`` Or in the ``SERVER_NAME`` The port defined in the configuration variable .
debug: t.Optional[bool] = None,
# ebug: if given, enable or disable debug mode. See :attr:`debug`.
load_dotenv: bool = True,
# Load the nearest :file:`.env` and :file:`.flaskenv` files to set environment variables. Will also change the working directory to the directory containing the first file found.
# Load the closest :file:`.env` and :file:`.flaskenv` file , To set the environment variables . You will also change the working directory to the directory containing the first file found .
**options: t.Any,
) -> None:
Note that if you are testing for assertions or exceptions in your application code, you must set app.testing = True in order for the exceptions to propagate to the test client.
Please note that , If you are testing assertions or exceptions in your application code , Must be set app.testing = True, To propagate the exception to the test client .
Otherwise, the exception will be handled by the application (not visible to the test client) and the only indication of an AssertionError or other exception will be a 500 status code response to the test client. See the :attr:testing attribute. For example::
app.testing = True
client = app.test_client()
The test client can be used in a with block to defer the closing down of the context until the end of the with block. This is useful if you want to access the context locals for testing::
The test client can be installed with with Use in , To delay the closing of the context until with with End . If you want to access the context local language for testing , This is very useful ::
with app.test_client() as c:
rv = c.get('/?vodka=42')
assert request.args['vodka'] == '42'
Additionally, you may pass optional keyword arguments that will then be passed to the application’s :attr:test_client_class constructor. For example::
from flask.testing import FlaskClient
class CustomClient(FlaskClient):
def __init__(self, *args, **kwargs):
self._authentication = kwargs.pop("authentication")
super(CustomClient,self).__init__( *args, **kwargs)
app.test_client_class = CustomClient
client = app.test_client(authentication='Basic ....')
os.getenv(key, default=None) Function introduction :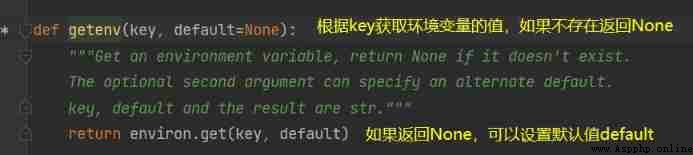
If the dictionary set of environment variables does not have a corresponding KEY, The default values will be read :“ Wake up the wrist ”
import os
print(os.getenv("CONF", default=" Wake up the wrist "))
Flask The default is single process , Single thread blocking task mode , When the project goes online, you can go through nginx+gunicorn How to deploy flask Mission
But in the development process, if you want to test the high concurrency through delay, how to achieve it , It's very simple :
app.run() Two parameters can be accepted in , Namely threaded and processes, Used to turn on thread support and process support .
Flask Single thread blocking task mode test : Open three browsers at the same time to access
from datetime import datetime
from flask import Flask
@app.route("/index")
def index():
print('start : ', datetime.now())
time.sleep(10) # Analog blocking
""" Flask The default is single process , Single thread blocking task mode """
print('end: : ', datetime.now())
return "hello world"
if __name__ == "__main__":
app.run(load_dotenv=True)
Running results : The total time required is 30 More than a second , Description is a single thread blocking mode
start : 2022-02-15 14:57:42.714942
end: : 2022-02-15 14:57:52.728294
start : 2022-02-15 14:57:52.730206
127.0.0.1 - - [15/Feb/2022 14:57:52] "GET /index HTTP/1.1" 200 -
end: : 2022-02-15 14:58:02.730972
start : 2022-02-15 14:58:02.733863
127.0.0.1 - - [15/Feb/2022 14:58:02] "GET /index HTTP/1.1" 200 -
end: : 2022-02-15 14:58:12.745196
127.0.0.1 - - [15/Feb/2022 14:58:12] "GET /index HTTP/1.1" 200 -
The source code is too clear , Turned out to be ThreadingMixIn The instance of is multithreaded to process each request , So for developers , It's just starting app When will threaded Parameter set to True,flask Only in this way can each request be handled in a multi-threaded way .
Opening mode :
if __name__ == "__main__":
app.run(load_dotenv=True, threaded=True)
This case is to connect to the database , start-up Flask Server applications , The build view function maps to the address directory of the response , And build pymysql The connection object of , Operate the database , Here is the corresponding operation of adding words .
from datetime import datetime
import threading
import time
from flask import Flask, request, redirect
app = Flask(__name__)
import pymysql
app.config['mysql'] = pymysql.connect(
host='localhost', # Connection name , Default 127.0.0.1
user='pythondb', # user name
passwd='root', # password
port=3306, # port , The default is 3306
db='pythondb', # Database name
charset='utf8', # Character encoding
)
@app.route('/')
def Login():
with open('index.html', 'r', encoding='utf-8') as f:
html = f.read()
return html
@app.route('/data')
def ShowData():
english = request.args['english'].strip().replace("\n", "")
chinese = request.args['chinese'].strip().replace("\n", "")
sentence_eng = request.args['sentence_eng'].strip().replace("\n", "")
sentence_chi = request.args['sentence_chi'].strip().replace("\n", "")
cursor = app.config['mysql'].cursor()
sql = "SELECT * FROM word ORDER BY id DESC limit 1"
cursor.execute(sql)
id = cursor.fetchone()[0] + 1
sql = "insert into word values(%s,%s,%s,%s,%s)"
print(cursor.execute(sql, (id, english, chinese, sentence_eng, sentence_chi)))
app.config['mysql'].commit()
return redirect("http://localhost:8080/")
if __name__ == "__main__":
app.run(host='localhost', port=8080, load_dotenv=True)
The corresponding front-end page code is displayed , In fact, it simply constructs a form to submit :
<!DOCTYPE html>
<html lang="en">
<head>
<meta charset="UTF-8">
<title>Title</title>
</head>
<body>
<form action="http://localhost:8080/data">
<p><input name="english" placeholder="Word:"></p>
<p><input name="chinese" placeholder="Chinese:"></p>
<p><input name="sentence_eng" placeholder="sentence_eng:"></p>
<p><input name="sentence_chi" placeholder="sentence_chi:"></p>
<input type="submit" value="Submit">
</form>
<style> input{
 width: 300px; height: 40px } </style>
</body>
</html>