In dynamic websites , All user requests , The server will go to the database for corresponding increment , Delete , check , Change , Apply colours to a drawing template , Execute business logic , Finally, generate the page that the user sees .
When a website has a large number of users , Every time the background operation , Will consume a lot of server resources , So you have to use caching to relieve the pressure on the back-end server .
Cache is to save some common data in memory or memcache in , When someone comes to access the data for a certain period of time , No more database and rendering operations , But directly from memory or memcache To get data from , And then back to the user .
Often used are file cache and Mencache cache
1.2.1 Development and debugging ( This mode is used for development and debugging , In fact, nothing is done )
settings.py File configuration
CACHES = {

'default': {

'BACKEND': 'django.core.cache.backends.dummy.DummyCache', # Cache the engine used in the background
'TIMEOUT': 300, # Cache timeout ( Default 300 second ,None Never expire ,0 Indicates immediate expiration )
'OPTIONS':{

'MAX_ENTRIES': 300, # Maximum number of cache records ( Default 300)
'CULL_FREQUENCY': 3, # After the cache reaches the maximum number , The proportion of the number of cache removed , namely :1/CULL_FREQUENCY( Default 3)
},
}
}
1.2.2 Memory cache ( Save the contents of the cache to a memory area )
settings.py File configuration
CACHES = {

'default': {

'BACKEND': 'django.core.cache.backends.locmem.LocMemCache', # Specifies the engine used by the cache
'LOCATION': 'unique-snowflake', # The unique value of a variable written in memory
'TIMEOUT':300, # Cache timeout ( The default is 300 second ,None Never expire )
'OPTIONS':{

'MAX_ENTRIES': 300, # Maximum number of cache records ( Default 300)
'CULL_FREQUENCY': 3, # After the cache reaches the maximum number , The proportion of the number of cache removed , namely :1/CULL_FREQUENCY( Default 3)
}
}
}
1.2.3 File cache ( Store the cache data in a file )
settings.py File configuration
CACHES = {

'default': {

'BACKEND': 'django.core.cache.backends.filebased.FileBasedCache', # Specifies the engine used by the cache
'LOCATION': '/var/tmp/django_cache', # Specify the cache path
'TIMEOUT':300, # Cache timeout ( The default is 300 second ,None Never expire )
'OPTIONS':{

'MAX_ENTRIES': 300, # Maximum number of cache records ( Default 300)
'CULL_FREQUENCY': 3, # After the cache reaches the maximum number , The proportion of the number of cache removed , namely :1/CULL_FREQUENCY( Default 3)
}
}
}
1.2.4 Database cache ( Store the cached data in the database )
settings.py File configuration
CACHES = {

'default': {

'BACKEND': 'django.core.cache.backends.db.DatabaseCache', # Specifies the engine used by the cache
'LOCATION': 'cache_table', # Database table
'OPTIONS':{

'MAX_ENTRIES': 300, # Maximum number of cache records ( Default 300)
'CULL_FREQUENCY': 3, # After the cache reaches the maximum number , The proportion of the number of cache removed , namely :1/CULL_FREQUENCY( Default 3)
}
}
}
Be careful , The statement used to create the cached database table :
python manage.py createcachetable
1.2.5 Memcache cache ( Use python-memcached Module connection memcache)
Memcached yes Django Native supported caching system . To use Memcached, Need to download Memcached Support library for python-memcached or pylibmc.
settings.py File configuration
CACHES = {

'default': {

'BACKEND': 'django.core.cache.backends.memcached.MemcachedCache', # Specifies the engine used by the cache
'LOCATION': '192.168.10.100:11211', # Appoint Memcache Cache server's IP Address and port
'OPTIONS':{

'MAX_ENTRIES': 300, # Maximum number of cache records ( Default 300)
'CULL_FREQUENCY': 3, # After the cache reaches the maximum number , The proportion of the number of cache removed , namely :1/CULL_FREQUENCY( Default 3)
}
}
}
LOCATION It can also be configured as follows :
'LOCATION': 'unix:/tmp/memcached.sock', # Specify the host name and socket Socket is Memcache Cache server
'LOCATION': [ # Specify one or more other hosts ip The address plus port is Memcache Cache server
'192.168.10.100:11211',
'192.168.10.101:11211',
'192.168.10.102:11211',
]
1.2.6 Memcache cache ( Use pylibmc Module connection memcache)
settings.py File configuration
CACHES = {

'default': {

'BACKEND': 'django.core.cache.backends.memcached.PyLibMCCache', # Specifies the engine used by the cache
'LOCATION':'192.168.10.100:11211', # Specify the 11211 Port is Memcache Cache server
'OPTIONS':{

'MAX_ENTRIES': 300, # Maximum number of cache records ( Default 300)
'CULL_FREQUENCY': 3, # After the cache reaches the maximum number , The proportion of the number of cache removed , namely :1/CULL_FREQUENCY( Default 3)
},
}
}
LOCATION It can also be configured as follows :
'LOCATION': '/tmp/memcached.sock', # Specify a path as the cache directory
'LOCATION': [ # Distributed cache , Running on multiple servers Memcached process , The program treats multiple servers as a single cache , Instead of copying cache values on each server
'192.168.10.100:11211',
'192.168.10.101:11211',
'192.168.10.102:11211',
]
Memcached Is a memory-based cache , Data stored in memory . So if the server crashes , The data is lost , therefore Memcached Generally used with other caches
Django Provides caching with different granularity , You can cache a page , You can cache only a part of a page , You can even cache the entire site .
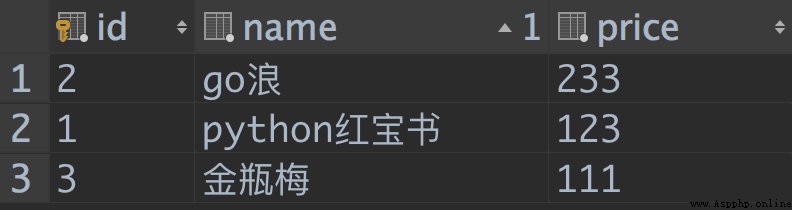
database :
class Book(models.Model):
name=models.CharField(max_length=32)
price=models.DecimalField(max_digits=6,decimal_places=1)
View :
from django.views.decorators.cache import cache_page
import time
from .models import *
@cache_page(15) # The timeout is 15 second
def index(request):
t=time.time() # Get the current time
bookList=Book.objects.all()
return render(request,"index.html",locals())
Templates (index.html):
<!DOCTYPE html>
<html lang="en">
<head>
<meta charset="UTF-8">
<title>Title</title>
</head>
<body>
<h3> current time :-----{
{ t }}</h3>
<ul>
{% for book in bookList %}
<li>{
{ book.name }}--------->{
{ book.price }}$</li>
{% endfor %}
</ul>
</body>
</html>
The above example is a memory based cache configuration , How to configure file based caching ??
change settings.py Configuration of
CACHES = {

'default': {

'BACKEND': 'django.core.cache.backends.filebased.FileBasedCache', # Specifies the engine used by the cache
'LOCATION': 'E:\django_cache', # Specify the cache path
'TIMEOUT': 300, # Cache timeout ( The default is 300 second ,None Never expire )
'OPTIONS': {

'MAX_ENTRIES': 300, # Maximum number of cache records ( Default 300)
'CULL_FREQUENCY': 3, # After the cache reaches the maximum number , The proportion of the number of cache removed , namely :1/CULL_FREQUENCY( Default 3)
}
}
}
Then refresh the browser again , You can see the cache file generated in the directory just configured
Through experiments, we can know ,Django The cache file will be saved in its own form in the directory specified in the configuration file .
Since it is the whole site cache , Of course, use Django Middleware in .
The user's request goes through middleware , Through a series of certification and other operations , If the requested content exists in the cache , Then use FetchFromCacheMiddleware Get content and return to user
Before returning to the user , Determine whether the cache already exists , If it doesn't exist , be UpdateCacheMiddleware Will save the cache to Django In the cache , To achieve the whole site cache
 Caching the entire site , Is the simplest way to cache
stay MIDDLEWARE_CLASSES Add “update” and “fetch” middleware
MIDDLEWARE_CLASSES = (
‘django.middleware.cache.UpdateCacheMiddleware’, # First of all
'django.middleware.common.CommonMiddleware',
‘django.middleware.cache.FetchFromCacheMiddleware’, # Last
)
“update” Must be configured in the first
“fetch” Must be configured in the last
modify settings.py The configuration file
MIDDLEWARE_CLASSES = (
'django.middleware.cache.UpdateCacheMiddleware', # Respond to HttpResponse Set up a few headers
'django.contrib.sessions.middleware.SessionMiddleware',
'django.middleware.common.CommonMiddleware',
'django.middleware.csrf.CsrfViewMiddleware',
'django.contrib.auth.middleware.AuthenticationMiddleware',
'django.contrib.auth.middleware.SessionAuthenticationMiddleware',
'django.contrib.messages.middleware.MessageMiddleware',
'django.middleware.clickjacking.XFrameOptionsMiddleware',
'django.middleware.security.SecurityMiddleware',
'django.middleware.cache.FetchFromCacheMiddleware', # Used to cache through GET and HEAD Method to get the status code as 200 Response
)
CACHE_MIDDLEWARE_SECONDS=10
The view function :
from django.views.decorators.cache import cache_page
import time
from .models import *
def index(request):
t=time.time() # Get the current time
bookList=Book.objects.all()
return render(request,"index.html",locals())
def foo(request):
t=time.time() # Get the current time
return HttpResponse("HELLO:"+str(t))
Templates (index.html):
<!DOCTYPE html>
<html lang="en">
<head>
<meta charset="UTF-8">
<title>Title</title>
</head>
<body>
<h3 > current time :-----{
{ t }}</h3>
<ul>
{% for book in bookList %}
<li>{
{ book.name }}--------->{
{ book.price }}$</li>
{% endfor %}
</ul>
</body>
</html>
The rest of the code remains the same , Refreshing the browser is 10 second , The time on the page changes once , In this way, the whole site cache is realized .
Example , When refreshing the page , Part of the whole web page realizes caching
views The view function
from django.views.decorators.cache import cache_page
import time
from .models import *
def index(request):
t=time.time() # Get the current time
bookList=Book.objects.all()
return render(request,"index.html",locals())
Templates (index.html):
{
% load cache %}
<!DOCTYPE html>
<html lang="en">
<head>
<meta charset="UTF-8">
<title>Title</title>
</head>
<body>
<h3 > Don't cache :-----{
{
 t }}</h3>
{
% cache 2 'name' %}
<h3> cache :-----:{
{
 t }}</h3>
{
% endcache %}
</body>
</html>
Templates (index.html):
{
% load cache %}
<!DOCTYPE html>
<html lang="en">
<head>
<meta charset="UTF-8">
<title>Title</title>
</head>
<body>
<h3 > Don't cache :-----{
{
 t }}</h3>
{
% cache 2 'name' %}
<h3> cache :-----:{
{
 t }}</h3>
{
% endcache %}
</body>
</html>
Django Provide a signaling mechanism . It's actually the observer mode , It's also called release - subscribe (Publish/Subscribe) . When something happens , Signal , Then the function that listens to this signal will execute .
Popular speaking , It's when something happens , A signal allows a particular sender to alert some recipients . Used to decouple when the framework performs operations .
Model signals
pre_init # django Of modal Before executing its construction method , Automatic triggering
post_init # django Of modal After executing its construction method , Automatic triggering
pre_save # django Of modal Before saving objects , Automatic triggering
post_save # django Of modal After saving objects , Automatic triggering
pre_delete # django Of modal Before object deletion , Automatic triggering
post_delete # django Of modal After object deletion , Automatic triggering
m2m_changed # django Of modal Use in m2m Third table of field operation (add,remove,clear) Before and after , Automatic triggering
class_prepared # Program startup , Detect registered app in modal class , For each class , Automatic triggering
Management signals
pre_migrate # perform migrate Before the command , Automatic triggering
post_migrate # perform migrate After the command , Automatic triggering
Request/response signals
request_started # Before the request arrives , Automatic triggering
request_finished # After request , Automatic triggering
got_request_exception # After request exception , Automatic triggering
Test signals
setting_changed # Use test When testing modifying a profile , Automatic triggering
template_rendered # Use test When testing render templates , Automatic triggering
Database Wrappers
connection_created # When creating a database connection , Automatic triggering
Django Provides a series of built-in signals , Allow the user's code to get DJango Notification of specific operation of . This contains some useful notifications :
django.db.models.signals.pre_save & django.db.models.signals.post_save
In the model save() Send before or after a method call .
django.db.models.signals.pre_delete & django.db.models.signals.post_delete
In the model delete() Method or query set delete() Send before or after a method call .
django.db.models.signals.m2m_changed
On the model ManyToManyField Send when modifying .
django.core.signals.request_started & django.core.signals.request_finished
Django Create or close HTTP Send on request .
about Django Built in signal , Just register the specified signal , When the program performs the corresponding operation , Auto trigger registration function :
The way 1:
from django.core.signals import request_finished
from django.core.signals import request_started
from django.core.signals import got_request_exception
from django.db.models.signals import class_prepared
from django.db.models.signals import pre_init, post_init
from django.db.models.signals import pre_save, post_save
from django.db.models.signals import pre_delete, post_delete
from django.db.models.signals import m2m_changed
from django.db.models.signals import pre_migrate, post_migrate
from django.test.signals import setting_changed
from django.test.signals import template_rendered
from django.db.backends.signals import connection_created
Mode one :
# Put it in __init__ in
from django.db.models.signals import pre_save
import logging
def callBack(sender, **kwargs):
print(sender)
print(kwargs)
# Create object write log
logging.basicConfig(level=logging.DEBUG)
# logging.error('%s Created a %s object '%(sender._meta.db_table,kwargs.get('instance').title))
logging.debug('%s Created a %s object '%(sender._meta.model_name,kwargs.get('instance').title))
pre_save.connect(callBack)
Mode two :
from django.db.models.signals import pre_save
from django.dispatch import receiver
@receiver(pre_save)
def my_callback(sender, **kwargs):
print(" Object created successfully ")
print(sender)
print(kwargs)
a. Defining signals ( Generally create a py file )(toppings,size Is the accepted parameter )
import django.dispatch
pizza_done = django.dispatch.Signal(providing_args=["toppings", "size"])
b. Registration signal
def callback(sender, **kwargs):
print("callback")
print(sender,kwargs)
pizza_done.connect(callback)
c. Trigger signal
from route import pizza_done
pizza_done.send(sender='seven',toppings=123, size=456)
Because the trigger of the built-in signal has been integrated into Django in , So it will automatically call , For custom signals, developers need to trigger them anywhere .
practice : A log record is generated when a record is added to the database .
CSRF(Cross-site request forgery) Cross-site request forgery , Also known as “One Click Attack” perhaps Session Riding, Commonly abbreviated as CSRF perhaps XSRF, Is a malicious use of the site . Although it sounds like a cross-site script (XSS), But it has something to do with XSS Very different ,XSS Leverage trusted users within the site , and CSRF To exploit a trusted site by masquerading as a request from a trusted user . And XSS Compared to attack ,CSRF Attacks are often unpopular ( So there are few resources to guard against it ) And hard to prevent , So it's considered a ratio XSS More dangerous
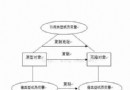
You can think of it this way : The attacker stole your identity , Send malicious requests in your name , This request is completely legal for the server , However, it has completed an operation expected by the attacker , For example, send email in your name 、 Send a message , Stealing your account , Add system administrator , Even buying goods 、 Virtual money transfer, etc . as follows : among Web A For existence CSRF Loopholes in the website ,Web B Malicious websites built for attackers ,User C by Web A Legitimate users of the site
Here's the picture :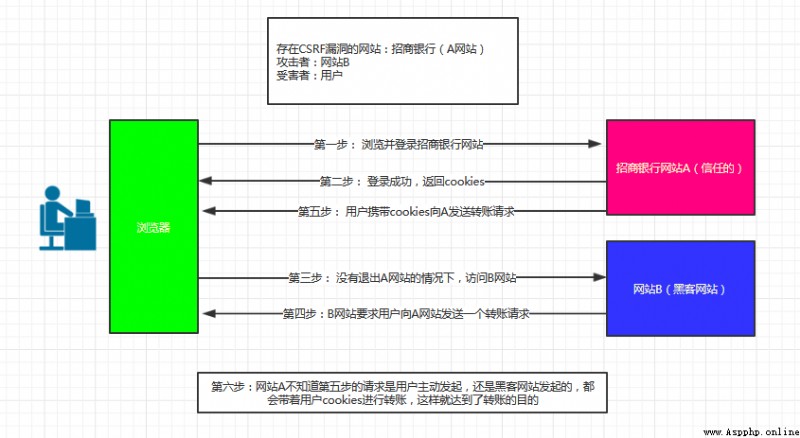
As can be seen from the above figure , To complete once CSRF attack , The victim must complete two steps in turn :
1. Log in to trusted sites A, And build locally Cookie.
2. Do not log out A Under the circumstances , Visit the danger website B.
See here , You might say :“ If I don't meet one of the above two conditions , I would not have been CSRF The attack of ”. Yes , Such is the case , But you can't guarantee that :
1. You can't guarantee that when you log on to a website , No more open one tab Page and visit another website .
2. You can't guarantee that when you close the browser , Your local Cookie Expire immediately , Your last conversation has ended .( in fact , Closing browser cannot end a session , But most people mistakenly think that closing the browser is equivalent to logging out / It's over ……)
3. The so-called attack website in the figure above , It may be a trusted and frequently visited website with other vulnerabilities .
Current defense CSRF There are three main strategies to attack : verification HTTP Referer Field ; Add... To the request address token And verify ; stay HTTP Custom properties in the header and verify
(1) verification HTTP Referer Field
according to HTTP agreement , stay HTTP There is a field in the header called Referer, It records the time to HTTP The source address of the request . In general , Requests to access a security restricted page come from the same website , For example, you need to visit http://bank.example/withdraw?account=bob&amount=1000000&for=Mallory, Users must log in first bank.example, Then trigger the transfer event by clicking the button on the page . At this time , The transfer request Referer The value will be on the page where the transfer button is located URL, Usually with bank.example Address at the beginning of the domain name . And if the hackers want to implement the bank website CSRF attack , He can only build requests on his own website , When the user sends the request to the bank through the hacker's website , The requested Referer It's pointing to hackers' own websites . therefore , Be defensive CSRF attack , The bank website only needs to verify each transfer request Referer value , If so bank.example Domain name at the beginning , It means that the request is from the bank's website , It's legal. . If Referer If it's another website , It could be hackers CSRF attack , Refuse the request .
The obvious advantage of this method is its simplicity , The average developer of a website doesn't have to worry about CSRF A loophole in the , Just add an interceptor to all security sensitive requests at the end to check Referer The value of . Especially for the current system , There is no need to change any existing code and logic of the current system , There is no risk , Very convenient .
However , This method is not foolproof .Referer The value of is provided by the browser , although HTTP There are clear requirements in the agreement , But every browser for Referer There may be differences in the specific implementation of , There's no guarantee that the browser itself doesn't have security holes . Use validation Referer The method of value , It is to rely on the third party for security ( Browser ) To protect , In theory , It's not safe . in fact , For some browsers , such as IE6 or FF2, At present, there are some methods that can be tampered with Referer value . If bank.example Site support IE6 browser , Hackers can put the user's browser Referer The value is set to bank.example Address at the beginning of the domain name , In this way, we can pass the verification , So as to carry out CSRF attack .
Even with the latest browsers , Hackers can't tamper with Referer value , There are still problems with this method . because Referer Value will record the user's access source , Some users think it would infringe their privacy rights , Especially some organizations are worried about Referer Value will leak some information in the internal network of the organization to the external network . therefore , The user can set up the browser to not provide any more when sending the request Referer. When they visit the bank's website normally , The website will not have Referer It's worth it CSRF attack , Deny access to legitimate users .
(2) Add... To the request address token And verify
CSRF The attack was successful , Because hackers can completely fake users' requests , All user authentication information in this request exists in cookie in , So hackers can directly use users' own... Without knowing the authentication information cookie To pass security verification . Resist CSRF, The key is to put information in the request that the hacker can't forge , And the information does not exist in cookie In . Can be in HTTP Was added a request in the form of randomly generated parameter token, And build an interceptor on the server side to verify this token, If not in the request token perhaps token The content is not correct , Think it might be CSRF Attack and reject the request .
This method is better than inspection Referer Be safe ,token It can be produced and put on after the user logs session In , And then at every request put token from session Took out , With... In the request token compare , But the difficulty of this method is how to put token Add the request as a parameter . about GET request ,token Will be attached to the request address , such URL It becomes http://url?csrftoken=tokenvalue. And for POST The request for , To be in form At the end of the sentence, add , This way token Added the request as a parameter . however , In a website , There are so many places to accept requests , Add... To every request token It's very troublesome , And it's easy to miss , The usual way to do this is to load each page , Use javascript Traverse the whole dom Trees , about dom All of the a and form Add... After the label token. This solves most of the requests , But for the dynamically generated html Code , This method has no effect , It also requires the programmer to manually add token.
Another disadvantage of this method is that it is difficult to guarantee token Own safety . Especially in some forums and other websites that support users to publish their own content , Hackers can post the address of their own website on it . Because the system will also add token, Hackers can get this on their own websites token, And we can start it right away CSRF attack . To avoid that , The system can add token Add a judgment , If this link is linked to your own site , Just add token, If it's going to the Internet, it's not going to add . however , Even if this csrftoken Not attached to the request as a parameter , Hackers' websites can also be accessed through Referer To get this token It's worth starting CSRF attack . This is also some users like to close the browser manually Referer The reason for the function .
(3) stay HTTP Custom properties in the header and verify
This method is also used token And verify that , Different from the previous method , It's not about token In the form of parameters HTTP In request , But put it in HTTP In the custom attribute in the header . adopt XMLHttpRequest This class , You can add... To all such requests at once csrftoken This HTTP Head properties , And put token Value in it . This solves the problem of adding token The inconvenience of , meanwhile , adopt XMLHttpRequest The requested address will not be recorded in the browser's address bar , And don't worry about it token Through Referer Leaked to other websites .
The same-origin policy (Same origin policy) It's a convention , It is the core and most basic security feature of the browser , If the same origin policy is missing , The normal functions of the browser may be affected . so to speak Web Is built on top of the same origin policy , The browser is simply an implementation of the same origin policy
Requested url Address , Must be associated with the browser on url The address is in the same domain , That's the domain name , port , The agreement is the same .
such as : My local domain name is 127.0.0.1:8000, Request another domain name :127.0.0.1:8001 A piece of data
Error will be reported on the browser , One is the protection of homology strategy , If the browser is right javascript There is no protection from homologous strategies , Then some important confidential websites will be very dangerous
Cross source requests have been blocked : The same origin policy prohibits reading from http://127.0.0.1:8001/SendAjax/ Remote resources .( reason :CORS Head missing 'Access-Control-Allow-Origin').
But notice , project 2 The visit in has taken place , It means that the browser intercepts the results returned by non homologous requests
CORS Requires both browser and server support . at present , All browsers support this feature ,IE The browser cannot be lower than IE10.
Whole CORS Communication process , It's all done automatically by the browser , No user involvement is required . For developers ,CORS Correspondence and homology AJAX There is no difference in communication , The code is exactly the same . Once the browser finds AJAX Request cross source , Will automatically add some additional header information , Sometimes there is an additional request , But users don't feel .
therefore , Realization CORS The key to communication is the server . As long as the server implements it CORS Interface , You can communicate across sources .
The browser will CORS Requests fall into two categories : A simple request (simple request) and It's not a simple request (not-so-simple request). The browser sends out CORS A simple request , Just add one... To the header Origin word paragraph . The browser sends out CORS It's not a simple request , Will be before formal correspondence , Add a HTTP Query request , be called ” preview ” request (preflight). The browser asks the server first , Whether the domain name of the current web page is in the server's license list , And what can be used HTTP Verb and header fields . Only a positive response , Browser will send out official XMLHttpRequest request , Otherwise, it will be wrong .
As long as the following two conditions are met , It's a simple request .
(1) The request method is one of three :
HEAD
GET
POST
(2)HTTP The header information of does not exceed the following fields :
Accept
Accept-Language
Content-Language
Last-Event-ID
Content-Type: Three values only application/x-www-form-urlencoded、multipart/form-data、text/plain
If the above two conditions are not met at the same time , It's not a simple request .
Browser processing of these two requests , It's different .
* The difference between simple request and non simple request ?
A simple request : One request
It's not a simple request : Two requests , Before sending data, a request will be sent to do “ preview ”, Only “ preview ” Send another request for data transmission after passing .
* About “ preview ”
- Request mode :OPTIONS
- “ preview ” In fact, check it out , Check that data transfer is allowed if passed , If the check fails, the message that you really want to send will not be sent
- how “ preview ”
=> If the complex request is PUT Equal request , Then the server needs to set to allow a request , otherwise “ preview ” Not through
Access-Control-Request-Method
=> If a complex request has a request header set , The server needs to set a request header to allow , otherwise “ preview ” Not through
Access-Control-Request-Headers
Support cross-domain , A simple request
Server set response header :Access-Control-Allow-Origin = ‘ domain name ’ or ‘*’
Support cross-domain , Complex request
Due to complex requests , It will be sent first “ preview ” request , If “ preview ” success , Send real data .
Add the allowed information... To the returned result ( A simple request )
def test(request):
import json
obj=HttpResponse(json.dumps({
'name':'lqz'}))
# obj['Access-Control-Allow-Origin']='*'
obj['Access-Control-Allow-Origin']='http://127.0.0.1:8004'
return obj
Put it in middleware to handle complex and simple requests :
from django.utils.deprecation import MiddlewareMixin
class CorsMiddleWare(MiddlewareMixin):
def process_response(self,request,response):
if request.method=="OPTIONS":
# You can add *
response["Access-Control-Allow-Headers"]="Content-Type"
response["Access-Control-Allow-Origin"] = "http://localhost:8080"
return response
1、 A long time ago ,Web Basically, it's just browsing documents , Since it's browsing , As a server , There's no need to record who's browsing what documents at a certain time , Every request is a new HTTP agreement , It's request plus response , Especially I don't have to remember who just sent it HTTP request , Every request is new to me . This period of time is very hi pi
2、 But with interaction Web The rise of applications , Like online shopping sites , Websites that need to be logged in , There's a problem right now , It's about managing conversations , You have to remember who's logged into the system , Who put the goods in their shopping cart , That is to say, I have to distinguish everyone , This is a big challenge , because HTTP Request is stateless , So the way I came up with was to send you a conversation sign (session id), To put it bluntly, it's a random string , Everyone receives different , Every time I was asked to HTTP On request , Take this string with you , So I can tell who is who
3、 In this way, everyone is very happy , But the server is not hi pi , Everyone just needs to keep their own session id, And the server keeps everyone's session id ! If there are more servers to visit , It's going to be thousands of , Even hundreds of thousands .
This is a huge overhead for the server , It severely limits the server's scalability , For example, I use two machines to form a cluster , Small F By machine A Logged into the system , that session id Will be stored in the machine A On , Hypothetical F The next request for is forwarded to the machine B What do I do ? machine B No small F Of session id ah .
Sometimes I use a little trick : session sticky , It's to let little F The request has been stuck in the machine A On , But it doesn't work , If the machine A Hang up , We have to switch to the machine B Go to .
Then we have to do session The copy of , hold session id Move between two machines , I'm exhausted .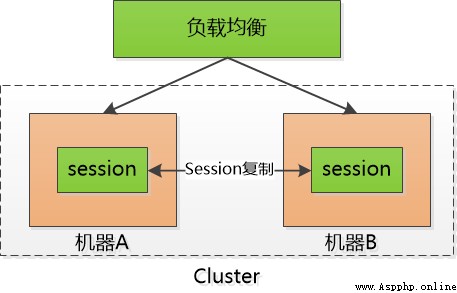
Then there was a man named Memcached I've got a move : hold session id Centralized storage in one place , All the machines are here to access the data , thus , You don't have to copy , But it increases the possibility of a single point of failure , If that one is responsible for session The machine of has been hung up , Everyone has to log in again , I guess I'll be scolded to death .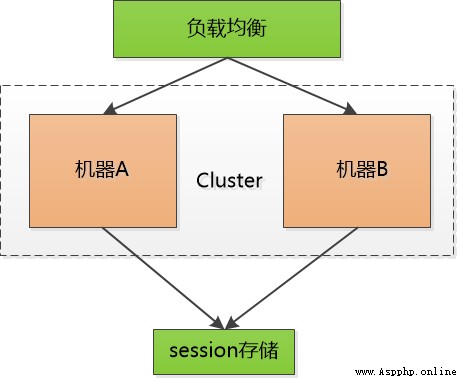
Also try to cluster this single point machine , Increase reliability , But no matter what , This little session It's a heavy burden for me
4 So someone has been thinking , Why should I keep this hateful session Well , Only let each client save it ?
But if you don't save these session id , How to verify the client sent me session id I did make it ? If you don't verify , We don't know if they are legitimate users , Those bad guys can fake session id , Get your way .
Um. , by the way , The key point is to verify !
for instance , Small F Already logged into the system , I sent him a token (token), It contains little F Of user id, Next time small F Through again Http When asked to visit me , Put this token adopt Http header Just bring it here .
But this is the same as session id There is no essential difference , Anyone can forge , So I have to think of something , Let others not forge .
Then make a signature on the data , For example, I use HMAC-SHA256 Algorithm , Add a key that only I know , Make a signature on the data , Take this signature and the data as token , Because the key is unknown to others , You can't fake token 了 .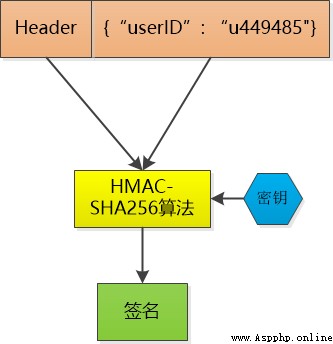
This token I don't save , When small F Put this token When you send it to me , I use the same HMAC-SHA256 The algorithm and the same key , Calculate the signature of the data again , and token Make a comparison of the signatures in , If the same , I knew little F It's already logged in , And it can be taken directly to the small F Of user id , If it's not the same , The data must have been tampered with , I'll tell the sender : I'm sorry , No certification .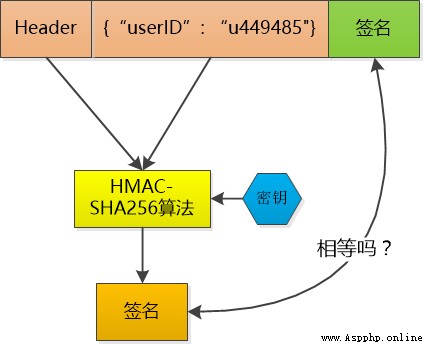
Token The data in is stored in clear text ( Although I can use Base64 Make the code , But that's not encryption ), It can be seen by others , So I can't keep sensitive information like passwords in it .
Of course , If a person's token Stolen by someone else , Then I can't either , I also think thieves are legitimate users , This is actually with a person's session id It's the same to be stolen .
thus , I don't save session id 了 , I just generate token , And then verify token , I use my CPU Calculate the time to get my session Storage space !
Lifted session id This burden , It can be said that everything is light , My machine cluster can now easily do horizontal expansion , Increased user access , Just add the machine directly . This feeling of Statelessness is so good !
cookie It's a very specific thing , It refers to a kind of data that can be stored permanently in the browser , It's just a data storage function implemented by browser .
cookie Generated by the server , Send it to the browser , Browser handle cookie With kv Save form to a text file in a directory , The next time you request the same website, you will send the cookie Send to the server . because cookie It's on the client side , So browsers add some restrictions to make sure cookie Will not be used maliciously , It doesn't take up too much disk space at the same time , So for each domain cookie The quantity is limited .
session Literally , It's conversation . It's like talking to someone , How do you know that Zhang three is talking to you instead of Li Sine ? The other party must have some characteristics ( Looks, etc ) It shows that he is Zhang San .
session It's the same thing , The server needs to know who is sending the request to itself . To make this distinction , The server is going to assign each client a different “ Identification ”, Then every time the client sends a request to the server , Take this with you “ Identification ”, The server knows who the request comes from . As for how the client saves this “ Identification ”, There are many ways , For browser clients , Everyone defaults to cookie The way .
Server usage session Save the user's information on the server temporarily , After the user leaves the website session Will be destroyed . This kind of user information storage mode is relative cookie It's safer , But session There is a flaw : If web The server has done load balancing , When the next operation request arrives at another server session Will lose .
stay Web The domain is based on Token Authentication is everywhere . In most uses Web API Of the Internet companies ,tokens It's the best way to handle authentication under multi-user environment .
Here are a few features you can use in your application based on Token Authentication of
1. No state 、 Scalable
2. Support for mobile devices
3. Cross program calls
4. Security
Those uses are based on Token The authentication guys of
Most of what you've seen API and Web Applications use tokens. for example Facebook, Twitter, Google+, GitHub etc. .
Token The origin of
In the introduction based on Token The principles and advantages of authentication before , Might as well look at the previous certification is how to do .
Server based authentication
We all know HTTP Protocol is stateless , This statelessness means that the program needs to verify every request , So as to identify the client .
before this , Programs are stored in the server through the login information to identify the request . This is usually done by storing Session To complete .
The following figure shows the principle of server based authentication
With Web, Applications , The rise of mobile terminals , This kind of verification gradually exposes the problem . Especially in terms of scalability .
Based on some problems exposed by server authentication
1.Seesion: Every time an authenticated user initiates a request , The server needs to create a record to store information . When more and more users make requests , Memory overhead will also increase .
2. Extensibility : Use... In the memory of the server Seesion Store login information , Along with that comes the issue of scalability .
3.CORS( Cross-domain resource sharing ): When we need to use data across multiple mobile devices , Cross domain resource sharing will be a headache . In the use of Ajax Grab resources from another domain , You can have a prohibition request situation .
4.CSRF( Cross-site request forgery ): When users visit the bank website , They are vulnerable to cross site requests forged attacks , And can be used to visit other websites .
In these questions , Extensible lines are the most prominent . So it's necessary for us to find a more effective way .
be based on Token The principle of verification
be based on Token Is stateless , We don't store user information on servers or Session in .
This concept solves many problems in storing information on the server
NoSession That means your program can add or remove machines as needed , Instead of worrying about whether users log in .
be based on Token The process of authentication is as follows :
1. The user sends the request through the user name and password .
2. Program validation .
3. The program returns a signed token To the client .
4. Client store token, And every time it's used to send requests .
5. Server side validation token And return the data .
Every request requires token.token belong HTTP The header is sent so that Http Request stateless . We also set the server properties Access-Control-Allow-Origin:* , Allow the server to accept requests from all domains . The main thing that needs to be done is , stay ACAO Mark on the head (designating)* when , Do not carry the image HTTP authentication , client SSL Certificates and cookies Certificate .
Realize the idea :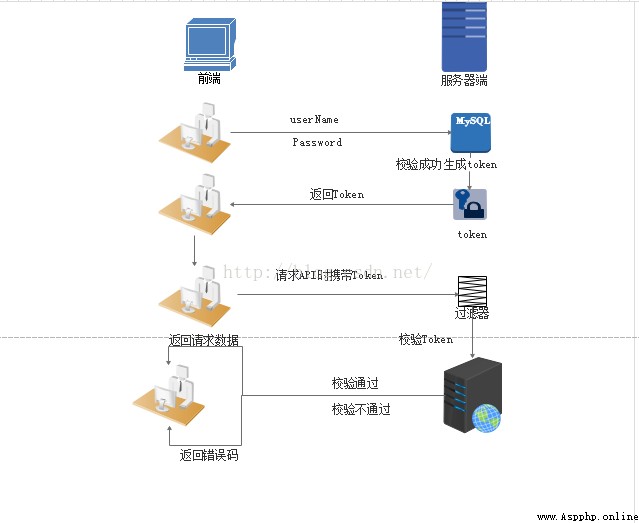
1. User login verification , Return after successful verification Token To the client .
2. The client receives the data and saves it in the client
3. Every client visit API It's carrying Token To the server side .
4. Server side uses filter Filter calibration . If the verification is successful, the request data will be returned , Error code will be returned if verification fails
When we authenticate the information in the program and get token after , We can get through this Token Do a lot of things .
We can even create a permission based token Pass it on to a third-party application , These third-party programs can get our data ( Of course, only when we allow specific token)
Tokens The advantages of
No state 、 Scalable
Stored on the client Tokens It's stateless , And can be extended . Based on this stateless and non storage Session Information , Load balancer can transfer user information from one service to other servers .
If we save the information of authenticated users in Session in , Each request requires the user to send authentication information to the authenticated server ( be called Session Affinity ). When the number of users is large , It may cause
Some congestion .
But don't worry . Use tokens After that, all these problems are solved , because tokens own hold User's authentication information .
Security
Send on request token Instead of sending cookie Can prevent CSRF( Cross-site request forgery ). Even in the client cookie Storage token,cookie It's just a storage mechanism, not for authentication . Do not store information in Session in , Let's lose the right to session operation .
token It's time limited , After a period of time, the user needs to revalidate . We don't have to wait token Automatic failure ,token There is a retraction operation , adopt token revocataion Can make a specific token Or a group with the same certification token Invalid .
Extensibility ()
Tokens Can create programs that share permissions with other programs . for example , Can put a casual social account and its own large size (Fackbook or Twitter) Connect . When logging in through the service Twitter( We'll take this process Buffer) when , We can put these Buffer Attached to Twitter On the data stream of (we are allowing Buffer to post to our Twitter stream).
Use tokens when , Optional permissions can be provided to third-party applications . When users want another application to access their data , We can build our own API, The tokens.
Multi platform cross domain
Let's talk about it in advance CORS( Cross-domain resource sharing ), When extending applications and services , Need to be involved in a variety of devices and Applications .
Having our API just serve data, we can also make the design choice to serve assets from a CDN. This eliminates the issues that CORS brings up after we set a quick header configuration for our application.
As long as the user has a verified token, Data and resources can be requested on any domain .
Access-Control-Allow-Origin: *
Based on standards
establish token When , You can set some options . We will give a more detailed description in the following articles , But the standard usage will be JSON Web Tokens reflect .
Recent programs and documents are provided JSON Web Tokens Of . It supports many languages . This means that in the future, you can really transform your authentication mechanism .