This article mainly introduces “Python first-order-model How to make photos move ” Knowledge about , Xiaobian shows you the operation process through practical cases , The operation method is simple and fast , Practical , Hope this article “Python first-order-model How to make photos move ” The article can help you solve problems .
Let's take a look first README Basic information about the project , It can be seen that in addition to the expression driven photos , You can also move your posture .

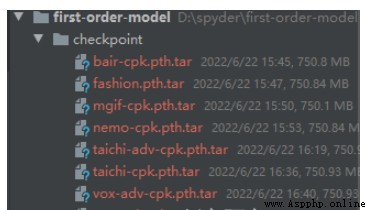
The model file provides an online download address .
take requirements.txt Install the dependency in .

In the test README At the time of the command in , If there is an error .
Traceback (most recent call last):
File "demo.py", line 17, in <module>
from animate import normalize_kp
File "D:\spyder\first-order-model\animate.py", line 7, in <module>
from frames_dataset import PairedDataset
File "D:\spyder\first-order-model\frames_dataset.py", line 10, in <module>
from augmentation import AllAugmentationTransform
File "D:\spyder\first-order-model\augmentation.py", line 13, in <module>
import torchvision
File "C:\Users\huyi\.conda\envs\fom\lib\site-packages\torchvision\__init__.py", line 2, in <module>
from torchvision import datasets
File "C:\Users\huyi\.conda\envs\fom\lib\site-packages\torchvision\datasets\__init__.py", line 9, in <module>
from .fakedata import FakeData
File "C:\Users\huyi\.conda\envs\fom\lib\site-packages\torchvision\datasets\fakedata.py", line 3, in <module>
from .. import transforms
File "C:\Users\huyi\.conda\envs\fom\lib\site-packages\torchvision\transforms\__init__.py", line 1, in <module>
from .transforms import *
File "C:\Users\huyi\.conda\envs\fom\lib\site-packages\torchvision\transforms\transforms.py", line 16, in <module>
from . import functional as F
File "C:\Users\huyi\.conda\envs\fom\lib\site-packages\torchvision\transforms\functional.py", line 5, in <module>
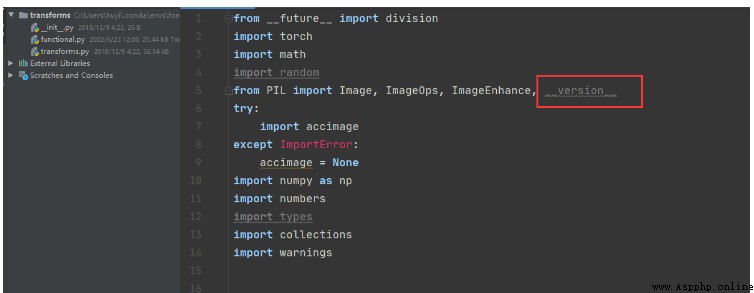
from PIL import Image, ImageOps, ImageEnhance, PILLOW_VERSION
ImportError: cannot import name 'PILLOW_VERSION' from 'PIL' (C:\Users\huyi\.conda\envs\fom\lib\site-packages\PIL\__init__.py)
This question is mainly used by me pillow The reason why the version is too high , If you don't want to find the corresponding lower version , It can be solved in my way .
1、 modify functional.py Code , take PILLOW_VERSION Adjusted for __version__.
2、 take imageio upgrade .
pip install --upgrade imageio -i https://pypi.douban.com/simple
3、 install imageio_ffmpeg modular .
pip install imageio-ffmpeg -i https://pypi.douban.com/simple
I will not repeat the test for the official method of use , You can test it according to the following command .

Here I recommend a visual Library gradio, Below I will demo.py A bit of code transformation .
The new tool file code is as follows :
#!/user/bin/env python# coding=utf-8"""@project : [email protected] : Swordsman a Liang [email protected] : [email protected] : [email protected] : 2022-06-23 14:35:28"""import uuidfrom typing import Optional import gradio as grimport matplotlib matplotlib.use('Agg')import os, sysimport yamlfrom argparse import ArgumentParserfrom tqdm import tqdm import imageioimport numpy as npfrom skimage.transform import resizefrom skimage import img_as_ubyteimport torchfrom sync_batchnorm import DataParallelWithCallback from modules.generator import OcclusionAwareGeneratorfrom modules.keypoint_detector import KPDetectorfrom animate import normalize_kpfrom scipy.spatial import ConvexHull if sys.version_info[0] < 3: raise Exception("You must use Python 3 or higher. Recommended version is Python 3.7") def load_checkpoints(config_path, checkpoint_path, cpu=False): with open(config_path) as f: config = yaml.load(f) generator = OcclusionAwareGenerator(**config['model_params']['generator_params'], **config['model_params']['common_params']) if not cpu: generator.cuda() kp_detector = KPDetector(**config['model_params']['kp_detector_params'], **config['model_params']['common_params']) if not cpu: kp_detector.cuda() if cpu: checkpoint = torch.load(checkpoint_path, map_location=torch.device('cpu')) else: checkpoint = torch.load(checkpoint_path) generator.load_state_dict(checkpoint['generator']) kp_detector.load_state_dict(checkpoint['kp_detector']) if not cpu: generator = DataParallelWithCallback(generator) kp_detector = DataParallelWithCallback(kp_detector) generator.eval() kp_detector.eval() return generator, kp_detector def make_animation(source_image, driving_video, generator, kp_detector, relative=True, adapt_movement_scale=True, cpu=False): with torch.no_grad(): predictions = [] source = torch.tensor(source_image[np.newaxis].astype(np.float32)).permute(0, 3, 1, 2) if not cpu: source = source.cuda() driving = torch.tensor(np.array(driving_video)[np.newaxis].astype(np.float32)).permute(0, 4, 1, 2, 3) kp_source = kp_detector(source) kp_driving_initial = kp_detector(driving[:, :, 0]) for frame_idx in tqdm(range(driving.shape[2])): driving_frame = driving[:, :, frame_idx] if not cpu: driving_frame = driving_frame.cuda() kp_driving = kp_detector(driving_frame) kp_norm = normalize_kp(kp_source=kp_source, kp_driving=kp_driving, kp_driving_initial=kp_driving_initial, use_relative_movement=relative, use_relative_jacobian=relative, adapt_movement_scale=adapt_movement_scale) out = generator(source, kp_source=kp_source, kp_driving=kp_norm) predictions.append(np.transpose(out['prediction'].data.cpu().numpy(), [0, 2, 3, 1])[0]) return predictions def find_best_frame(source, driving, cpu=False): import face_alignment def normalize_kp(kp): kp = kp - kp.mean(axis=0, keepdims=True) area = ConvexHull(kp[:, :2]).volume area = np.sqrt(area) kp[:, :2] = kp[:, :2] / area return kp fa = face_alignment.FaceAlignment(face_alignment.LandmarksType._2D, flip_input=True, device='cpu' if cpu else 'cuda') kp_source = fa.get_landmarks(255 * source)[0] kp_source = normalize_kp(kp_source) norm = float('inf') frame_num = 0 for i, image in tqdm(enumerate(driving)): kp_driving = fa.get_landmarks(255 * image)[0] kp_driving = normalize_kp(kp_driving) new_norm = (np.abs(kp_source - kp_driving) ** 2).sum() if new_norm < norm: norm = new_norm frame_num = i return frame_num def h_interface(input_image: str): parser = ArgumentParser() opt = parser.parse_args() opt.config = "./config/vox-256.yaml" opt.checkpoint = "./checkpoint/vox-cpk.pth.tar" opt.source_image = input_image opt.driving_video = "./data/input/ts.mp4" opt.result_video = "./data/result/{}.mp4".format(uuid.uuid1().hex) opt.relative = True opt.adapt_scale = True opt.cpu = True opt.find_best_frame = False opt.best_frame = False # source_image = imageio.imread(opt.source_image) source_image = opt.source_image reader = imageio.get_reader(opt.driving_video) fps = reader.get_meta_data()['fps'] driving_video = [] try: for im in reader: driving_video.append(im) except RuntimeError: pass reader.close() source_image = resize(source_image, (256, 256))[..., :3] driving_video = [resize(frame, (256, 256))[..., :3] for frame in driving_video] generator, kp_detector = load_checkpoints(config_path=opt.config, checkpoint_path=opt.checkpoint, cpu=opt.cpu) if opt.find_best_frame or opt.best_frame is not None: i = opt.best_frame if opt.best_frame is not None else find_best_frame(source_image, driving_video, cpu=opt.cpu) print("Best frame: " + str(i)) driving_forward = driving_video[i:] driving_backward = driving_video[:(i + 1)][::-1] predictions_forward = make_animation(source_image, driving_forward, generator, kp_detector, relative=opt.relative, adapt_movement_scale=opt.adapt_scale, cpu=opt.cpu) predictions_backward = make_animation(source_image, driving_backward, generator, kp_detector, relative=opt.relative, adapt_movement_scale=opt.adapt_scale, cpu=opt.cpu) predictions = predictions_backward[::-1] + predictions_forward[1:] else: predictions = make_animation(source_image, driving_video, generator, kp_detector, relative=opt.relative, adapt_movement_scale=opt.adapt_scale, cpu=opt.cpu) imageio.mimsave(opt.result_video, [img_as_ubyte(frame) for frame in predictions], fps=fps) return opt.result_video if __name__ == "__main__": demo = gr.Interface(h_interface, inputs=[gr.Image(shape=(500, 500))], outputs=[gr.Video()]) demo.launch() # h_interface("C:\\Users\\huyi\\Desktop\\xx3.jpg")Code instructions
1、 The original demo.py Medium main Function content , Re edit as h_interface Method , Input is the picture you want to drive .
2、 among driving_video The parameter uses an expression video recorded by myself ts.mp4, I suggest that you can record a replacement with your mobile phone .
3、 Use gradio To generate the page of the method , The following will show you .
4、 Use uuid Name the resulting video .
The results are as follows
Running on local URL: http://127.0.0.1:7860/
To create a public link, set `share=True` in `launch()`.
Open the local address :http://localhost:7860/
You can see that the interactive interface we implemented is as follows :
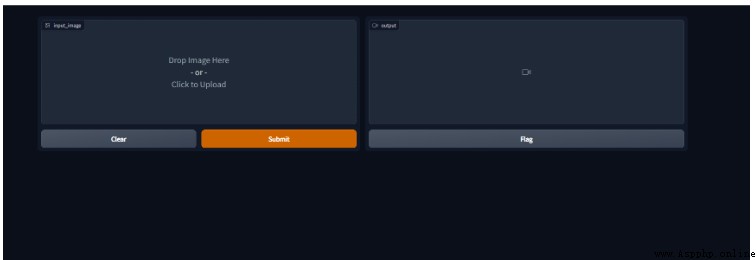
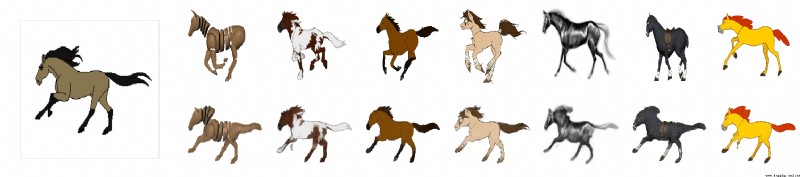
Let's upload the sample image I prepared , Submit for production .

Look at the execution log , Here's the picture .

Take a look at the production results .

Because I can't upload the video , I turned the video into gif.

About “Python first-order-model How to make photos move ” That's all for , Thanks for reading . If you want to know more about the industry , You can pay attention to the Yisu cloud industry information channel , Xiaobian will update different knowledge points for you every day .