Jetty是一個用 Java 實現、開源、基於標准的,並且具有豐富功能的 Http 服務器和 Web 容器。Jetty中應用最廣泛的一項功能就是可以作為嵌入式Web容器。
本文將著重介紹如何配置使用Jetty的嵌入式Web容器功能,關於Jetty的基本配置和功能請參考http://www.ibm.com/developerworks/cn/web/wa-lo-jetty/
一、開發階段
1、使用maven啟動Jetty
我們修改了源碼的時候eclipse會自動編譯,Jetty Maven Plugin插件發現編譯文件有變化後會自動更新到jetty容器中,非常方便我們進行開發。
首先定義Jetty的版本屬性
1 2 3<properties>
<jetty.version>8.1.9.v20130131</jetty.version>
</properties>
然後引入Jetty依賴
1 2 3 4 5 6 7 8 9 10 11 12 13<!-- jetty -->
<dependency>
<groupId>org.eclipse.jetty.aggregate</groupId>
<artifactId>jetty-webapp</artifactId>
<version>${jetty.version}</version>
<scope>test</scope>
</dependency>
<dependency>
<groupId>org.eclipse.jetty</groupId>
<artifactId>jetty-jsp</artifactId>
<version>${jetty.version}</version>
<scope>test</scope>
</dependency>
配置Jetty Maven Plugin插件,示例如下
1 2 3 4 5 6 7 8 9 10 11 12 13 14 15 16 17 18<plugin>
<groupId>org.mortbay.jetty</groupId>
<artifactId>jetty-maven-plugin</artifactId>
<version>${jetty.version}</version>
<configuration>
<systemProperties>
<systemProperty>
<name>spring.profiles.active</name>
<value>development</value>
</systemProperty>
</systemProperties>
<useTestClasspath>true</useTestClasspath>
<webAppConfig>
<contextPath>/${project.artifactId}</contextPath>
</webAppConfig>
</configuration>
</plugin>
該配置運行jetty並指定spring的profile為development,同時設定web應用的上下文地址與應用本身的artifactId一致。
執行如下命令啟動Jetty,即可通過http://localhost:8080/${project.artifactId}訪問Web應用。
1mvn jetty:run
Jetty Maven Plugin插件支持多個maven goals,最常用的就是run,下面的參數支持大部分的goals
(1)配置Jetty容器(支持所有goals)
比如org.mortbay.jetty.NCSARequestLog就是一個NCSA格式((美國)國家超級計算技術應用中心 (NCSA) 公用格式,是常用的標准日志格式)的實現。
(2)配置Web應用程序(不支持run-forked、stop兩個goals)
run goals將會啟動Jetty並運行應用程序,不需要應用程序編譯成war包。另外run還支持webapp節點的其它屬性:
Jetty Maven Plugin插件支持的其它goals簡介如下(詳見http://wiki.eclipse.org/Jetty/Feature/Jetty_Maven_Plugin):
2、在java中啟動Jetty
SpringSide4中封裝了Jetty的操作提供了工具類JettyFactory ,讓我們可以很簡單的啟動Jetty容器,JettyFactory代碼如下:
/**
* Copyright (c) 2005-2012 springside.org.cn
*
* Licensed under the Apache License, Version 2.0 (the "License");
*/
package org.springside.modules.test.jetty;
import java.util.List;
import org.apache.commons.lang3.StringUtils;
import org.eclipse.jetty.server.Connector;
import org.eclipse.jetty.server.Server;
import org.eclipse.jetty.server.nio.SelectChannelConnector;
import org.eclipse.jetty.webapp.WebAppClassLoader;
import org.eclipse.jetty.webapp.WebAppContext;
import com.google.common.collect.Lists;
/**
* 創建Jetty Server的工廠類.
*
* @author calvin
*/
public class JettyFactory {
private static final String DEFAULT_WEBAPP_PATH = "src/main/webapp";
private static final String WINDOWS_WEBDEFAULT_PATH = "jetty/webdefault-windows.xml";
/**
* 創建用於開發運行調試的Jetty Server, 以src/main/webapp為Web應用目錄.
*/
public static Server createServerInSource(int port, String contextPath) {
Server server = new Server();
// 設置在JVM退出時關閉Jetty的鉤子。
server.setStopAtShutdown(true);
SelectChannelConnector connector = new SelectChannelConnector();
connector.setPort(port);
// 解決Windows下重復啟動Jetty居然不報告端口沖突的問題.
connector.setReuseAddress(false);
server.setConnectors(new Connector[] { connector });
WebAppContext webContext = new WebAppContext(DEFAULT_WEBAPP_PATH, contextPath);
// 修改webdefault.xml,解決Windows下Jetty Lock住靜態文件的問題.
webContext.setDefaultsDescriptor(WINDOWS_WEBDEFAULT_PATH);
server.setHandler(webContext);
return server;
}
/**
* 設置除jstl-*.jar外其他含tld文件的jar包的名稱.
* jar名稱不需要版本號,如sitemesh, shiro-web
*/
public static void setTldJarNames(Server server, String... jarNames) {
WebAppContext context = (WebAppContext) server.getHandler();
List<String> jarNameExprssions = Lists.newArrayList(".*/jstl-[^/]*\\.jar$", ".*/.*taglibs[^/]*\\.jar$");
for (String jarName : jarNames) {
jarNameExprssions.add(".*/" + jarName + "-[^/]*\\.jar$");
}
context.setAttribute("org.eclipse.jetty.server.webapp.ContainerIncludeJarPattern",
StringUtils.join(jarNameExprssions, '|'));
}
/**
* 快速重新啟動application,重載target/classes與target/test-classes.
*/
public static void reloadContext(Server server) throws Exception {
WebAppContext context = (WebAppContext) server.getHandler();
System.out.println("[INFO] Application reloading");
context.stop();
WebAppClassLoader classLoader = new WebAppClassLoader(context);
classLoader.addClassPath("target/classes");
classLoader.addClassPath("target/test-classes");
context.setClassLoader(classLoader);
context.start();
System.out.println("[INFO] Application reloaded");
}
}
JettyFactory包含三個方法
調用JettyFactory在Jetty中運行調試Maven Web應用的示例代碼如下:
1 2 3 4 5 6 7 8 9 10 11 12 13 14 15 16 17 18 19 20 21 22 23 24 25 26 27 28 29 30 31 32 33 34 35 36 37 38 39 40 41 42 43 44 45package org.springside.examples.quickstart;
import org.eclipse.jetty.server.Server;
import org.springside.modules.test.jetty.JettyFactory;
import org.springside.modules.test.spring.Profiles;
/**
* 使用Jetty運行調試Web應用, 在Console輸入回車快速重新加載應用.
*
* @author calvin
*/
public class QuickStartServer {
public static final int PORT = 8080;
public static final String CONTEXT = "/quickstart";
public static final String[] TLD_JAR_NAMES = new String[] { "sitemesh", "spring-webmvc", "shiro-web",
"springside-core" };
public static void main(String[] args) throws Exception {
// 設定Spring的profile
Profiles.setProfileAsSystemProperty(Profiles.DEVELOPMENT);
// 啟動Jetty
Server server = JettyFactory.createServerInSource(PORT, CONTEXT);
JettyFactory.setTldJarNames(server, TLD_JAR_NAMES);
try {
server.start();
System.out.println("[INFO] Server running at http://localhost:" + PORT + CONTEXT);
System.out.println("[HINT] Hit Enter to reload the application quickly");
// 等待用戶輸入回車重載應用.
while (true) {
char c = (char) System.in.read();
if (c == '\n') {
JettyFactory.reloadContext(server);
}
}
} catch (Exception e) {
e.printStackTrace();
System.exit(-1);
}
}
}
上段代碼還提供了通過捕獲在console中輸入的回車自動重新載入上下文,並重新載入Class文件,提高了響應速度。
在執行main方法過程中如果發生如下錯誤:
class “javax.servlet.HttpConstraintElement”‘s signer information does not match signer information of other classes in the same package
通過執行如下命令檢查依賴
1mvn dependency:tree -Dverbose|grep servlet
檢查結果如圖
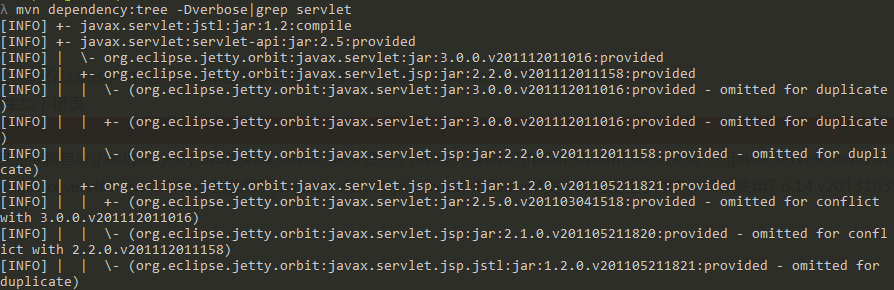
發現是因為Jetty8版本的包的依賴包org.eclipse.jetty.orbit.javax.servlet3.0.jar提供了javax.servlet.HttpConstraintElement類,而javax.servlet.servlet-api.jar的依賴包javax.servlet.javax.servlet-api-3.0.1.jar也提供了javax.servlet.HttpConstraintElement類,兩者發生了沖突。可以使用7.6.14.v20131031版本的Jetty解決此問題。
二、測試階段
在功能測試或集成測試階段,希望在測試開始時自動運行Jetty加載項目進行測試,測試完成時停止Jetty容器。Jetty Maven Plugin插件可以幫助我們完成這種自動化工作。配置示例如下:
1 2 3 4 5 6 7 8 9 10 11 12 13 14 15 16 17 18 19 20 21 22 23 24 25 26 27 28 29<plugin>
<groupId>org.mortbay.jetty</groupId>
<artifactId>jetty-maven-plugin</artifactId>
<configuration>
<scanIntervalSeconds>10</scanIntervalSeconds>
<stopKey>foo</stopKey>
<stopPort>9999</stopPort>
</configuration>
<executions>
<execution>
<id>start-jetty</id>
<phase>pre-integration-test</phase>
<goals>
<goal>start</goal>
</goals>
<configuration>
<scanIntervalSeconds>0</scanIntervalSeconds>
<daemon>true</daemon>
</configuration>
</execution>
<execution>
<id>stop-jetty</id>
<phase>post-integration-test</phase>
<goals>
<goal>stop</goal>
</goals>
</execution>
</executions>
</plugin>
在上述配置中,通過execution來自定義運行階段:
使用<daemon>true</daemon>配置選項來預防Jetty無限期運行,迫使它只在執行Maven時才運行。
三、運行階段
為了能夠創建可以直接運行的war包,需要把jetty jar包解開,將其中的class直接編譯到war包中,並需要在war中提供一個可以創建並運行Jetty的Main方法。本文提供兩種實現方法:
方法一
SpringSide4中提供了一種實現方法,稍加修改優化後步驟如下:
1、使用maven-assembly-plugin重新打包
maven-assembly-plugin插件能將應用程序打包成指定格式的分發包,更重要的是能夠自定義包含/排除指定的目錄或文件。
為方便操作,單獨建立一個Maven Profile用於打包,配置如下:
1 2 3 4 5 6 7 8 9 10 11 12 13 14 15 16 17 18 19 20 21 22 23 24 25 26 27 28 29<profile>
<id>standalone</id>
<build>
<plugins>
<plugin>
<groupId>org.apache.maven.plugins</groupId>
<artifactId>maven-assembly-plugin</artifactId>
<executions>
<execution>
<phase>package</phase>
<goals>
<goal>single</goal>
</goals>
<configuration>
<descriptors>
<descriptor>assembly-standalone.xml</descriptor>
</descriptors>
<archive>
<manifest>
<mainClass>org.springside.examples.showcase.Main</mainClass>
</manifest>
</archive>
</configuration>
</execution>
</executions>
</plugin>
</plugins>
</build>
</profile>
上述配置中,通過execution配置打包操作在package階段開始,引入assembly-standalone.xml文件定義打包的規則,配置archive修改war包中的META-INF/Manifest.mf,替換main class為org.springside.examples.showcase.Main。
assembly-standalone.xml中的配置如下:
1 2 3 4 5 6 7 8 9 10 11 12 13 14 15 16 17 18 19 20 21 22 23 24 25 26 27 28 29 30 31 32 33 34 35 36 37 38 39 40 41 42 43 44<?xml version="1.0" encoding="UTF-8"?>
<assembly xmlns="http://maven.apache.org/plugins/maven-assembly-plugin/assembly/1.1.2" xmlns:xsi="http://www.w3.org/2001/XMLSchema-instance"
xsi:schemaLocation="http://maven.apache.org/plugins/maven-assembly-plugin/assembly/1.1.2 http://maven.apache.org/xsd/assembly-1.1.2.xsd">
<id>standalone</id>
<formats>
<format>war</format>
</formats>
<includeBaseDirectory>false</includeBaseDirectory>
<dependencySets>
<dependencySet>
<outputDirectory>/</outputDirectory>
<includes>
<include>org.eclipse.jetty*:*</include>
</includes>
<scope>provided</scope>
<unpack>true</unpack>
<unpackOptions>
<excludes>
<exclude>*</exclude>
<exclude>META-INF/*</exclude>
<exclude>about_files/*</exclude>
</excludes>
</unpackOptions>
</dependencySet>
</dependencySets>
<fileSets>
<fileSet>
<directory>${project.basedir}/target/${project.build.finalName}</directory>
<outputDirectory>/</outputDirectory>
<excludes>
<exclude>META-INF/**/*</exclude>
</excludes>
</fileSet>
<fileSet>
<directory>${project.basedir}/target/classes</directory>
<includes>
<include>**/*/Main.class</include>
</includes>
<outputDirectory>/</outputDirectory>
</fileSet>
</fileSets>
</assembly>
assembly-standalone.xml涉及到幾個關鍵點:
2、使用代碼創建Jetty容器
1 2 3 4 5 6 7 8 9 10 11 12 13 14 15 16 17 18 19 20 21 22 23 24 25 26 27 28 29 30 31 32 33 34 35 36 37 38 39 40 41 42 43 44 45 46 47 48 49 50 51 52 53 54 55package org.springside.examples.quickstart;
import java.io.File;
import java.net.URL;
import java.security.ProtectionDomain;
import org.eclipse.jetty.server.Server;
import org.eclipse.jetty.webapp.WebAppContext;
/**
* Main Class for standalone running.
*
* @author calvin
*/
public class Main {
public static void main(String[] args) throws Exception {
String contextPath = "/";
int port = Integer.getInteger("port", 8080);
Server server = createServer(contextPath, port);
try {
server.start();
server.join();
} catch (Exception e) {
e.printStackTrace();
System.exit(100);
}
}
private static Server createServer(String contextPath, int port) {
// use Eclipse JDT compiler
System.setProperty("org.apache.jasper.compiler.disablejsr199", "true");
Server server = new Server(port);
server.setStopAtShutdown(true);
ProtectionDomain protectionDomain = Main.class.getProtectionDomain();
URL location = protectionDomain.getCodeSource().getLocation();
String warFile = location.toExternalForm();
WebAppContext context = new WebAppContext(warFile, contextPath);
context.setServer(server);
// 設置work dir,war包將解壓到該目錄,jsp編譯後的文件也將放入其中。
String currentDir = new File(location.getPath()).getParent();
File workDir = new File(currentDir, "work");
context.setTempDirectory(workDir);
server.setHandler(context);
return server;
}
}
createServer方法負責創建Jetty服務,獲取war包路徑,創建context及工作目錄
main方法負責調用createServer方法創建Jetty服務,設置上下文路徑及啟動端口,並啟動Jetty服務,另外如果war包所在的路徑包含中文,則獲取路徑的代碼應修改為:
1 2 3ProtectionDomain protectionDomain = Main.class.getProtectionDomain();
URL location = protectionDomain.getCodeSource().getLocation();
location = java.net.URLDecoder.decode(location , "utf-8");
3、注意事項
通過以上配置,已經可以在Web應用程序內嵌入Jetty容器了,但還需要注意以下幾點
Maven Pom中的Jetty依賴注意scope修改為provided,防止Jetty的Jar包被打到WEB-INF/lib中。
如果需要解析jsp頁面,需要在依賴中加入jsp-2.1-glassfish包的引用,注意其scope不能設置為provided
<dependency>
<groupId>org.mortbay.jetty</groupId>
<artifactId>jsp-2.1-glassfish</artifactId>
<version>2.1.v20100127</version>
</dependency>
由於Jetty只會在容器的classpath中尋找jstl tags,所以需要注意將jstl包拆包到Jetty容器的classpath中,但是jetty-7 (7.6.9)、jetty-8 (8.1.9)、jetty-9 (9.0.0.M4)之後的版本內嵌了jstl包,不需要添加jstl包。
4、運行
執行如下命令將Web應用打包成war包,在${project.basedir}/target目錄下將會生成嵌入Jetty容器的war包。
mvn package -Pstandalone
通過如下命令運行war包。
1Java -Xms2048m -Xmx2048m -XX:MaxPermSize=128m -jar xxx.war
方法二
方法一中主要是使用了maven-assembly-plugin進行自定義打包,除此之外還可以使用maven-war-plugin、maven-antrun-plugin、maven-dependency-plugin、maven-compiler-plugin共同實現創建可執行的war包
Maven POM配置示例如下:
1 2 3 4 5 6 7 8 9 10 11 12 13 14 15 16 17 18 19 20 21 22 23 24 25 26 27 28 29 30 31 32 33 34 35 36 37 38 39 40 41 42 43 44 45 46 47 48 49 50 51 52 53 54 55 56 57 58 59 60 61 62 63 64 65 66 67 68 69 70 71 72 73 74 75 76 77 78 79 80 81<profile>
<id>standalone</id>
<build>
<finalName>quickstart</finalName>
<plugins>
<plugin>
<groupId>org.apache.maven.plugins</groupId>
<artifactId>maven-war-plugin</artifactId>
<version>2.3</version>
<configuration>
<archive>
<manifest>
<mainClass>org.springside.examples.quickstart.Main</mainClass>
</manifest>
</archive>
<warName>${project.artifactId}-standalone</warName>
</configuration>
</plugin>
<plugin>
<groupId>org.apache.maven.plugins</groupId>
<artifactId>maven-antrun-plugin</artifactId>
<version>1.7</version>
<executions>
<execution>
<id>main-class-placement</id>
<phase>prepare-package</phase>
<configuration>
<target>
<move todir="${project.build.directory}/${project.artifactId}/">
<fileset dir="${project.build.directory}/classes/">
<include name="**/*/Main.class" />
</fileset>
</move>
</target>
</configuration>
<goals>
<goal>run</goal>
</goals>
</execution>
</executions>
</plugin>
<plugin>
<groupId>org.apache.maven.plugins</groupId>
<artifactId>maven-dependency-plugin</artifactId>
<version>2.5.1</version>
<executions>
<execution>
<id>jetty-classpath</id>
<phase>prepare-package</phase>
<goals>
<goal>unpack-dependencies</goal>
</goals>
<configuration>
<includeGroupIds>org.eclipse.jetty, org.eclipse.jetty.orbit,
javax.servlet</includeGroupIds>
<includeScope>provided</includeScope>
<!-- remove some files in order to decrease size -->
<excludes>*, about_files/*, META-INF/*</excludes>
<!-- <excludeArtifactIds>jsp-api,jstl</excludeArtifactIds> -->
<outputDirectory>
${project.build.directory}/${project.artifactId}
</outputDirectory>
</configuration>
</execution>
</executions>
</plugin>
<!-- to support compilation in linux -->
<plugin>
<groupId>org.apache.maven.plugins</groupId>
<artifactId>maven-compiler-plugin</artifactId>
<version>2.5.1</version>
<configuration>
<target>1.6</target>
<source>1.6</source>
<encoding>UTF-8</encoding>
</configuration>
</plugin>
</plugins>
</build>
</profile>
注意事項、org.springside.examples.showcase.Main類實現及運行方法同方法一。
問啊-一鍵呼叫程序員答題神器,牛人一對一服務,開發者編程必備官方網站:www.wenaaa.com
QQ群290551701 聚集很多互聯網精英,技術總監,架構師,項目經理!開源技術研究,歡迎業內人士,大牛及新手有志於從事IT行業人員進入!