import tkinter as tk
import ttkbootstrap
from tkinter import Frame, ttk, scrolledtext, Button, VERTICAL, NS, NSEW, END, Label
class RunMain(object):
def __init__(self):
pass
def interface_main(self):
self.window = ttkbootstrap.Window(themename="pulse")
# 設置標題
self.window.title('實驗界面')
# 窗口的位置和大小
sw = self.window.winfo_screenwidth()
# 得到屏幕寬度
sh = self.window.winfo_screenheight()
# 得到屏幕高度
ww = 820
wh = 600
# 窗口寬高為500
x = (sw-ww) / 2
y = (sh-wh) / 2
self.window.geometry("%dx%d+%d+%d" % (ww, wh, x, y))
""" 基本布局 """
lable1_line = Label(self.window, text='-' * 66, font=('微軟雅黑', 20), fg='black', bg='#C0D9D9')
lable1_line.place(x=0, y=40)
lable1_title = Label(self.window, text='實驗界面', font=('微軟雅黑', 30), fg='black', bg='#C0D9D9')
lable1_title.place(x=320, y=0)
lable1_edition = Label(self.window, text='版本號v1.0', font=('微軟雅黑', 10), fg='black', bg='#C0D9D9')
lable1_edition.place(x=720, y=30)
# 設置窗口是否可以變化長寬,默認可變
self.window.resizable(width=False, height=False)
frame = Frame(self.window)
# 創建表格
self.tree_date = ttk.Treeview(frame, show='tree headings', height=15)
frame.place(x=10, y=100, width=580)
# 設置x軸和y軸的滾動條
ybar = ttk.Scrollbar(frame, orient=VERTICAL)
ybar.pack(side='right', fill='y')
xbar = ttk.Scrollbar(frame, orient=tk.HORIZONTAL)
xbar.pack(side='bottom', fill='x')
self.tree_date.configure(yscrollcommand=ybar.set, xscrollcommand=xbar.set)
# 定義列
self.tree_date["columns"] = ["name", "age", "weight", "number", "hang", "X"]
self.tree_date.pack()
# 使用commandparameters to bindtreevievw
ybar.config(command=self.tree_date.yview)
xbar.config(command=self.tree_date.xview)
# 設置列寬度
self.tree_date.column("#0", width=90, anchor="center")
self.tree_date.column("name", width=70, anchor="center")
self.tree_date.column("age", width=70, anchor="center")
self.tree_date.column("weight", width=70, anchor="center")
self.tree_date.column("number", width=70, anchor="center")
self.tree_date.column("hang", width=70, anchor="center")
self.tree_date.column("X", width=160, anchor="center")
# 添加列名
self.tree_date.heading("#0", text="循環名")
self.tree_date.heading("name", text="姓名")
self.tree_date.heading("age", text="年齡")
self.tree_date.heading("weight", text="體重")
self.tree_date.heading("number", text="狀態")
self.tree_date.heading("hang", text="行")
self.tree_date.heading("X", text="完成時間")
# # 添加列名
# self.tree_date.heading("#0", text="制式")
# for j in date_columns:
# self.tree_date.heading(j, text=j)
""" 進度條 """
self.jin_du = ttkbootstrap.Meter(
master=self.window,
boot,
subtext,
metertype="full", # 將儀表顯示為一個完整的圓形或半圓形(semi)
# wedgesize=5, #設置弧周圍的指示器楔形長度,如果大於 0,則此楔形設置為以當前儀表值為中心的指示器
amounttotal=100, # 儀表的最大值,默認100
amountused=100, # 儀表的當前值
metersize=140, # 儀表大小
showtext=True, # 指示是否在儀表上顯示左、中、右文本標簽
interactive=False, # 是否可以手動調節數字的大小
textleft='進度:', # 插入到中心文本左側的短字符串
textright='%',
textfont="-size 15", # 中間數字大小
# subtext=" ",
subtextfont="-size 15", # 文本大小
)
self.jin_du.place(x=620, y=260)
""" Description box below """
self.scr_explain = scrolledtext.ScrolledText(self.window, font=('微軟雅黑', 10), width=85, height=6)
self.scr_explain.place(x=10, y=450)
self.run_button = Button(self.window, text="開始運行", font=('微軟雅黑', 20))
self.run_button.place(x=620, y=100)
self.exit_button = Button(self.window, text="退出界面", font=('微軟雅黑', 20))
self.exit_button.place(x=620, y=180)
import time
import sys
import threading
from tkinter import END, messagebox
from configure import RunMain
test_item_num = 0
class MyThread(threading.Thread):
def __init__(self, func, *args):
super().__init__()
self.func = func
self.args = args
self.setDaemon(True)
self.start() # 在這⾥開始
def run(self):
self.func(*self.args)
class DataHandle(RunMain):
def __init__(self):
super().__init__()
# Calculate the total of all test items
def test_number(self):
all_number = 18
return all_number
# The progress bar parameters are displayed
def step_number(self):
global test_item_num
all_number = self.test_number()
# print(all_number)
number = (1 / all_number) * 100
test_item_num = test_item_num + number
self.jin_du.configure(amountused=int(test_item_num))
# Output to the prompt box below
def out_put(self, output: str):
self.scr_explain.insert(END, "{}\n".format(output))
self.scr_explain.yview_moveto(1)
def tool_exit(self):
confirmation_information = messagebox.askquestion('確認操作', 'OK to exit the tool?')
if confirmation_information == "no":
self.out_put("Exit operation canceled!")
return
sys.exit()
# 清空表格
def delButton(self, tree):
x = tree.get_children()
for item in x:
tree.delete(item)
def run_main(self):
# Clear the form and the prompt box below
self.scr_explain.delete(0.0, END)
self.delButton(self.tree_date)
# progress bar clear
global test_item_num
test_item_num = 0
self.jin_du.configure(amountused=0)
# The progress bar display turns blue
self.jin_du.configure(boot)
self.scr_explain.delete(0.0, END)
self.delButton(self.tree_date)
# Create a standard header
sf1 = self.tree_date.insert('', END, text='第一個循環', open=True)
complete_time = time.strftime("%Y.%m.%d %H:%M:%S", time.localtime())
for num in range(1, 10):
# 顯示進度條
self.step_number()
time.sleep(0.1)
self.out_put("表格加載第{}次!".format(num))
data = ["張三", "18", "70kg", "ok", num, complete_time]
# 直接在已有數據後填充
idd = self.tree_date.insert(sf1, END, values=tuple(data))
self.tree_date.see(idd)
self.tree_date.update()
num += 1
# Create a standard header
sf2 = self.tree_date.insert('', END, text='第二個循環', open=True)
for num in range(1, 10):
# 顯示進度條
self.step_number()
time.sleep(0.1)
self.out_put("表格加載第{}次!".format(num))
data = ["李四", "18", "70kg", "ok", num, complete_time]
# 直接在已有數據後填充
idd = self.tree_date.insert(sf2, END, values=tuple(data))
self.tree_date.see(idd)
self.tree_date.update()
num += 1
# 進度條
test_item_num = 0
self.jin_du.configure(boot, amountused=100)
self.out_put("程序運行完成!")
def set_command(self):
self.exit_button.configure(command=self.tool_exit)
self.run_button.configure(command=lambda: MyThread(self.run_main))
# 用x鍵,Prevent files from not being created
self.window.protocol("WM_DELETE_WINDOW", self.tool_exit)
def main(self):
self.interface_main()
self.set_command()
self.window.mainloop()
if __name__ == '__main__':
data_handle = DataHandle()
data_handle.main()
整體界面如下: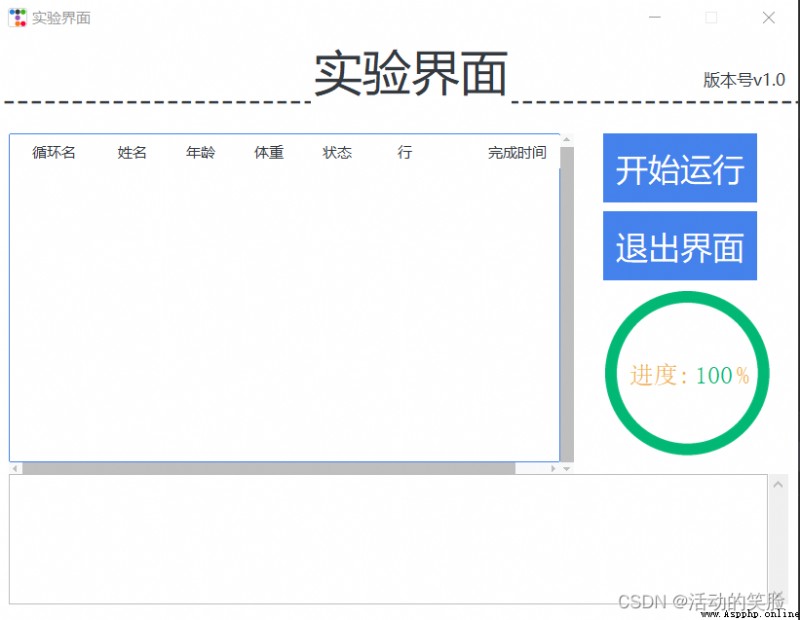
The interface and logical classification are used here,The code is overall concise and easy to read,Also add new features,It can give more comprehensive feedback on the process of code running.
 Python graduation design works are based on the django framework enterprise company website. The finished product (1) Development overview
The whole project includes: op
 How to resolve the failure of installing wordcloud library with PIP in python3.9
Catalog Preface Problems ari