stay 《 Pleasant goat and grey wolf 》2021 year 1 Part of the moon rise 《 Sports heroes pass victory to the basket 》 in , At the end of the last episode , There is a pan shot facing a large background , Use Python You can restore the big background according to this part of the lens .
The basket of pleasant goat and grey wolf wins The first 60 Set champion
Import related libraries
import numpy as np
import cv2
import matplotlib.pyplot as plt
from pyod.models.knn import KNN
Read the first frame in the video
video = cv2.VideoCapture(r'60.mp4') # Read video
ret, leftframe = video.read() # Read frame
Transparency is required for post stitching pictures , So here we turn the picture into 4 passageway
b_channel, g_channel, r_channel = cv2.split(leftframe)
alpha_channel = np.ones(b_channel.shape, dtype=b_channel.dtype) * 255
# The minimum value is 0
#alpha_channel[:, :int(b_channel.shape[0] / 2)] = 100
leftframe = cv2.merge((b_channel, g_channel, r_channel, alpha_channel))
#cv2.imshow('leftframe',leftframe)
Reference resources https://blog.csdn.net/qq878594585/article/details/81901703, First, we need to detect the key feature points of the image . Now? SIFT Can be found in cv2 You can use , Reference resources https://www.dtmao.cc/news_show_359297.shtml
hessian=400
surf=cv2.SIFT_create(hessian) # take Hessian Threshold Set to 400, The larger the threshold, the fewer features can be detected
# to update openCV Version can be used SIFT, Reference resources https://www.dtmao.cc/news_show_359297.shtml
kp1,des1=surf.detectAndCompute(leftframe,None) # Find key points and descriptors
Read the same operation after the next frame
ret, rightframe = video.read() # Read the next frame
b_channel, g_channel, r_channel = cv2.split(rightframe)
alpha_channel = np.ones(b_channel.shape, dtype=b_channel.dtype) * 255
# The minimum value is 0
#alpha_channel[:, :int(b_channel.shape[0] / 2)] = 100
rightframe = cv2.merge((b_channel, g_channel, r_channel, alpha_channel))
print("frameshape:",leftframe.shape,rightframe.shape)
kp2,des2=surf.detectAndCompute(rightframe,None) # Find key points and descriptors
# frameshape: (1080, 1920, 4) (1080, 1920, 4)
Here we continue to refer to https://blog.csdn.net/qq878594585/article/details/81901703
FLANN_INDEX_KDTREE=0 # establish FLANN Matcher parameter
indexParams=dict(algorithm=FLANN_INDEX_KDTREE,trees=5) # Configuration index , The number of density trees is 5
searchParams=dict(checks=50) # Specifies the number of recursions
#FlannBasedMatcher: It is the fastest feature matching algorithm at present ( Nearest neighbor search )
flann=cv2.FlannBasedMatcher(indexParams,searchParams) # Set up matcher
matches=flann.knnMatch(des1,des2,k=2) # Get the key points that match
good=[]
# Extract excellent feature points
for m,n in matches:
if m.distance < 0.7*n.distance: # If the first neighborhood is greater than the second neighborhood 0.7 Times smaller , The retention
good.append(m)
src_pts = np.array([ kp1[m.queryIdx].pt for m in good if kp2[m.trainIdx].pt[1]<=933]) # Query the feature description subindex of the image
dst_pts = np.array([ kp2[m.trainIdx].pt for m in good if kp2[m.trainIdx].pt[1]<=933]) # Training ( Templates ) Image feature description subindex
#H=cv2.findHomography(src_pts,dst_pts) # Generating transformation matrix
h,w=leftframe.shape[:2]
h1,w1=rightframe.shape[:2]
Get all detected key offset vectors
sandian=dst_pts-src_pts
print("sandian:",sandian.shape)
# sandian: (298, 2)
If these scattered points are shown on the graph, it is like this
import mpl_toolkits.axisartist as axisartist
from matplotlib.patches import ConnectionPatch
# https://zhuanlan.zhihu.com/p/40399870
fig=plt.figure()
# Use axisartist.Subplot Method to create a drawing area object ax
ax1=axisartist.Subplot(fig,121)
ax2=axisartist.Subplot(fig,122)
#fig,(ax1,ax2)=plt.subplots(1,2)
for ax in (ax1,ax2):
# adopt set_visible Method to hide all axes in the drawing area
#ax.axis[:].set_visible(False)
#ax.new_floating_axis Represents adding a new axis
ax.axis["x"] = ax.new_floating_axis(0,0)
ax.axis["x"].toggle(all=False)
# to x Axis plus arrow
ax.axis["x"].set_axisline_style("-|>", size = 1.0)
# add to y Axis , And add an arrow
ax.axis["y"] = ax.new_floating_axis(1,0)
ax.axis["y"].toggle(all=False)
ax.axis["y"].set_axisline_style("-|>", size = 1.0)
# Set up x、y The scale on the axis shows the direction
#ax1.axis["x"].set_axis_direction("top")
ax.axis["y"].set_axis_direction("right")
#plt.subplot(1,2,1)
ax1.scatter(*sandian.T)
#plt.subplot(1,2,2)
ax2.scatter(*sandian.T)
ax2.set_xlim(-1,1)
ax2.set_ylim(-1,1)
# Add the drawing area object to the canvas
fig.add_axes(ax1)
fig.add_axes(ax2)
fig.tight_layout(pad=2)
# https://matplotlib.org/stable/gallery/userdemo/connect_simple01.html#sphx-glr-gallery-userdemo-connect-simple01-py
for i in [(-1,-1),(-1,1)]:
con=ConnectionPatch(i,i,ax1.transData,ax2.transData)
fig.add_artist(con)
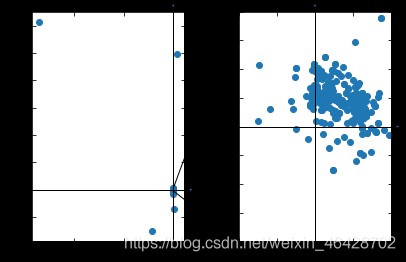
You can see that most of the scatter points are concentrated in a small area , There are only a few outliers , Outliers need to be excluded , Then take the average value to the final translation vector , Reference here https://blog.csdn.net/weixin_42199542/article/details/106885459 Methods .
# Reference resources :https://blog.csdn.net/weixin_42199542/article/details/106885459
clf = KNN(0.5)
clf.fit(sandian)
y_test_pred = clf.predict(sandian)
sandian=sandian[y_test_pred==0]
# Take the average value to the translation vector
pingyi=np.mean(sandian,0)
print("pingyi:",pingyi)
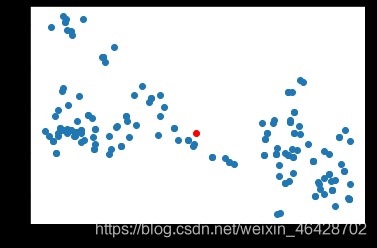
plt.scatter(*sandian.T)
plt.scatter(*pingyi,c='red')
# pingyi: [0.30781024 0.24436529]
Variables to be used later :
h,w Is the height and width of the original picture
h1,w1 Is the height and width of the new picture
zuo The vector that needs to be translated for the original image
you The vector that needs to be translated for the new picture
rows and cols Is the height and width of the composite big picture
pingyi Is the vector from the upper left corner of the new image to the upper left corner of the original image (np.array The coordinate system of takes the upper left corner as the origin )
With the translation of the image , The coordinate system may change , Here is a picture to illustrate .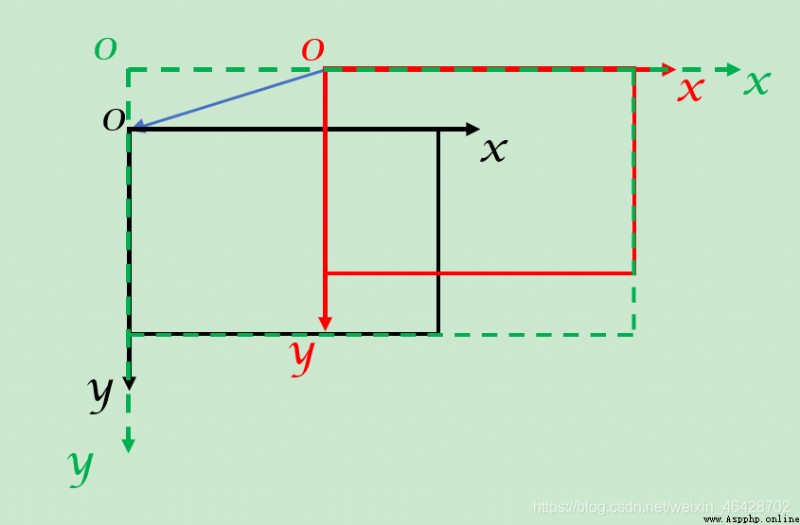
( Black is the original picture , Red is the new picture , Green is the big picture of synthesis , Blue is pingyi)
In this diagram ,pingyi stay x Value in the axial direction ( namely pingyi[0]) Less than 0 Of , At this time, the new picture should be shifted to the right , That is to x Translation in the positive direction of the axis , At the same time, the width of the big picture (cols) by pingyi stay x The absolute value of the value in the axial direction + The width of the new picture (w1);
and pingyi stay y Value in the axial direction ( namely pingyi[1]) It is greater than 0 Of , At this time, the original picture is translated downward , That is to y Translation in the positive direction of the axis , At the same time, the height of the big picture (rows) by pingyi
stay y The absolute value of the value in the axial direction + The height of the original picture (h).
rows,cols=0,0
zuo,you=[0,0],[0,0]
for i in [0,1]:
if pingyi[i]>0:
zuo[i]=pingyi[i]
else:
you[i]=-pingyi[i]
if pingyi[1]<0:
if h1 + abs(int(round(pingyi[1]))) > rows:
rows = h1 + abs(int(round(pingyi[1]))) # Expand the base map
else:
if h + abs(int(round(pingyi[1]))) > rows:
rows = h + abs(int(round(pingyi[1])))
if pingyi[0]<0:
if w1 + abs(int(round(pingyi[0]))) > cols:
cols = w1 + abs(int(round(pingyi[0])))
else:
if w + abs(int(round(pingyi[0]))) > cols:
cols = w + abs(int(round(pingyi[0])))
print("rows:",rows,"cols:",cols)
# rows: 1080 cols: 1920

In the process of lens movement, subtitles constantly produce blocking pictures , Therefore, if the lens moves downward during synthesis , Then apply the new image to overwrite the original image , So as to block the subtitles ; If the lens moves up , Then apply the original image to cover the new image , Prevent subtitles from being exposed .
The specific code is as follows :
( Because this part is finally put into the function to execute , So if it is executed separately , Should be implemented first leftgray,rightgray=leftframe,rightframe)
When the camera moves down , First translate and expand the original picture , Then cover the new picture .
if pingyi[1]<0:
M = np.float32([[1,0,zuo[0]],[0,1,zuo[1]]])
leftdst = cv2.warpAffine(leftgray,M,(cols,rows),borderValue=(0,0,0,0))
#cv2.namedWindow('leftdst', 0)
#cv2.imshow('leftdst',leftdst)
#cv2.namedWindow('rightdst', 0)
#cv2.imshow('rightdst',rightdst)
print("dstshape:",leftdst.shape)
weizhix=abs(int(round(you[0])))
weizhiy=abs(int(round(you[1])))
print("weizhi:",weizhix,weizhiy)
#cv2.imwrite(r'leftdst.png',leftdst)
#cv2.imwrite(r'rightgray.png',rightgray)
leftdst[weizhiy:weizhiy+h1,weizhix:weizhix+w1]=rightgray[:,:]
When the lens moves up , First pan and expand the new picture , Then cover the original picture according to the transparency of the original picture , The final image displayed is Original picture * Transparency of the original picture + New picture *(1- Transparency of the original picture ), Because in this scene, transparency is only opaque and transparent , So the transparency of the final display image is The union of transparency of the original image and the new image . Here, the value of transparency layer is the maximum 255 The integer of , The union effect is achieved after operation .
else:
M = np.float32([[1,0,you[0]],[0,1,you[1]]])
rightdst = cv2.warpAffine(rightgray,M,(cols,rows),borderValue=(0,0,0,0))
print("dstshape:",rightdst.shape)
weizhix=abs(int(round(zuo[0])))
weizhiy=abs(int(round(zuo[1])))
print("weizhi:",weizhix,weizhiy)
#rightdst[weizhiy:weizhiy+h,weizhix:weizhix+w,:3]=leftgray[:,:,:3]
#rightdst=cv2.addWeighted(rightdst[weizhiy:weizhiy+h,weizhix:weizhix+w],leftgray[:,:,2],leftgray[:,:,:3],1-leftgray[:,:,2],0)
alpha = leftgray[:,:,3] / 255.0
#print(alpha[:10,:10])
#result = np.zeros(rightdst.shape[:2]+(4,))
#cv2.imshow('result',result)
#cv2.imwrite(r'rightdst.png',rightdst)
#cv2.imwrite(r'leftgray.png',leftgray)
#cv2.waitKey(1000)
print(rightdst.shape[:2]+(4,),leftgray.shape)
print(rightdst[weizhiy:weizhiy+h,weizhix:weizhix+w,0].shape)
print(leftgray[weizhiy:weizhiy+h,weizhix:weizhix+w,1].shape)
print(weizhiy,weizhiy+h,weizhix,weizhix+w)
rightdst[weizhiy:weizhiy+h,weizhix:weizhix+w,0] = (1. - alpha) * rightdst[weizhiy:weizhiy+h,weizhix:weizhix+w,0] + alpha * leftgray[:,:,0]
rightdst[weizhiy:weizhiy+h,weizhix:weizhix+w,1] = (1. - alpha) * rightdst[weizhiy:weizhiy+h,weizhix:weizhix+w,1] + alpha * leftgray[:,:,1]
rightdst[weizhiy:weizhiy+h,weizhix:weizhix+w,2] = (1. - alpha) * rightdst[weizhiy:weizhiy+h,weizhix:weizhix+w,2] + alpha * leftgray[:,:,2]
rightdst[weizhiy:weizhiy+h,weizhix:weizhix+w,3] = (1 - (1-rightdst[weizhiy:weizhiy+h,weizhix:weizhix+w,3]/255) * (1-leftgray[:,:,3]/255)) * 255
For the synthesized picture , It needs to be combined with the third figure , At this time, if the key points are detected again for the original composite picture , It will waste a lot of memory 、 Extend code run time , And because the picture is too big , The key points are not concentrated , The final effect will not be ideal . Based on the fact that every two adjacent frames have overlapping parts , Therefore, the key points of other parts of the whole large picture can be ignored , The key points detected in the previous new image can be used as the key points of the original image detected next time .
global kp1,des1,rows,cols
kp1,des1=kp2,des2
for j in kp1:
j.pt=(j.pt[0]+you[0],j.pt[1]+you[1])
 if pingyi[1]<0:
return leftdst
else:
return result
Define the above process as pinjie function , Then add a loop to read every frame in the video for synthesis .
i=0
while 1: # Read frame by frame
ret, rightframe = video.read() # Read the next frame
if not ret:
break
b_channel, g_channel, r_channel = cv2.split(rightframe)
alpha_channel = np.ones(b_channel.shape, dtype=b_channel.dtype) * 255
# The minimum value is 0
#alpha_channel[:, :int(b_channel.shape[0] / 2)] = 100
rightframe = cv2.merge((b_channel, g_channel, r_channel, alpha_channel))
#cv2.imshow('frame',frame)
#if i%5==0:
print(i)
leftframe=pinjie(leftframe,rightframe)
#cv2.namedWindow('dst', 0)
#cv2.imshow('dst',leftframe)
#cv2.waitKey(1000)
print()
cv2.imwrite(r'dst.png',leftframe)
i+=1
First official operation , It turns out like this :( The original image is too large to insert , Here is the reduced image )
You can see , A black edge appears on the edge of the image , And after zooming in, you can see that the original part of the lens becomes blurred after a circle , The earlier the picture appears, the more blurred , It forms a clear contrast with the later pictures .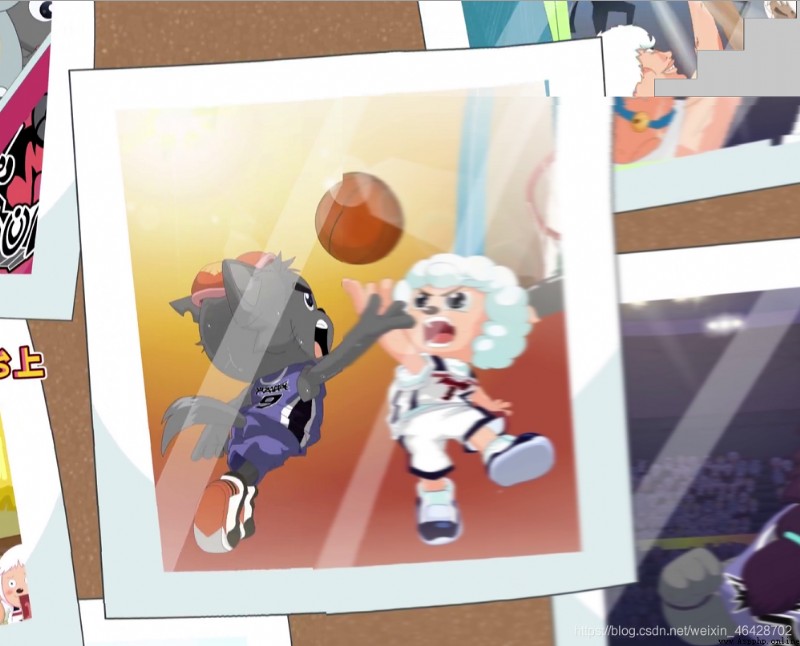
After careful study , I found out why .
Used many times in the program cv2.warpAffine function , And the translation vectors are basically decimal , Multiple non integer shifts blur the final image , Make the boundary between the transparent part and the opaque part of the transparency channel not obvious , Will produce black edges .
M = np.float32([[1,0,zuo[0]],[0,1,zuo[1]]])
leftdst = cv2.warpAffine(leftgray,M,(cols,rows),borderValue=(0,0,0,0))
M = np.float32([[1,0,you[0]],[0,1,you[1]]])
rightdst = cv2.warpAffine(rightgray,M,(cols,rows),borderValue=(0,0,0,0))
meanwhile , In this scenario, transparency can only be transparent or opaque , Therefore, you can change the division in the statement that sets transparency to integer division .
alpha = leftgray[:,:,3] // 255.0
...
rightdst[weizhiy:weizhiy+h,weizhix:weizhix+w,3] = (1 - (1-rightdst[weizhiy:weizhiy+h,weizhix:weizhix+w,3]//255) * (1-leftgray[:,:,3]//255)) * 255
When looking for problems , See this https://zhuanlan.zhihu.com/p/89684929, So I have a train of thought , Just a test .
When translating an integer pixel :
d = np.array([[255, 200, 0, 50],
[200, 255, 50, 0],
[ 0, 50, 255, 200],
[ 50, 0, 200, 255]], np.uint8)
M = np.float32([[1,0,1],[0,1,1]])
M2 = np.float32([[1,0,-1],[0,1,-1]])
for i in range(100):
d = cv2.warpAffine(d,M,(10,10))
d = cv2.warpAffine(d,M2,(10,10))
print(d)
"""[[255 200 0 50 0 0 0 0 0 0] [200 255 50 0 0 0 0 0 0 0] [ 0 50 255 200 0 0 0 0 0 0] [ 50 0 200 255 0 0 0 0 0 0] [ 0 0 0 0 0 0 0 0 0 0] [ 0 0 0 0 0 0 0 0 0 0] [ 0 0 0 0 0 0 0 0 0 0] [ 0 0 0 0 0 0 0 0 0 0] [ 0 0 0 0 0 0 0 0 0 0] [ 0 0 0 0 0 0 0 0 0 0]] """
When translating decimal pixels :
d = np.array([[255, 200, 0, 50],
[200, 255, 50, 0],
[ 0, 50, 255, 200],
[ 50, 0, 200, 255]], np.uint8)
M = np.float32([[1,0,0.5],[0,1,0.5]])
M2 = np.float32([[1,0,-0.5],[0,1,-0.5]])
for i in range(100):
d = cv2.warpAffine(d,M,(10,10))
d = cv2.warpAffine(d,M2,(10,10))
print(d)
"""[[ 3 4 6 7 7 6 5 3 1 0] [ 4 7 10 12 12 10 9 6 3 1] [ 6 10 13 15 15 13 11 8 4 1] [ 7 12 15 16 16 14 12 8 5 2] [ 7 12 15 16 15 14 11 8 4 1] [ 6 10 13 14 14 12 9 6 3 1] [ 5 9 11 12 11 9 6 3 1 0] [ 3 6 8 8 8 6 3 1 0 0] [ 1 3 4 5 4 3 1 0 0 0] [ 0 1 1 2 1 1 0 0 0 0]] """
Then I tested it with pictures , It is found that continuous translation of decimal pixels will indeed blur .
Now that you know the problem , That's a good solution , The amount of translation required for the original image and the new image can be rounded off .
M = np.float32([[1,0,int(round(zuo[0]))],[0,1,int(round(zuo[1]))]])
leftdst = cv2.warpAffine(leftgray,M,(cols,rows),borderValue=(0,0,0,0))
M = np.float32([[1,0,int(round(you[0]))],[0,1,int(round(you[1]))]])
rightdst = cv2.warpAffine(rightgray,M,(cols,rows),borderValue=(0,0,0,0))
Here is only the rounding of the transformation matrix required by affine transformation , Instead of directly modifying pingyi, In this way, the error accumulation caused by continuous rounding can be avoided .
caption :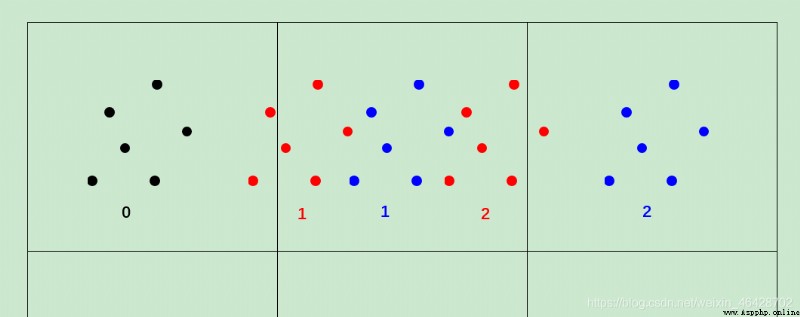
The original black dot 0 After translation, it should reach the red dot 1, But due to rounding to the blue dot 1, If you modify it directly pingyi, Then the second translation will directly translate to the blue dot 2, The error becomes larger . The correct translation is the red dot 2, If the red dot 2 integer , The result is still a blue dot 1, Less error .
You can see , Some subtitles are still exposed on the left .
After careful consideration , I found out why .
At present, the variable to judge the upward and downward movement of the lens is pingyi, But the actual meaning of this variable is the vector from the upper left corner of the new image to the upper left corner of the original image (np.array The coordinate system of takes the upper left corner as the origin ), therefore , It can be judged normally in the following cases .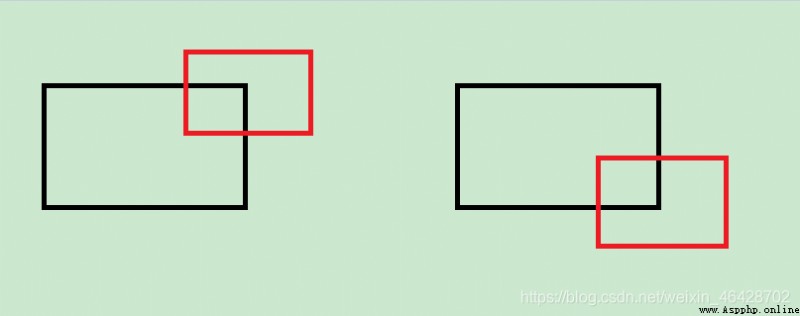
( Black is the original picture , Red is the new picture )
But when this lens moves the right and lower parts , When moving up from the left , The addition of new images does not need to expand the size of the original image .
( Black is the original picture , Red is the new picture , Blue is the last new picture )
here , According to the correct judgment , The upper left corner of the red picture is shifted upward relative to the blue picture , But with the current judgment method , The upper left corner of the black picture is translated downward , Then there will be problems .
The solution is also simple , Record the last pingyi, Each time with the current pingyi Subtract the last pingyi That is, the vector relative to the last image translation .
last_x,last_y=0,0
...
global kp1,des1,rows,cols,last_x,last_y
...
up_or_down=pingyi[1]-last_y
last_x,last_y=pingyi
...
if up_or_down<0:
...
else:
...
...
if up_or_down<0:
return leftdst
else:
return rightdst
After solving the above problems , Run again , It turns out like this :( The original image is too large to insert , Here is the reduced image )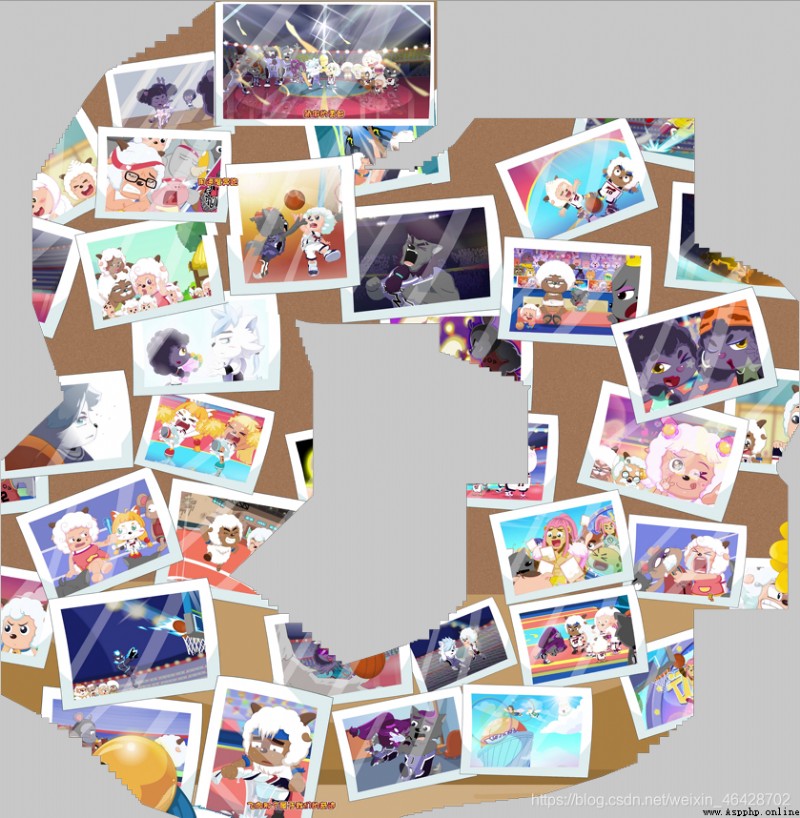
It can be seen that the effect is much better , Blur and black edges are gone , The subtitles of the left blockbuster are gone , Although some places are still a little misplaced , Subtitles are not completely removed , But on the whole, the effect is good .
( There is no blur , But there are still dislocations and subtitles )
# Reference resources :https://blog.csdn.net/qq878594585/article/details/81901703
import numpy as np
import cv2
import matplotlib.pyplot as plt
from pyod.models.knn import KNN
clf_name = 'KNN'
clf = KNN(0.5)
hessian=400
surf=cv2.SIFT_create(hessian) # take Hessian Threshold Set to 400, The larger the threshold, the fewer features can be detected
rows,cols=0,0
last_x,last_y=0,0
def pinjie(leftgray,rightgray):
global kp1,des1,rows,cols,last_x,last_y
print("grayshape:",leftgray.shape,rightgray.shape)
kp2,des2=surf.detectAndCompute(rightgray,None) # Find key points and descriptors
FLANN_INDEX_KDTREE=0 # establish FLANN Matcher parameter
indexParams=dict(algorithm=FLANN_INDEX_KDTREE,trees=5) # Configuration index , The number of density trees is 5
searchParams=dict(checks=50) # Specifies the number of recursions
#FlannBasedMatcher: It is the fastest feature matching algorithm at present ( Nearest neighbor search )
flann=cv2.FlannBasedMatcher(indexParams,searchParams) # Set up matcher
matches=flann.knnMatch(des1,des2,k=2) # Get the key points that match
good=[]
# Extract excellent feature points
for m,n in matches:
if m.distance < 0.7*n.distance: # If the first neighborhood is greater than the second neighborhood 0.7 Times smaller , The retention
good.append(m)
src_pts = np.array([ kp1[m.queryIdx].pt for m in good if kp2[m.trainIdx].pt[1]<=933]) # Query the feature description subindex of the image
dst_pts = np.array([ kp2[m.trainIdx].pt for m in good if kp2[m.trainIdx].pt[1]<=933]) # Training ( Templates ) Image feature description subindex
#H=cv2.findHomography(src_pts,dst_pts) # Generating transformation matrix
h,w=leftgray.shape[:2]
h1,w1=rightgray.shape[:2]
sandian=dst_pts-src_pts
print("sandian:",sandian.shape)
#plt.figure(1)
#plt.scatter(*sandian.T)
# Reference resources :https://blog.csdn.net/weixin_42199542/article/details/106885459
# train kNN detector
clf.fit(sandian)
# If you want to see the predictions of the training data, you can use this way:
#y_train_scores = clf.decision_scores_
#plt.figure(2)
y_test_pred = clf.predict(sandian)
sandian=sandian[y_test_pred==0]
pingyi=np.mean(sandian,0)
print("pingyi:",pingyi)
#plt.scatter(*sandian.T)
#plt.scatter(*pingyi,c='red')
# h,w Is the height and width of the original picture
# h1,w1 Is the height and width of the new picture
# zuo The vector that needs to be translated for the original image
# you The vector that needs to be translated for the new picture
# Because it is finally synthesized on a large base map , So sometimes both the original image and the new image need to be panned
# rows and cols It is the height and width of the large base map
zuo,you=[0,0],[0,0]
for i in [0,1]:
if pingyi[i]>0:
zuo[i]=pingyi[i]
else:
you[i]=-pingyi[i]
if pingyi[1]<0:
if h1 + abs(int(round(pingyi[1]))) > rows:
rows = h1 + abs(int(round(pingyi[1])))
else:
if h + abs(int(round(pingyi[1]))) > rows:
rows = h + abs(int(round(pingyi[1])))
if pingyi[0]<0:
if w1 + abs(int(round(pingyi[0]))) > cols:
cols = w1 + abs(int(round(pingyi[0])))
else:
if w + abs(int(round(pingyi[0]))) > cols:
cols = w + abs(int(round(pingyi[0])))
print("rows:",rows,"cols",cols)
up_or_down=pingyi[1]-last_y
last_x,last_y=pingyi
if up_or_down<0: # If not int and round It will cause continuous affine transformation of decimals , It will eventually produce blur
M = np.float32([[1,0,int(round(zuo[0]))],[0,1,int(round(zuo[1]))]])
leftdst = cv2.warpAffine(leftgray,M,(cols,rows),borderValue=(0,0,0,0))
#cv2.namedWindow('leftdst', 0)
#cv2.imshow('leftdst',leftdst)
#cv2.namedWindow('rightdst', 0)
#cv2.imshow('rightdst',rightdst)
print("dstshape:",leftdst.shape)
weizhix=abs(int(round(you[0])))
weizhiy=abs(int(round(you[1])))
print("weizhi:",weizhix,weizhiy)
#cv2.imwrite(r'leftdst.png',leftdst)
#cv2.imwrite(r'rightgray.png',rightgray)
leftdst[weizhiy:weizhiy+h1,weizhix:weizhix+w1]=rightgray[:,:]
else:
M = np.float32([[1,0,int(round(you[0]))],[0,1,int(round(you[1]))]])
rightdst = cv2.warpAffine(rightgray,M,(cols,rows),borderValue=(0,0,0,0))
print("dstshape:",rightdst.shape)
weizhix=abs(int(round(zuo[0])))
weizhiy=abs(int(round(zuo[1])))
print("weizhi:",weizhix,weizhiy)
#rightdst[weizhiy:weizhiy+h,weizhix:weizhix+w,:3]=leftgray[:,:,:3]
#rightdst=cv2.addWeighted(rightdst[weizhiy:weizhiy+h,weizhix:weizhix+w],leftgray[:,:,2],leftgray[:,:,:3],1-leftgray[:,:,2],0)
alpha = leftgray[:,:,3] // 255.0
#print(alpha[:10,:10])
#result = np.zeros(rightdst.shape[:2]+(4,))
#cv2.imshow('result',result)
#cv2.imwrite(r'rightdst.png',rightdst)
#cv2.imwrite(r'leftgray.png',leftgray)
#cv2.waitKey(1000)
print(rightdst.shape[:2]+(4,),leftgray.shape)
print(rightdst[weizhiy:weizhiy+h,weizhix:weizhix+w,0].shape)
print(leftgray[weizhiy:weizhiy+h,weizhix:weizhix+w,1].shape)
print(weizhiy,weizhiy+h,weizhix,weizhix+w)
rightdst[weizhiy:weizhiy+h,weizhix:weizhix+w,0] = (1. - alpha) * rightdst[weizhiy:weizhiy+h,weizhix:weizhix+w,0] + alpha * leftgray[:,:,0]
rightdst[weizhiy:weizhiy+h,weizhix:weizhix+w,1] = (1. - alpha) * rightdst[weizhiy:weizhiy+h,weizhix:weizhix+w,1] + alpha * leftgray[:,:,1]
rightdst[weizhiy:weizhiy+h,weizhix:weizhix+w,2] = (1. - alpha) * rightdst[weizhiy:weizhiy+h,weizhix:weizhix+w,2] + alpha * leftgray[:,:,2]
rightdst[weizhiy:weizhiy+h,weizhix:weizhix+w,3] = (1 - (1-rightdst[weizhiy:weizhiy+h,weizhix:weizhix+w,3]//255) * (1-leftgray[:,:,3]//255)) * 255
#cv2.namedWindow('dst', 0)
#cv2.imshow('dst',leftdst)
#cv2.waitKey(1000)
#plt.show()
kp1,des1=kp2,des2
for j in kp1:
j.pt=(j.pt[0]+you[0],j.pt[1]+you[1])
if up_or_down<0:
return leftdst
else:
return rightdst
video = cv2.VideoCapture(r'60.mp4') # Read video
#for i in range(270):
# video.read()
ret, leftframe = video.read() # Read frame
b_channel, g_channel, r_channel = cv2.split(leftframe)
alpha_channel = np.ones(b_channel.shape, dtype=b_channel.dtype) * 255
# The minimum value is 0
#alpha_channel[:, :int(b_channel.shape[0] / 2)] = 100
leftframe = cv2.merge((b_channel, g_channel, r_channel, alpha_channel))
#cv2.imshow('leftframe',leftframe)
kp1,des1=surf.detectAndCompute(leftframe,None) # Find key points and descriptors
i=0
while i<=3700:
#for i in range(1200): # Read frame by frame
ret, rightframe = video.read() # Read the next frame
if not ret:
break
b_channel, g_channel, r_channel = cv2.split(rightframe)
alpha_channel = np.ones(b_channel.shape, dtype=b_channel.dtype) * 255
# The minimum value is 0
#alpha_channel[:, :int(b_channel.shape[0] / 2)] = 100
rightframe = cv2.merge((b_channel, g_channel, r_channel, alpha_channel))
#cv2.imshow('frame',frame)
#if i%5==0:
print(i)
leftframe=pinjie(leftframe,rightframe)
#cv2.namedWindow('dst', 0)
#cv2.imshow('dst',leftframe)
#cv2.waitKey(1000)
print()
cv2.imwrite(r'dst.png',leftframe)
i+=1
Change the affine transformation of the picture into perspective transformation , Re pass cv2.VideoCapture Call the camera of the mobile phone , Panoramic stitching of photos taken by mobile phone .( Mobile phone running Python You can use Aid-learning、QPython 3、Pydroid 3、Termux、Linux Deploy etc. , Pictures can also be transferred to the computer , Splice on the computer )