GitHub Portal
Project name : Facial expression recognition
Project background : In the process of communicating with customers , Judge whether the user is interested in the topic by the facial expression of the customer , Marketers or communicators can find out what customers are interested in , Or judge the customer's purchase desire
Image recognition refers to the use of computers to process images 、 analysis 、 understand , The process of image recognition can be divided into image processing and image analysis
Image processing refers to a series of graphic operations on the image to be analyzed , Including stretch scaling 、 Rotate flip 、 Color change 、 Pixel retention ……, Image analysis refers to the feedback of image information and classification through image features , The simplest method is based on statistics 、 The most commonly used method is deep learning
Technical support
The image processing :VoTT、OpenCV、PIL
Image analysis :TensorFlow、Keras、CNN
Data resources : This experiment is a binary recognition of facial expressions , Emotions are happiness and depression , Each emoticon 5000 Zhang
Technical support :Keras、TensorFlow、VoTT、OpenCV、PIL
Keras
Keras It's a by Python An open source artificial neural network library , It can be used as Tensorflow、Microsoft-CNTK and Theano High level application program interface of , Design of deep learning model 、 debugging 、 assessment 、 Application and visualization ,Keras The neural network of API It directly interacts with users after encapsulation API Components , When in use, you can call Keras Other components of . In addition to data preprocessing , Users can use neural networks API Implement common operations in machine learning tasks , Including the construction of artificial neural network 、 compile 、 Study 、 assessment 、 Testing, etc .
TensorFlow
TensorFlow By Google AI team Google brain (Google Brain) Development and maintenance , Ownership includes TensorFlow Hub、TensorFlow Lite、TensorFlow Research Cloud A number of projects and all kinds of [ Application program interface ]( API) [2] . since 2015 year 11 month 9 The date of ,TensorFlow According to the Apache license agreement (Apache 2.0 open source license) Open source ,TensorFlow Is a data flow based programming (dataflow programming) Symbolic mathematics system of , Widely used in all kinds of machine learning (machine learning) Programming implementation of algorithm , Google brain from 2011 Since its establishment in, it has carried out large-scale in-depth learning application research for scientific research and Google product development , Its early work was TensorFlow The forerunner of DistBelief.
VoTT
VoTT It's a use. TypeScript Compiling React + Redux Web Applications . The project is through Create React App Starting up , Open source annotation and tagging tools for image and video assets ,VoTT Can be installed as a native application , You can also run... From source code .VoTT It can also be used as independent Web Applications Use , And can be used in any modern Web The browser uses .
OpenCV
OpenCV It's based on BSD The license ( Open source ) Distributed cross-platform computer vision library , Can run in Linux、Windows、Android and Mac OS On the operating system . It's lightweight and efficient —— By a series of C Functions and small quantities C++ Class a , It also provides Python、Ruby、MATLAB Language interface , Many general algorithms in image processing and computer vision are realized .
PIL
python Image processing library , This library supports multiple file formats , And provides a powerful image processing and graphics processing capabilities .
The trial phase
Mid term work
Expand the data set , Use crawlers to obtain portrait pictures in batches , In the process of crawling Baidu pictures , If you get it directly, you can only get 30 Zhang image , Then the program stops automatically , The solution adopted is , Through observation url It is found that... Can be added page Page number is selected to refresh the picture downward with the scroll wheel , So add a page number loop to crawl the image .
# Crawling pictures
import re
import requests
from urllib import error
from bs4 import BeautifulSoup
import os
num = 0
numPicture = 0
file = ''
List = []
def Find(url):
global List
print(' Detecting total number of pictures , One moment please .....')
t = 0
i = 1
s = 0
while t < 1000:
Url = url + str(t)
try:
Result = requests.get(Url, timeout=7)
except BaseException:
t = t + 60
continue
else:
result = Result.text
pic_url = re.findall('"objURL":"(.*?)",', result, re.S) # First, use regular expressions to find pictures url
s += len(pic_url)
if len(pic_url) == 0:
break
else:
List.append(pic_url)
t = t + 60
return s
def recommend(url):
Re = []
try:
html = requests.get(url)
except error.HTTPError as e:
return
else:
html.encoding = 'utf-8'
bsObj = BeautifulSoup(html.text, 'html.parser')
div = bsObj.find('div', id='topRS')
if div is not None:
listA = div.findAll('a')
for i in listA:
if i is not None:
Re.append(i.get_text())
return Re
def dowmloadPicture(html, keyword):
global num
# t =0
pic_url = re.findall('"objURL":"(.*?)",', html, re.S) # First, use regular expressions to find pictures url
print(' Find keywords :' + keyword + ' Pictures of the , About to start downloading pictures ...')
for each in pic_url:
# print(' Downloading section ' + str(num + 1) + ' A picture , Picture address :' + str(each))
print('\r'," Downloaded "+str(num+1).ljust(10)+" A picture ",end='')
try:
if each is not None:
pic = requests.get(each, timeout=7)
else:
continue
except BaseException:
print(' error , The current picture cannot be downloaded ')
continue
else:
string = file + r'\\' + keyword + '_' + str(num) + '.jpg'
fp = open(string, 'wb')
fp.write(pic.content)
fp.close()
num += 1
if num >= numPicture:
return
if __name__ == '__main__': # Main function entry
word = input(" Please enter search keywords ( It could be names , Place names, etc ): ")
#add = 'http://image.baidu.com/search/flip?tn=baiduimage&ie=utf-8&word=%E5%BC%A0%E5%A4%A9%E7%88%B1&pn=120'
url = 'http://image.baidu.com/search/flip?tn=baiduimage&ie=utf-8&word=' + word + '&pn='
tot = Find(url)
Recommend = recommend(url) # Record relevant recommendations
print(' After testing %s Class pictures share %d Zhang ' % (word, tot))
numPicture = int(input(' Please enter the number of pictures you want to download '))
file = input(' Please create a folder to store pictures , Enter the name of the folder ')
words=input(" Please enter a picture prefix ")
y = os.path.exists(file)
if y == 1:
print(' The file already exists , Please re-enter ')
file = input(' Please create a folder to store pictures ,) Enter the name of the folder ')
os.mkdir(file)
else:
os.mkdir(file)
t = 0
tmp = url
while t < numPicture:
try:
url = tmp + str(t)
result = requests.get(url, timeout=10)
print(url)
except error.HTTPError as e:
print(' Network error , Please adjust the network and try again ')
t = t+60
else:
dowmloadPicture(result.text, words)
t = t + 60
recycling VoTT Only the position and size of the selected image are recorded when using the tool , It is not possible to cut and save the image , So using VoTT Add Python To complete image annotation and cutting , stay VoTT New projects , Select the image position for box selection and annotation , Save the export when finished json Format file , Using Python Read json file , Open the corresponding image and cut it according to the selected size , Then it is converted into an array, that is, the pixels are saved , according to 6,2,2 The proportional partition dataset is saved CSV file .
open VoTT, Choose new project 
New connection point 
Select Add location for 
Select the folder location of the image , Add confirmation 

The upper right corner of the work interface is the label processing area , You can add, delete and change the position of labels 
The area directly above is the selected work area 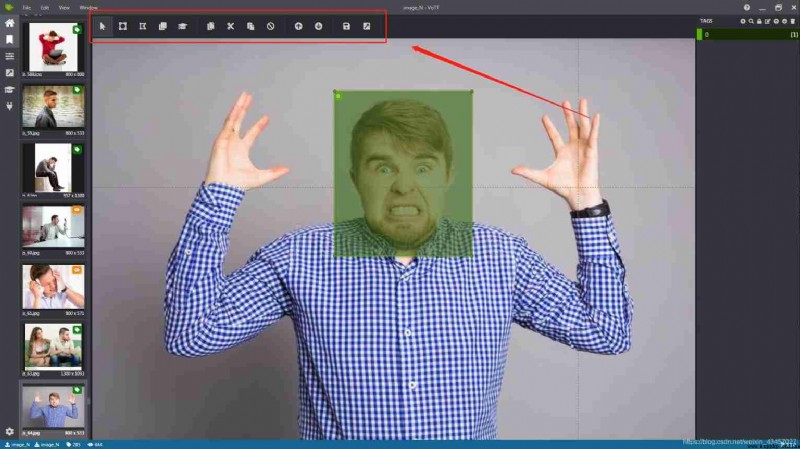
On the left are file options , You can select the box to select that the image has been exported 
The marked image is exported as json Format 
# The image is cut and saved according to the selected size
import pandas as pd
import os
import json
from PIL import Image
path=os.path.abspath(".")
path_image=path+"\\dat_20191202"
for i,j in zip(os.listdir(path_image),range(len(os.listdir(path_image)))):
if i.endswith("json"):
with open(path_image+"\\"+i,"r") as f:
data2=json.load(f)
path_i=data2["asset"]["name"]
labe=data2["regions"][0]["tags"][0]
box=(data2["regions"][0]["points"][0]["x"],data2["regions"][0]["points"][0]["y"],data2["regions"][0]["points"][2]["x"],data2["regions"][0]["points"][2]["y"])
im=Image.open(path_image+"\\"+path_i).crop(box)
try:
im.save(path+"\\image\\0\\"+str(j)+".jpg")
except:
print(" Format error ")
# Talk about image conversion and data saving
import pandas as pd
import numpy as np
from PIL import Image
import os
path=os.path.abspath(".")
emotion_Yes=path+"\\image\\1"
emotion_No=path+"\\image\\0"
Y=[]
for i in os.listdir(emotion_Yes):
im=Image.open(emotion_Yes+"\\"+i)
im=im.resize((48,48))
im=im.convert("L")
Y.append(np.array(im))
N=[]
for i in os.listdir(emotion_No):
im=Image.open(emotion_No+"\\"+i)
im=im.resize((48,48))
im=im.convert("L")
N.append(np.array(im))
d=[]
for i in Y:
d1=[]
for j in i:
for n in j:
d1.append(n)
d.append(str(d1).replace("[","").replace("]","").replace(",",""))
e=[]
for i in N:
e1=[]
for j in i:
for n in j:
e1.append(n)
e.append(str(e1).replace("[","").replace("]","").replace(",",""))
dat1=pd.DataFrame({
"emotion":[1]*len(d),"pixels":d})
jh1=["Training"]*int(dat1.shape[0]*0.7)+["PrivateTest"]*(int(dat1.shape[0]*0.2))+["PublicTest"]*(int(dat1.shape[0]-int(dat1.shape[0]*0.7)-int(dat1.shape[0]*0.2)))
# Training set 、 Test set 、 Verification set =70%,20%,10%
dat1["Usage"]=jh1
dat2=pd.DataFrame({
"emotion":[0]*len(e),"pixels":e})
jh2=["Training"]*int(dat2.shape[0]*0.7)+["PrivateTest"]*(int(dat2.shape[0]*0.2))+["PublicTest"]*(int(dat2.shape[0]-int(dat2.shape[0]*0.7)-int(dat2.shape[0]*0.2)))
dat2["Usage"]=jh2
data_x=pd.concat([dat1,dat2],ignore_index=True)
data_x.to_csv(path+"\\emotion_file.csv",index=False)
print(data_x.shape)
Read CSV file , The image is divided into training sets according to the labels 、 Test set 、 Validation set three folders , Each folder is saved under the subfolder of the tag according to the classification label of the image , When saving, it is important to perform gray processing on the image , That is, only one channel is reserved , This has the advantage of reducing the amount of computation , Speed up processing .
# Divide the data set into training sets according to labels 、 Test set 、 Verification set
import csv
import os
path = os.path.abspath(".")
database_path = os.path.abspath(".")
datasets_path = os.path.abspath(".")
csv_file = database_path+'emotion_file.csv'
train_csv = datasets_path+'train.csv'
val_csv = datasets_path+'val.csv'
test_csv = datasets_path+ 'test.csv'
with open(csv_file) as f:
csvr = csv.reader(f)
header = next(csvr)
print(header)
rows = [row for row in csvr]
trn = [row[:-1] for row in rows if row[-1] == 'Training']
csv.writer(open(train_csv, 'w+'), lineterminator='\n').writerows([header[:-1]] + trn)
print(len(trn))
val = [row[:-1] for row in rows if row[-1] == 'PublicTest']
csv.writer(open(val_csv, 'w+'), lineterminator='\n').writerows([header[:-1]] + val)
print(len(val))
tst = [row[:-1] for row in rows if row[-1] == 'PrivateTest']
csv.writer(open(test_csv, 'w+'), lineterminator='\n').writerows([header[:-1]] + tst)
print(len(tst))
# Images are converted to gray channels and saved in subfolders
import csv
import os
from PIL import Image
import numpy as np
datasets_path = os.path.abspath(".")
train_csv = os.path.join(datasets_path, 'train.csv')
val_csv = os.path.join(datasets_path, 'val.csv')
test_csv = os.path.join(datasets_path, 'test.csv')
train_set = os.path.join(datasets_path, 'train')
val_set = os.path.join(datasets_path, 'val')
test_set = os.path.join(datasets_path, 'test')
for save_path, csv_file in [(train_set, train_csv), (val_set, val_csv), (test_set, test_csv)]:
if not os.path.exists(save_path):
os.makedirs(save_path)
num = 1
with open(csv_file) as f:
csvr = csv.reader(f)
header = next(csvr)
for i, (label, pixel) in enumerate(csvr):
pixel = np.asarray([float(p) for p in pixel.split()]).reshape(48, 48)
subfolder = os.path.join(save_path, label)
if not os.path.exists(subfolder):
os.makedirs(subfolder)
im = Image.fromarray(pixel).convert('L')
image_name = os.path.join(subfolder, '{:05d}.jpg'.format(i))
im.save(image_name)
build CNN
Convolution neural network introduction , Neural network is to use computer to simulate the way and ability of human brain to think about problems , The calculated value is continuously transmitted forward , Backward feedback error , Keep on learning , Stop training until the error is the minimum loss , Save the trained model for prediction . When we solve a classification problem based on a finite set of fixed features , This method is very effective —— for example , We predict the position of a football player according to the statistics recorded in the game .
however , When dealing with photos , The problem becomes more complicated . Of course , We can treat the brightness of each pixel as a separate feature , Then pass it in as input to the dense network . Unfortunately , To enable it to cope with a typical smartphone photo , Our network must contain tens or even hundreds of millions of neurons . On the other hand , Although we can reduce the picture , But we also lose valuable information in the process . So we'll soon find out , Traditional strategies are useless —— We need a new and clever way , To use data as much as possible , But at the same time, the necessary calculation amount and parameters should be reduced . This is it. CNN It's time to play a role .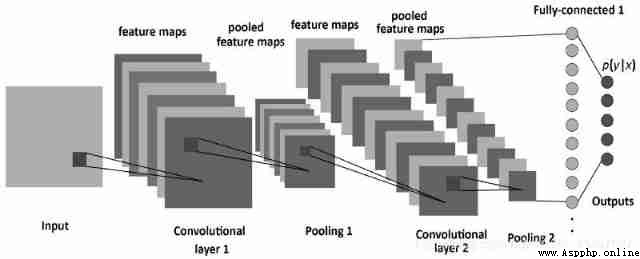
The difference between convolutional neural network and ordinary neural network mainly lies in “ Convolution ” Two words , Convolution is what we call inner product calculation , Is to multiply and add matrices , The operation of convolution is to extract the main features of the region , It is also a way to reduce dimensions , And this method is also very reasonable in image recognition , Convolution is an operation that began with computer corrugation , Later, it was applied to the field of computer vision and played a significant role .
Convolution can be used as edge detection of objects , This provides a great help in image recognition , After placing our filter on the selected pixel , We multiply each value in convolution kernel by corresponding value in image . Finally, add the results of the product , Then put the result in the correct position of the output characteristic graph . In the animation above, we can see the operation process in a microscopic form , But what's more interesting is the result of performing this operation on the whole image .
data input , Add... During data entry Keras Image generator module , Expand the data set .
import keras
from keras.layers import Dense, Dropout, Activation, Flatten,Conv2D, MaxPooling2D
from keras.layers.normalization import BatchNormalization
from keras.models import Sequential
from keras.preprocessing.image import ImageDataGenerator
from keras.callbacks import EarlyStopping
from keras.optimizers import SGD
batch_siz = 128
num_classes = 2
nb_epoch = 10
img_size=48
root_path=os.path.abspath(".")
import tensorflow as tf
import keras.backend.tensorflow_backend as KTF
KTF.set_session(tf.Session(config=tf.ConfigProto(device_count={
'gpu':0})))
class Model:
def __init__(self):
self.model = None
def build_model(self):
self.model = Sequential()
self.model.add(Conv2D(32, (3, 3), strides=1, padding='same', input_shape=(img_size, img_size, 1)))
self.model.add(Activation('relu'))
self.model.add(Conv2D(32, (5, 5), padding='same'))
self.model.add(Activation('relu'))
self.model.add(MaxPooling2D(pool_size=(2, 2)))
self.model.add(Conv2D(32, (3, 3), padding='same'))
self.model.add(Activation('relu'))
self.model.add(MaxPooling2D(pool_size=(2, 2)))
self.model.add(Conv2D(64, (5, 5), padding='same'))
self.model.add(Activation('relu'))
self.model.add(MaxPooling2D(pool_size=(2, 2)))
self.model.add(Flatten())
self.model.add(Dense(2048))
self.model.add(Activation('relu'))
self.model.add(Dropout(0.5))
self.model.add(Dense(1024))
self.model.add(Activation('relu'))
self.model.add(Dropout(0.5))
self.model.add(Dense(num_classes))
self.model.add(Activation('softmax'))
self.model.summary()
def train_model(self):
sgd=SGD(lr=0.01, decay=1e-6, momentum=0.9, nesterov=True)
self.model.compile(loss='categorical_crossentropy',
optimizer=sgd,
metrics=['accuracy'])
# Automatically expand training samples
train_datagen = ImageDataGenerator(
rescale = 1./255,
shear_range = 0.2,
zoom_range = 0.2,
horizontal_flip=True)
# Normalized verification set
val_datagen = ImageDataGenerator(
rescale = 1./255)
eval_datagen = ImageDataGenerator(
rescale = 1./255)
# Divided by file classification name label
train_generator = train_datagen.flow_from_directory(
root_path+'/train',
target_size=(img_size,img_size),
color_mode='grayscale',
batch_size=batch_siz,
class_mode='categorical')#categorical
val_generator = val_datagen.flow_from_directory(
root_path+'/val',
target_size=(img_size,img_size),
color_mode='grayscale',
batch_size=batch_siz,
class_mode='categorical')
eval_generator = eval_datagen.flow_from_directory(
root_path+'/test',
target_size=(img_size,img_size),
color_mode='grayscale',
batch_size=batch_siz,
class_mode='categorical')
early_stopping = EarlyStopping(monitor='loss',patience=3)
history_fit=self.model.fit_generator(
train_generator,
steps_per_epoch=800/(batch_siz/32),#28709
nb_epoch=nb_epoch,
validation_data=val_generator,
validation_steps=500
)
history_predict=self.model.predict_generator(
eval_generator,
steps=500)
with open(root_path+"\\model"+'/model_fit_log','w') as f:
f.write(str(history_fit.history))
with open(root_path+"\\model"+'/model_predict_log','w') as f:
f.write(str(history_predict))
print('model trained')
def save_model(self):
model_json=self.model.to_json()
with open(root_path+"\\model"+"/model_json.json", "w") as json_file:
json_file.write(model_json)
self.model.save_weights(root_path+"\\model"+'/model_weight.h5')
self.model.save(root_path+"\\model"+'/model.h5')
print('model saved')
if __name__=='__main__':
model=Model()
model.build_model()
print('model built')
model.train_model()
print('model trained')
model.save_model()
print('model saved')
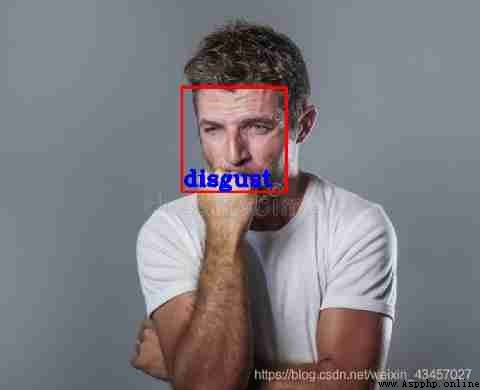
Image prediction results
Load model to predict image expression
import numpy as np
import cv2
import sys
import json
import time
import os
from keras.models import model_from_json
root_path=os.path.abspath(".")
model_path = root_path + '/model_50/'
img_size = 48
emotion_labels = ["happy",'disgust']
num_class = len(emotion_labels)
json_file = open(model_path + 'model_json.json')
loaded_model_json = json_file.read()
json_file.close()
model = model_from_json(loaded_model_json)
model.load_weights(model_path + 'model_weight.h5')
def predict_emotion(face_img):
img_size=48
face_img = face_img * (1. / 255)
resized_img = cv2.resize(face_img, (img_size, img_size))
results = []
rsh_img=resized_img.reshape(1,img_size, img_size, 1)
list_of_list = model.predict_proba(rsh_img, batch_size=32, verbose=1)
result = [prob for lst in list_of_list for prob in lst]
results.append(result)
return results
def face_detect(image_path):
cascPath = root_path+"/data/haarcascade_frontalface_alt2.xml"
faceCasccade = CascadeClassifier(cascPath)
img = imread(image_path)
img_gray = cvtColor(img, COLOR_BGR2GRAY)
faces = faceCasccade.detectMultiScale(
img_gray,
scaleFactor=1.1,
minNeighbors=1,
minSize=(10, 10)
)
return faces, img_gray, img
if __name__ == '__main__':
images = []
A=input(" Please enter the name of the folder where the pictures to be predicted are located :")
dir = root_path +"\\"+ A
if isdir(dir):
files = listdir(dir)
for file in files:
if file.endswith('jpg') or file.endswith('png') or file.endswith('PNG') or file.endswith('JPG'):
images.append(dir + '\\' + file)
else:
images.append(dir)
for image in images:
faces1, img_gray, img = face_detect(image)
if faces1==():
faces1=array([[0,0,img_gray.shape[1],img_gray.shape[0]]])
faces=[]
for i in faces1:
x,y,w,h=i
if w >= max(faces1[:,2])*0.8:
j=(x,y,w,h)
faces.append(j)
spb = img.shape
sp = img_gray.shape
height = sp[0]
width = sp[1]
size = 600
emo = ""
face_exists = 0
for (x, y, w, h) in faces:
face_exists = 1
face_img_gray = img_gray[y:y + h, x:x + w]
results = predict_emotion(face_img_gray) # face_img_gray
result_sum = array([0]*num_class)
for result in results:
result_sum = result_sum + array(result)
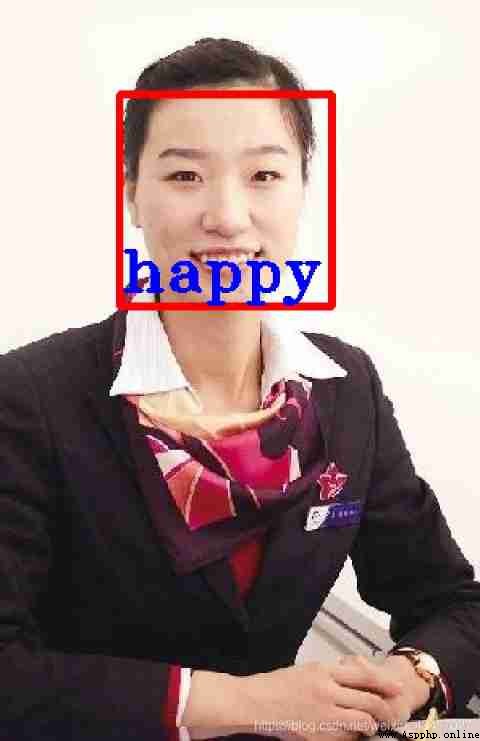
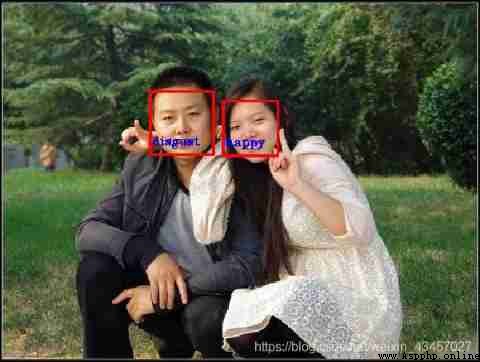
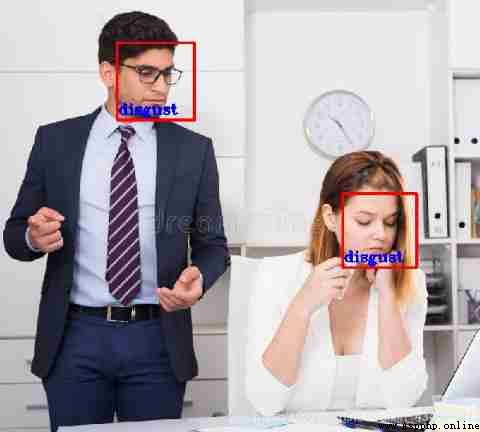
disgust,happy= result_sum
print('disgust:', disgust,' happy:', happy)
label = argmax(result_sum)
emo = emotion_labels[label]
print('Emotion : ', emo)
t_size = 2
ww = int(spb[0] * t_size / 300)
www = int((w + 10) * t_size / 100)
www_s = int((w + 20) * t_size / 100) * 2 / 5
rectangle(img, (x, y), (x + w, y + h), (0, 0, 255), ww)
putText(img, emo, (x+2, y+h-10),FONT_HERSHEY_TRIPLEX,www_s, (255, 0, 0), thickness=www, lineType=1)
if face_exists:
HoughLinesP
namedWindow(emo, 0)
cent = int((height * 1.0 / width) * size)
resizeWindow(emo, (size, cent))
imshow(emo, img)
k = waitKey(0)
destroyAllWindows()
if k & 0xFF == ord('q'):
break
Effect display
Training set
Test set
Real time prediction
The real-time recognition of facial expression requires the computer to obtain the information of the camera , The idea is to obtain the permission of the computer camera , Open the camera to capture real-time pictures , Get a frame of the current picture for prediction , The real-time rate of recognition varies according to the refresh rate
#-*- coding: utf-8 -*-
import cv2
import sys
import gc
import json
import numpy as np
from keras.models import Sequential
from keras.models import model_from_json
root_path=os.path.abspath(".")
model_path=root_path+'/model/'
img_size=48
emo_labels = ["happy", 'disgust']
num_class = len(emo_labels)
json_file=open(model_path+'model_json.json')
loaded_model_json = json_file.read()
json_file.close()
model = model_from_json(loaded_model_json)
model.load_weights(model_path+'model_weight.h5')
if __name__ == '__main__':
if len(sys.argv) == 1:
print(len(sys.argv))
print("Usage:%s camera_id\r\n" % (sys.argv[0]))
sys.exit(0)
# The color of the face frame
color = (0, 0, 2555)
# Capture the real-time video stream of the specified camera
cap = cv2.VideoCapture(0)
# Local storage path of face recognition classifier
cascade_path ="C:/ProgramData/Anaconda3/lib/site-packages/cv2/data/haarcascade_frontalface_alt.xml"
# Circular detection and face recognition
while True:
_, frame = cap.read() # Read a frame of video
# Image ashing , Reduce computational complexity
frame_gray = cv2.cvtColor(frame, cv2.COLOR_BGR2GRAY)
# Use a face recognition classifier , Read in classifier
cascade = cv2.CascadeClassifier(cascade_path)
# The classifier is used to recognize which area is the face
faceRects = cascade.detectMultiScale(frame_gray, scaleFactor = 1.1,
minNeighbors = 1, minSize = (120, 120))
if len(faceRects) > 0:
for faceRect in faceRects:
x, y, w, h = faceRect
images=[]
rs_sum=np.array([0.0]*num_class)
image = frame_gray[y: y + h, x: x + w ]
image=cv2.resize(image,(img_size,img_size))
image=image*(1./255)
images.append(image)
images.append(cv2.flip(image,1))
images.append(cv2.resize(image[2:45,:],(img_size,img_size)))
for img in images:
image=img.reshape(1,img_size,img_size,1)
list_of_list = model.predict_proba(image,batch_size=32,verbose=1)
result = [prob for lst in list_of_list for prob in lst]
rs_sum+=np.array(result)
print(rs_sum)
label=np.argmax(rs_sum)
emo = emo_labels[label]
print ('Emotion : ',emo)
cv2.rectangle(frame, (x - 10, y - 10), (x + w + 10, y + h + 10), color, thickness = 2)
font = cv2.FONT_HERSHEY_SIMPLEX
cv2.putText(frame,'%s' % emo,(x + 30, y + 30), font, 1, (255,0,255),4)
cv2.imshow(" Recognize my expression !", frame)
# wait for 10 Milliseconds to see if there is a key input
k = cv2.waitKey(30)
# If input q Then exit the loop
if k & 0xFF == ord('q'):
break
# Release the camera and destroy all Windows
cap.release()
cv2.destroyAllWindows()
The accuracy of facial expression recognition is closely related to the quality of data set , In training, it is best to select high-definition and waterless facial expressions for training , otherwise OpenCV There will be errors in face recognition , So as to affect the prediction results
The binary convolution neural network for facial expression can be completed well , It lies in that when communicating with customers, we can constantly correct our marketing strategy through the feedback of customers' expressions
Facial expressions can also be used in many ways , It can be used as a technical support to assist other industries , Need to continue to explore and improve