This paper is based on the prediction model of apple tree diseases and pests , Custom application layer communication logic , Design server and client . The client sends image data to the server , The server sends back the prediction results . To enhance the reliability and scalability of the server , The server adopts thread pool working mode . To enhance the operability of the client , The client uses PyQt5 Complete the graphical interface design .
The communication logic between the client and the server is shown in the figure 1 Shown .
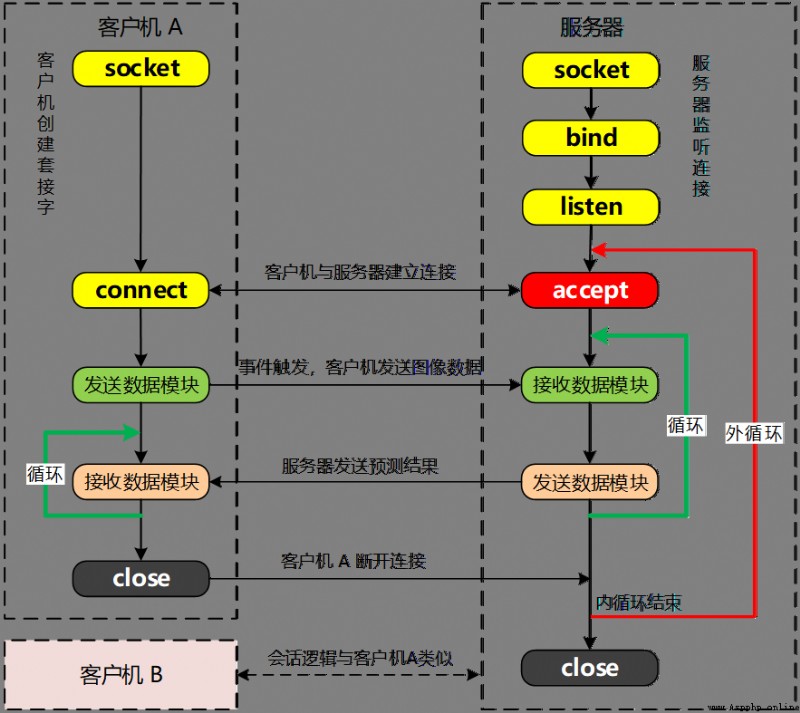
■ chart 1 Smart desktop App Client / Server communication logic
The protocol session process of a round trip of information between the client and the server , Defined as graph 2 Logical timing shown .
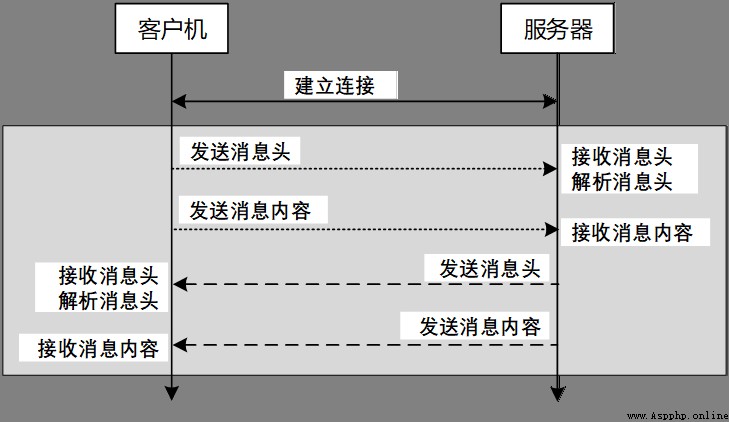
■ chart 2 Application layer communication protocol
Protocol session logic parsing :
(1) Message exchange is based on the message header mechanism . The message header contains the message type and message length . Message types include image messages and offline messages .
(2) use Json The formatted data represents the message header . For image data base64 Encoding and decoding .
(3) Sending data is done in two steps , First send the message header , Then send the message content .
(4) Receiving data is done in two steps , First receive the message header , Then receive the message content .
The structure design of the message header is shown in Figure 3 Shown , The fixed length of the message header is 128 byte , Contains message types (msg_type) And message content length (msg_len) Two fields .
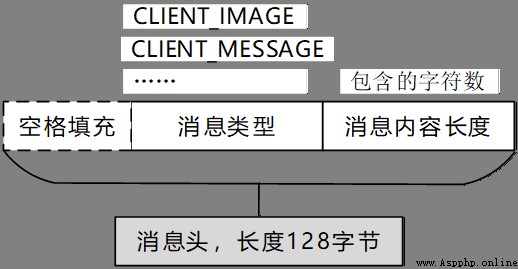
■ chart 3 The structure of the message header
Message types include :
(1)CLIENT_IMAGE: Indicates that the image data from the client is received .
(2)CLIENT_MESSAGE: Indicates that a logoff message is received from the client .
The message content length is expressed by the number of characters contained in the message . For image data , Because of the adoption of base64 code , The data it transmits is also a character message .
The length of the message header is agreed to be... At both ends of the server and the client 128 byte , Use constant MSG_HEADER_LEN Definition . Before sending the message header , You need to check the length of the message , If not enough 128 byte , The left side is filled with byte space characters .
According to the figure 1 Described server logic , Complete the main logic design of the server , Such as program segment P7.1 Shown .
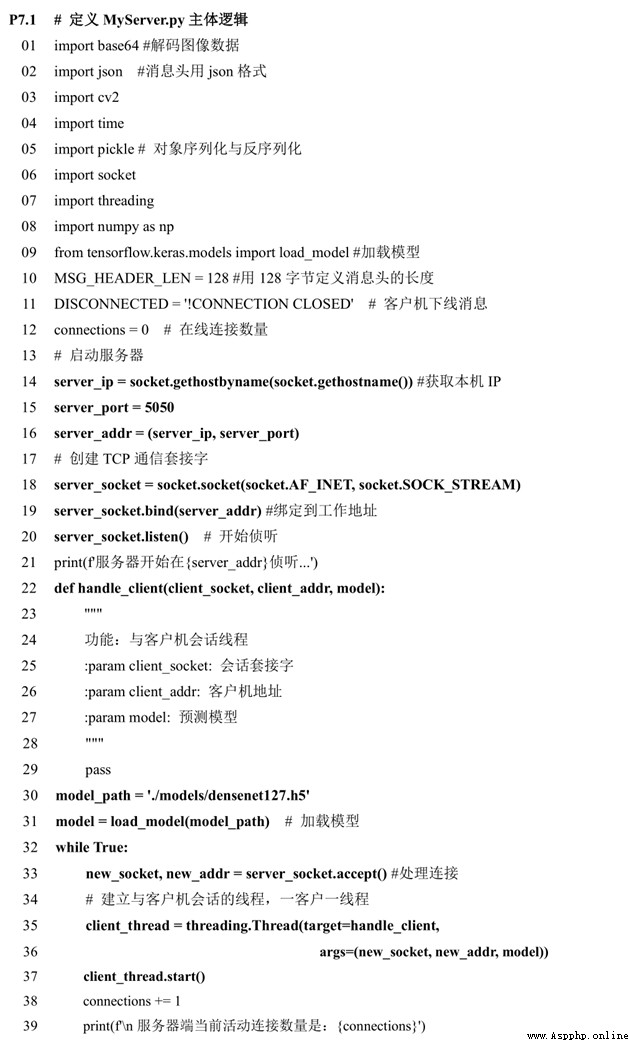
The first 32~39 Line defines the main loop on the server side , Handling client connections , It adopts a client thread mode . The server session thread is defined as handle_client modular , The main thread passes three parameters to the session thread :
(1)client_socket: Session socket
(2)client_addr: Client address
(3)model: Intelligent models for forecasting
Run the server program , Observe the output , At this time, the server is listening for connections , But because of handle_client The module has not been implemented yet , Therefore, various messages from the client cannot be processed .
The server session thread includes two modules: receiving data and sending data , Corresponding graph 1 Inner loop in . After the server finishes receiving data , It is necessary to send back the prediction result or confirmation message to the client , Therefore, the logic of receiving data and sending data is defined in the same function module handle_client in , The logic flow of sending and receiving data is shown in the figure 4 Shown .
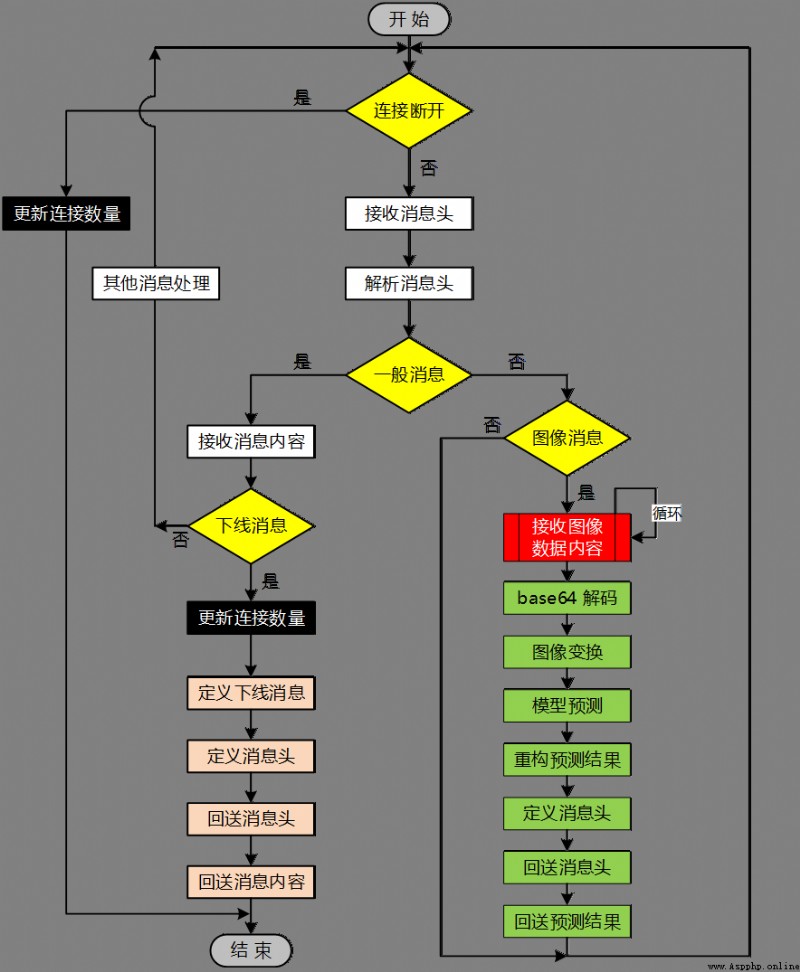
■ chart 4 Server sends and receives data session thread logic
The main logic of the session thread is a loop , The loop condition is whether the remote client ends the session , The logic flow is analyzed as follows :
(1) If the client disconnects from the server , Session thread ends .
(2) When the connection is normal , The server first receives the message header from the client , Parsing message headers , Depending on the type of message , There are general messages and image messages .
(3) If it is an image message , Through a cycle , Data reception is completed according to the size of the image , And then pass by base64 decode 、 Image transformation ( Adjust the color mode 、 normalization 、 The zoom )、 Model to predict 、 Reconstruct the prediction results 、 Define the message header 、 Echo message header 、 Send back the forecast results . Back to step (1).
(4) If it is a general message , Then continue to judge whether it is an offline message .
(5) If it is an offline message , Then update the number of connections , Define the offline message ( Time stamp the original message ), Define the message header , Echo message header , Echo message content , Session thread ends .
(6) If it is not an offline message , Do other message processing , To simplify the design , Other message processing modules are not programmed temporarily , Reserved for extension . Back to step (1).
Session thread handle_client The logical implementation of a program segment P7.2 Shown .
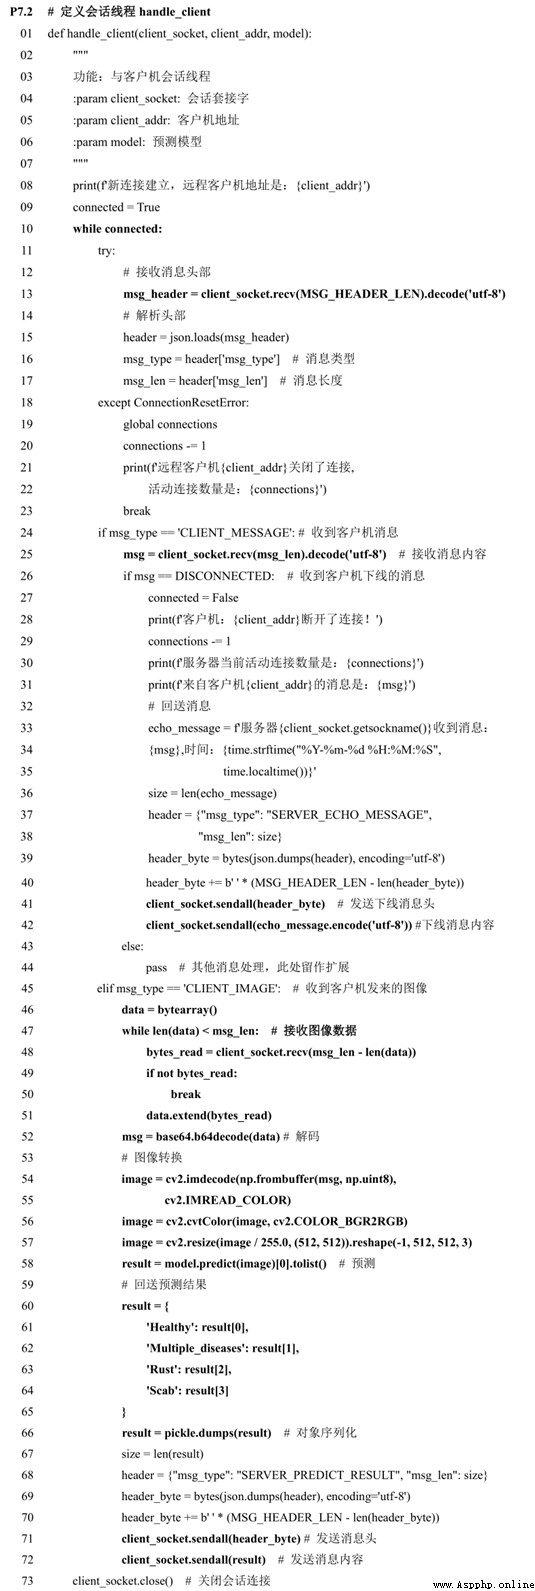
The first 46 That's ok – The first 51 Row defined loop structure , According to the length of the image data msg_len Complete data receiving .
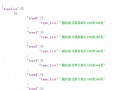
Run the server program , The output is :
The server starts at ('192.168.0.102', 5050) Listen ...Wait for the client program to complete , Then do the joint test .
New main program MyClient.py. According to the figure 1 Described client logic , Complete the main logic design of the client , The main modules are shown in the figure 5 Shown .
modular send_image_data Send image data , modular send_down_msg Send offline messages , modular recv_message Is the session thread used to receive server messages , Class module GUI(QMainWindow) Responsible for building the client graphical interface . The main program completes the main control logic design .
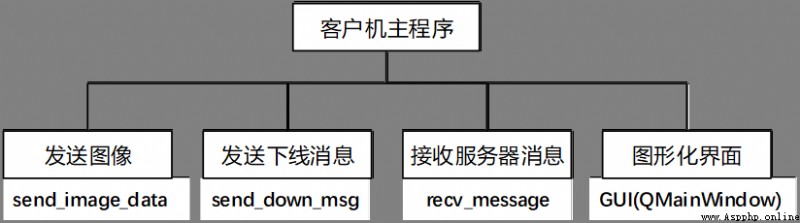
■ chart 5 Client program module structure
The message structure of the client is defined as shown in Figure 3 Shown , Consistent with the server . Message sending and receiving logic , Pictured 2 Shown , It is also consistent with the server .
The client body logic is like a program segment P7.3 Shown .
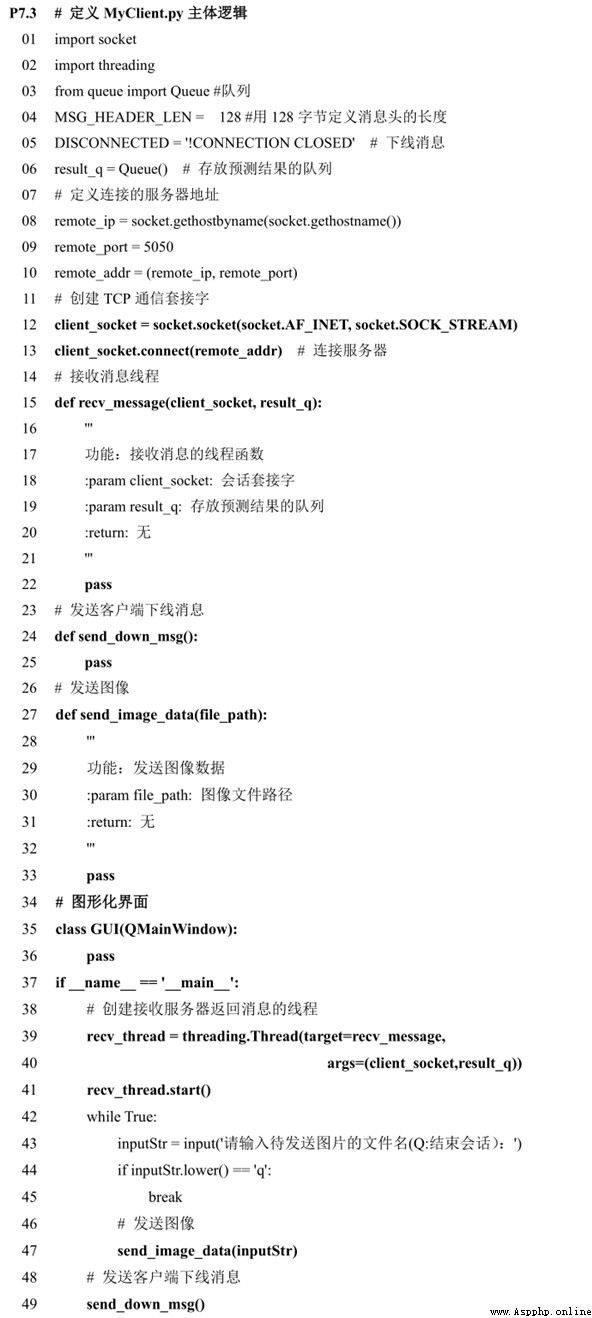
First run the server program , Then run the test client program . At present, the client can not do specific work , The input character Q Exit the client main loop .
There are two types of data that clients send to the server , First, image data , First, offline messages . The flow of sending image data is shown in the figure 6 Shown .
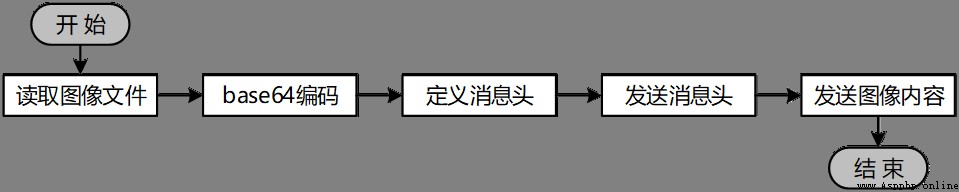
■ chart 6 Send image data flow
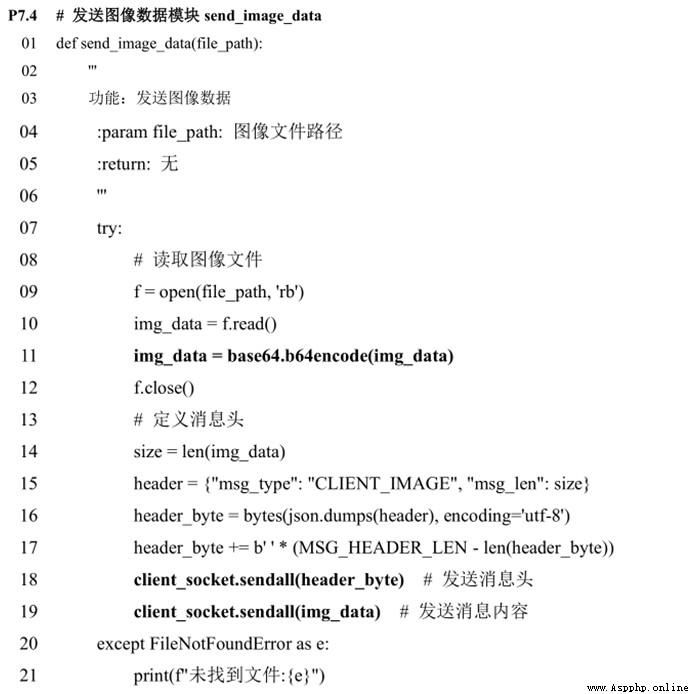
Procedures section P7.4 The sending image data module is described send_image_data The complete logic of .
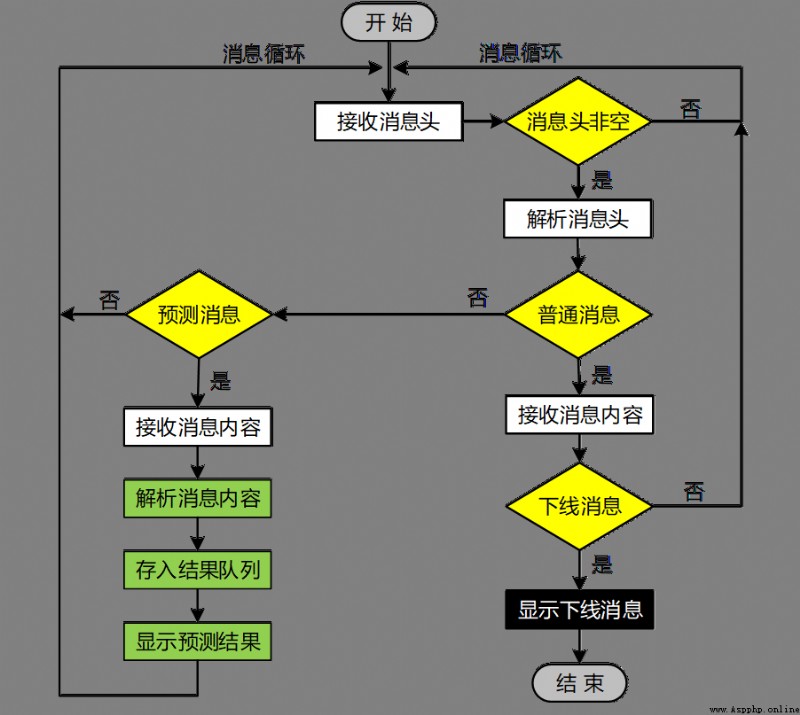
The client defines the thread function recv_message, Used to receive two types of data , First, general information ( Offline messages, etc ), Second, forecast information ( Predicted results ). The message processing flow is shown in Figure 7 Shown , The steps are described below .
(1) Enter the message loop , Receive header .
(2) If the message header is empty , Go to step (1).
(3) If the message header is not empty , Then parse the message header , Get the message type and message length .
(4) If it's ordinary news , Then the message content is received , Further determine whether it is an offline message .
(5) If it is an offline message , Then it will jump out of the message loop , Go to step (9).
(6) If the message is not offline , Then go to step (1).
(7) If it's not a regular message , Then judge whether it is a forecast message , If it's not a forecast message , Then go to step (1).
(8) If it is a forecast message , Then the message content is received , Parse message content , Put the prediction results in the queue , Show forecast results . Go to step (1).
(9) Show offline message , The message receiving thread ends .
■ chart 7 The client receives the message logic flow
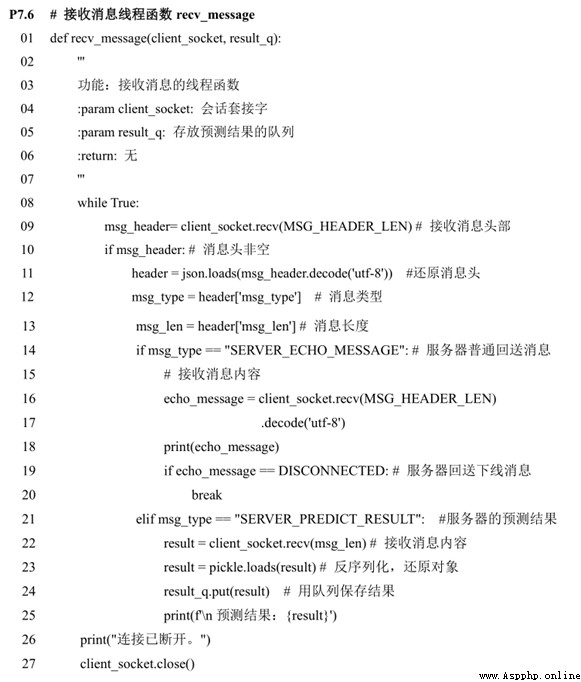
Procedures section P7.6 Describes the receiving message thread function recv_message The complete logic of .
take \dataset\images Image files in the directory Test_0.jpg、Test_7.jpg Copy to the root directory .
Run the server program , Then run the client program , Do joint tests .
The client inputs the name of the image file to be tested Test_0.jpg, Press enter to send image data , The server returns the prediction result . Client input characters Q, End client . After this communication between the client and the server , The status information of the server and client is shown in the figure 8 Shown .
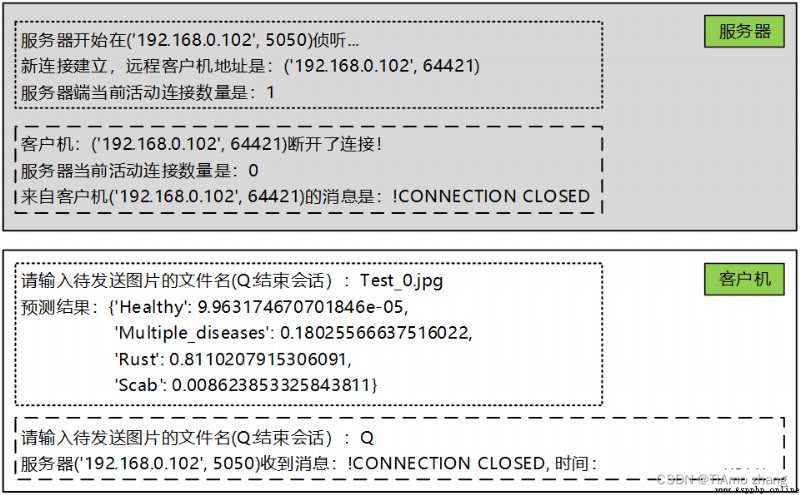
■ chart 8 Client and server joint test
At this point, the server works in a client thread mode , Start multiple clients , It can be used for joint testing .
To enhance the operability of the client , be based on PyQt5 The framework designs a graphical interface for the client , The interface layout and its control names are shown in the figure 9 Shown .
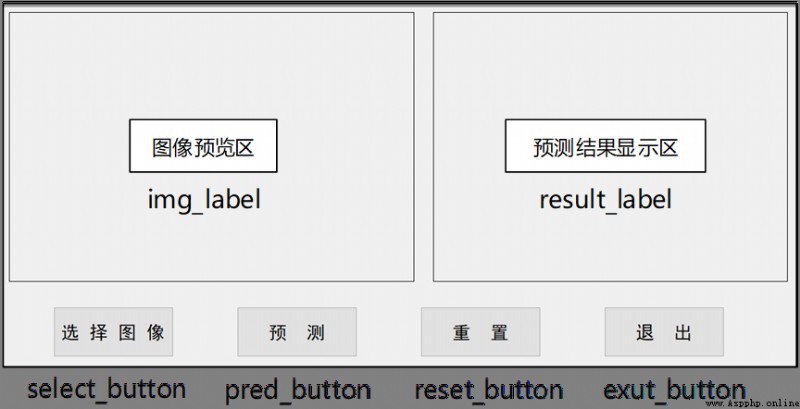
■ chart 9 Client graphical interface layout
Define graphical interface classes GUI(QMainWindow) Package diagram 9 The control and its event function shown in .
Run the server , Then run the client , from chapter7 Loading images in the root directory of Test_0.jpg, Observe the characteristics of the image . And then click “ forecast ” Button , Observe the prediction results fed back by the server , Pictured 10 Shown .
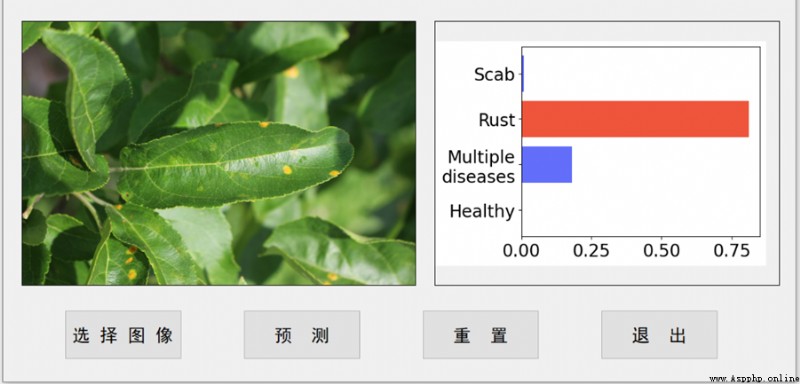
■ chart 10 Client graphical interface test results
The existing working mode of the server is one client one thread , That is to create an independent session thread for each client connected to the server , When the client concurrency is large , Servers often face the challenge of resource exhaustion .
Thread pool mode can effectively balance the load capacity of the server , Compared with the one client one thread mode , Its main advantages are :
(1) By reusing existing threads , Reduce the extra cost of thread creation and destruction .
(2) Improve system response speed , When a new mission arrives , By reusing existing threads, you can immediately execute , No need to wait for a new thread to be created .
(3) Control resource consumption , Limit the number of concurrent threads to a reasonable range .
(4) Provides more control over worker threads , For example, thread delay 、 Time to wait .
Python The thread pool of is defined in concurrent.futures In bag , Use ThreadPoolExecutor Class to create a thread pool . The process of thread pool scheduling task is shown in the figure 11 Shown .

■ chart 11 Schematic diagram of thread pool scheduling task
Change the one client one thread mode to the thread pool mode , Just make the following changes :
(1) Import thread pool class ThreadPoolExecutor. Add statements on the server side :
from concurrent.futures import ThreadPoolExecutor # Thread pool class (2) In the server main thread while Add a statement to create a thread pool before the loop :
pool = ThreadPoolExecutor(max_workers=5) # Creating a thread pool , Specify the number of worker threads as 5If the parameter is omitted here max_workers, The default number of worker threads in the thread pool is CPU In quantity 5 times . Consider that thread pools are often used in applications that require a large number of I/O Exchange scenarios , instead of CPU Computing intensive scenarios , Therefore, the number of worker threads should exceed CPU The number of .
(3) Replace the original thread creation statement with the thread pool scheduling statement .
#  Set up a thread to talk to the customer , One client, one thread
client_thread = threading.Thread(target=handle_client, args=(new_socket, new_addr, model))
client_thread.start()
Replace with :
pool.submit(handle_client,new_socket, new_addr, model) # Create thread task , Commit to thread pool (4) At the end of the main program ,while Outside of the loop , Add a statement to close the thread pool , Release resources :
pool.shutdown(wait=True) # Close thread pool perform shutdown after , The thread pool will no longer accept new tasks . Parameters wait The default is True, Indicates that you need to wait for all worker threads to end before closing the thread pool .
For the convenience of observation , Adjust the number of worker threads in the server thread pool to 2. Start the server , Then start four clients , Identify as client 1、 The client 2、 The client 3、 The client 4.
Four clients from dataset\images Select four different test pictures in the catalog ,
Suppose the client 1 The selected picture is Test_17.jpg, The client 2 The choice is Test_152.jpg, The client 3 The choice is Test_190.jpg, The client 4 The choice is Test_1572.jpg, Then click client in turn 1、 The client 2、 The client 3、 The client 4 Of “ forecast ” Button , Observe the prediction results .
You can see , Only the client 1、 The client 2 The prediction results were immediately fed back , And the client 3、 The client 4 Although already connected to the server , But there was no immediate prediction , The reason is that the server thread pool size is 2, The client 3、 The client 4 Need to wait in the task queue .
The client 1 The results are shown in the figure 12 Shown .
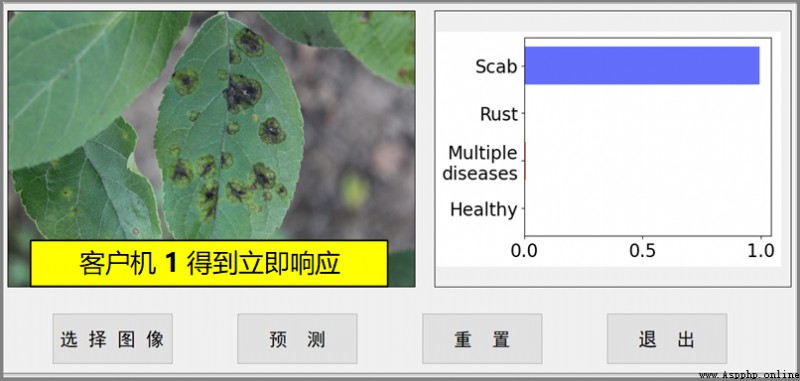
■ chart 12 The client 1 Forecast results of
The client 2 Display result diagram 13 Shown .

■ chart 13 The client 2 Forecast results of
The client 3 The results are shown in the figure 14 Shown . Because the server thread pool size is 2, So the client 1 With clients 2 After the worker thread is occupied , The client 3 You can only enter the task queue to wait .
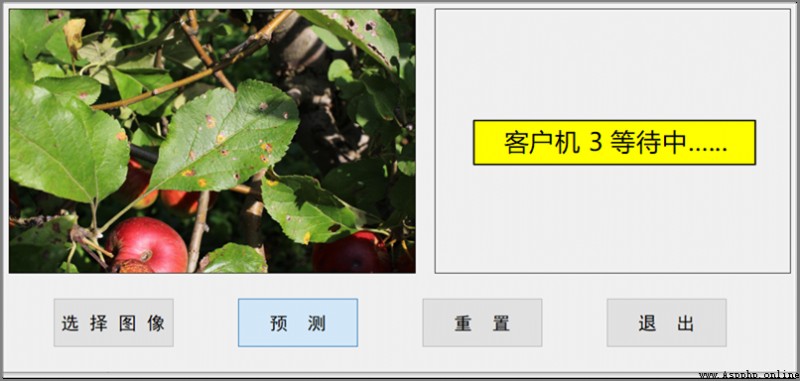
■ chart 14 The client 3 Waiting
The client 4 The results are shown in the figure 15 Shown . Again , The client 4 You can only enter the task queue of the server and wait .
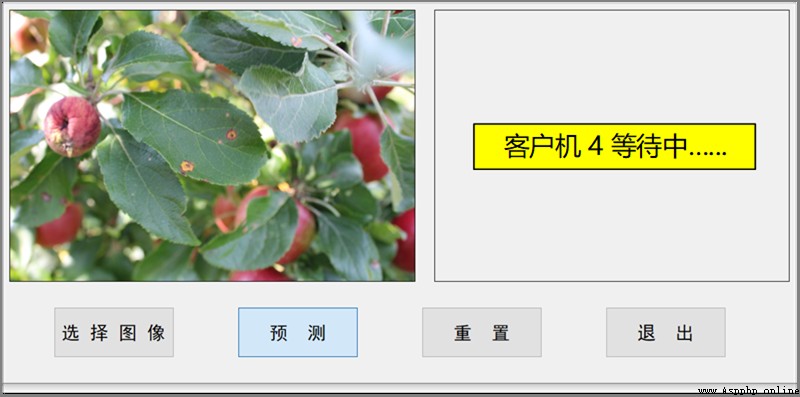
■ chart 15 The client 4 Waiting
Shut down the client 1, Will automatically release the client 1 Occupied worker threads , At this point, the queued clients 3 Will immediately get the corresponding , The result is shown in the figure 16 Shown .
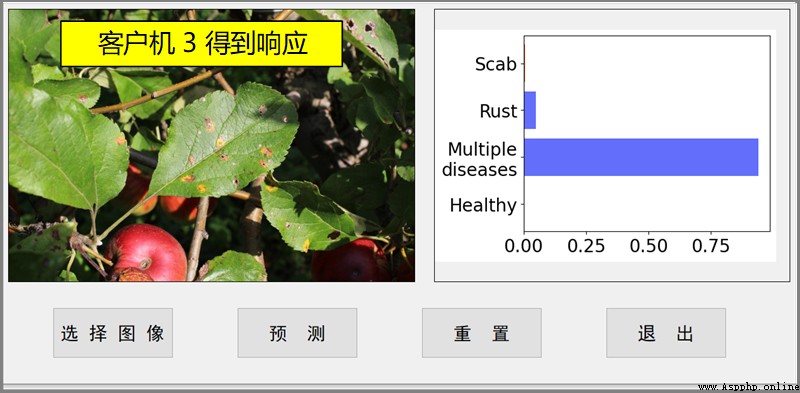
■ chart 16 The client 3 Get server response
At this point only the client 4 Still waiting . If you continue to shut down the client 2, Then the client 4 Will get an immediate response , The prediction results are shown in Figure 17 Shown .

■ chart 17 The client 4 Get server response
Shut down the client 3、 Shut down the client 4. Throughout the conversation , The information prompt in the server status monitoring interface is as follows :
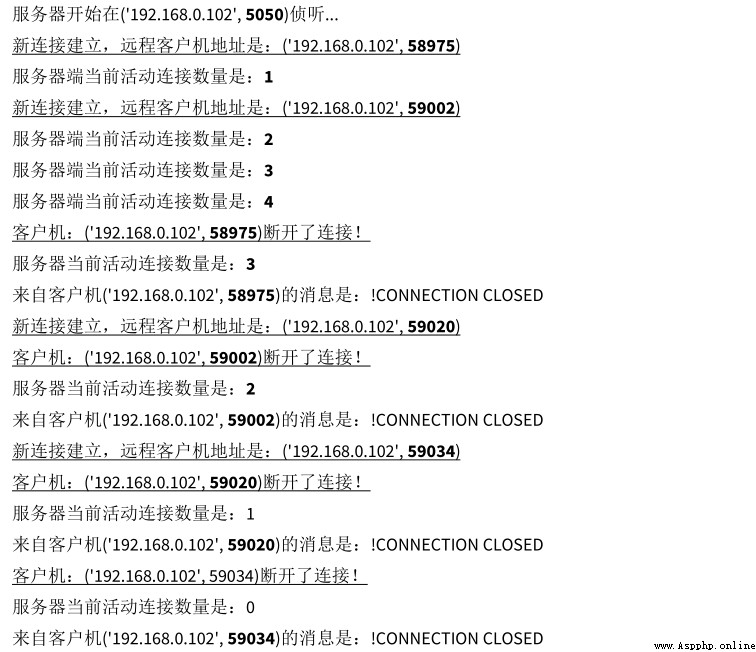
Read the status prompt of the server carefully , Compare with the operation of the client , It can more accurately grasp the whole session logic between the client and the server .
This article is based on Socket Communication method , Custom data exchange protocol , Around the needs of apple tree pest identification , Iteratively build the client / Server mode smart desktop App. The transmission of image data adopts base64 Encoding mode , The message header 、 The message content adopts Json data format . The server adopts one client one thread and thread pool technology to support concurrent access , The client is based on PyQt5 The graphic interface technology improves its operability . be based on Socket Technical network programming , Provides more design flexibility on both sides of the client and server .