# Course link :
new django3 Introduction to project practice ( Zero basis to learn django、 Project development practice 、 College graduation design is available )_ Bili, Bili _bilibili
# Course coverage :
Administrator module _(4-11 ~~~ 4-12 Curriculum ), among ajax First knowledge is divided into two sections
# If there is nothing to worry about , It's a good time on earth
# (1) Verification code verification
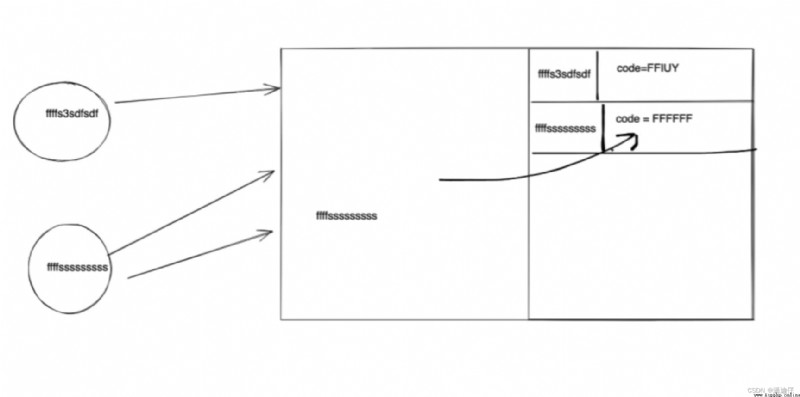
1) The logic of verification . We know that different users have different authentication codes when logging in , But we want to implement one-to-one verification . Then you need to use session There's a queue . stay session in , We have stored the credentials of different users and info , That is, after the verification code is generated , The server returns verification code information to the browser , We can write the corresponding verification code to session in .
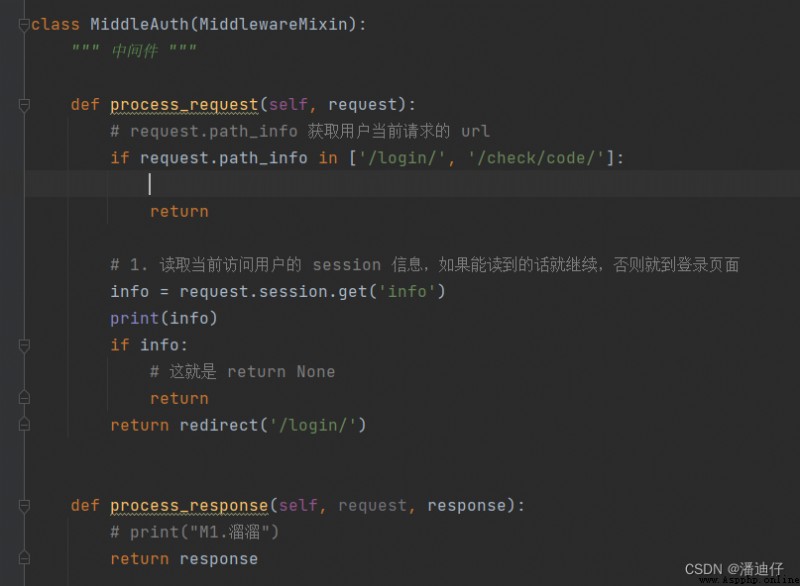
To understand the above logic , We need to review the middleware we wrote . Suppose the browser wants to access url by /admin/list/ , At the beginning, you decide whether to access the two in the list url No. , Just take a look session Of info Does the field write something , If not, redirect to /login/ .
# (2) Implementation of picture verification code verification
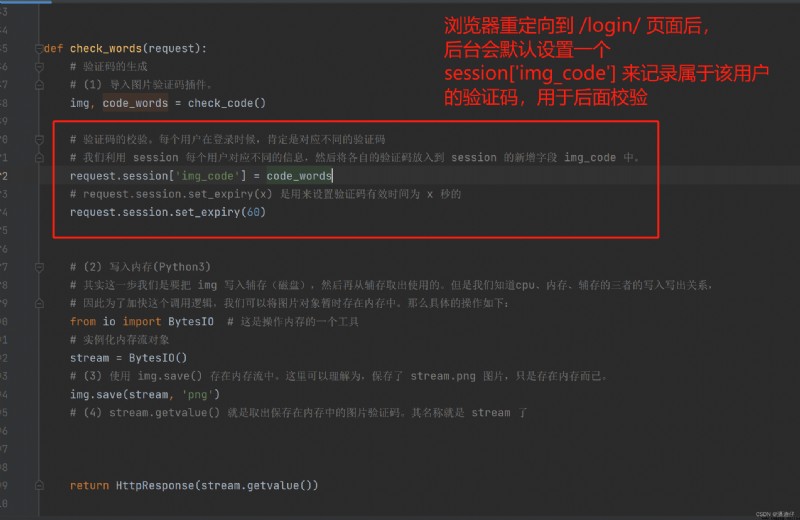
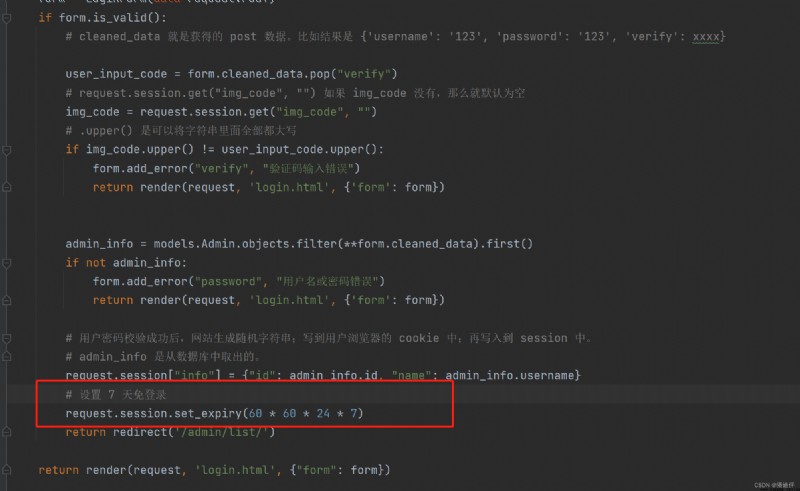
1) After we generate the verification code , We write the truth value of the verification code to session in , In the picture request.session["img_code"] = code_words To set it up , At the same time, we can set the valid time for this verification code to be 60 second , See the notes in the figure for details .
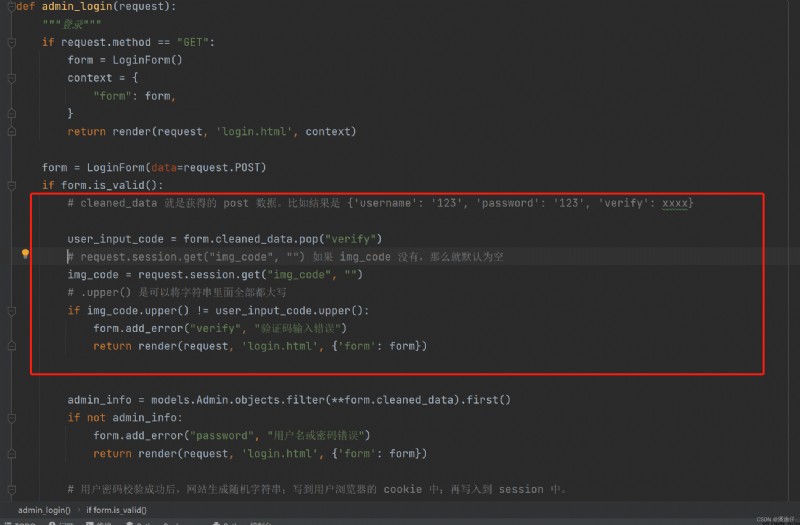
2) Revise login The logic of the view function . Now the user has to enter the verification code , So in form.cleaned_data There is only one more field of data in the dictionary .( We added a new verification code field to the hook method verify, The source code will be given later ). In order not to hinder the subsequent judgment of user name and password , We choose pop To extract values from the dictionary data , And delete verify Field , So what you get here is the verification code entered by the user user_input_code ; Then we take it out again request.session.get("img_code", "") It's from session Get the truth value of the verification code from the queue , We will match the input with the true value after capitalization , If not, an error is returned .
3) Considering that we will session The effective time of the information is set to 60 second , So we have to set it again session Effective time of , For example, seven days without login . The code is shown in the following figure . We need to understand that the whole process of authentication is the responsibility of a user . The logic has to turn around .
# (3) Login source code
# -*- coding=utf-8 -*-
# github: night_walkiner
# csdn: Pandizi
from django import forms
from app01 import models
from django.shortcuts import render, redirect, HttpResponse
from app01.utils.encrypt import md5
from app01.utils.check_words import check_code
from app01.utils.bootstrap import BootStrapForm
class LoginForm(BootStrapForm):
username = forms.CharField(
label=" user name ",
widget=forms.TextInput,
required=True
)
password = forms.CharField(
label=" password ",
widget=forms.PasswordInput,
required=True
)
verify = forms.CharField(
label=" Verification Code ",
widget=forms.TextInput,
required=True
)
# Hook method --- To determine the value of the password
def clean_password(self):
pwd = self.cleaned_data.get("password")
# On the password md5() encryption
return md5(pwd)
def admin_login(request):
""" Sign in """
if request.method == "GET":
form = LoginForm()
context = {
"form": form,
}
return render(request, 'login.html', context)
form = LoginForm(data=request.POST)
if form.is_valid():
# cleaned_data Is what you get post data . For example, the result is {'username': '123', 'password': '123', 'verify': xxxx}
user_input_code = form.cleaned_data.pop("verify")
img_code = request.session.get("img_code", "")
# .upper() You can capitalize all strings
if img_code.upper() != user_input_code.upper():
form.add_error("verify", " Error in captcha input ")
return render(request, 'login.html', {'form': form})
admin_info = models.Admin.objects.filter(**form.cleaned_data).first()
if not admin_info:
form.add_error("password", " Wrong user name or password ")
return render(request, 'login.html', {'form': form})
# After the user password is verified successfully , The website generates a random string ; Write to the user's browser cookie in ; Write it back to session in .
# admin_info Is taken from the database .
request.session["info"] = {"id": admin_info.id, "name": admin_info.username}
# Set up 7 Days free login
request.session.set_expiry(60 * 60 * 24 * 7)
return redirect('/admin/list/')
return render(request, 'login.html', {"form": form})
# Cancellation
def admin_logout(request):
""" Logout function """
# Know the current user's session Information
request.session.clear()
# Redirect back to login page
return redirect('/login/')
def check_words(request):
# Generation of verification code
# (1) Import the picture verification code plug-in .
img, code_words = check_code()
# Verification of verification code . Each user logs in , It must correspond to different verification codes
# We make use of session Each user corresponds to different information , Then put their verification codes into session New fields img_code in .
request.session['img_code'] = code_words
# request.session.set_expiry(x) It is used to set the valid time of the verification code to x Of a second
request.session.set_expiry(60)
# (2) Write to memory (Python3)
# In fact, this step is to img Write to secondary storage ( disk ), And then take out the used from the auxiliary storage . But we know that cpu、 Memory 、 Write write relationship of the three supplementary storage ,
# So to speed up the call logic , We can temporarily store image objects in memory . The specific operations are as follows :
from io import BytesIO # This is a tool for manipulating memory
# Instantiate memory stream object
stream = BytesIO()
# (3) Use img.save() In the memory stream . So this could be interpreted as , Save the stream.png picture , It's just memory .
img.save(stream, 'png')
# (4) stream.getvalue() It is to take out the picture verification code saved in the memory . Its name is stream 了
return HttpResponse(stream.getvalue())
# (1)ajax request
1) In the previous section, we solved the problem when the browser sends a request to the website , It's all based on form Submission request in form , That is to say GET、POST Two kinds of . This way is easy , But every time you click Submit , You need to refresh the page .
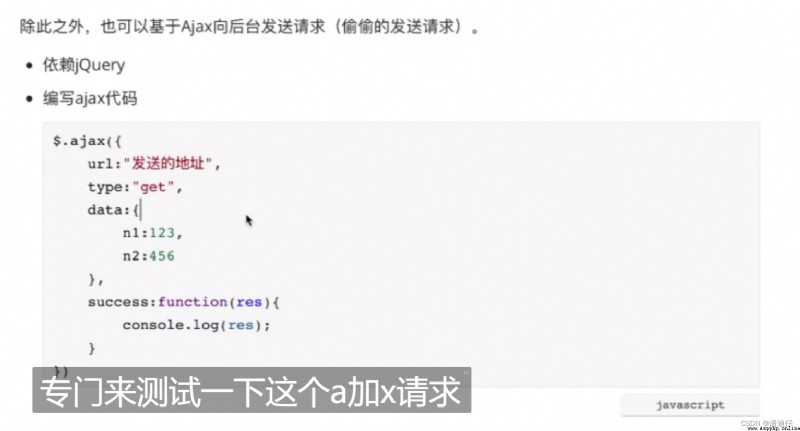
2) Except for the form above , We can base it on ajax Send a request to the background , This can be understood as secretly sending requests to the server , That is, the request mode without refreshing the page . It depends on JQuery library , This is a classic js The framework . Then write ajax Code .
Here is ajax Comments for the request code .
// Used python The way of annotation ...
$.ajax({
url: " Requested address ", # Here is the requested address
type: "get", # This is the type of request get still post
data: { # If it is get If you ask , that data Is the parameter passed to the background
n1: 123,
n2: 456
},
# If the request succeeds , The back end will return a res Parameters , Then we can directly get
success:function(res){
console.log(res)
}
})
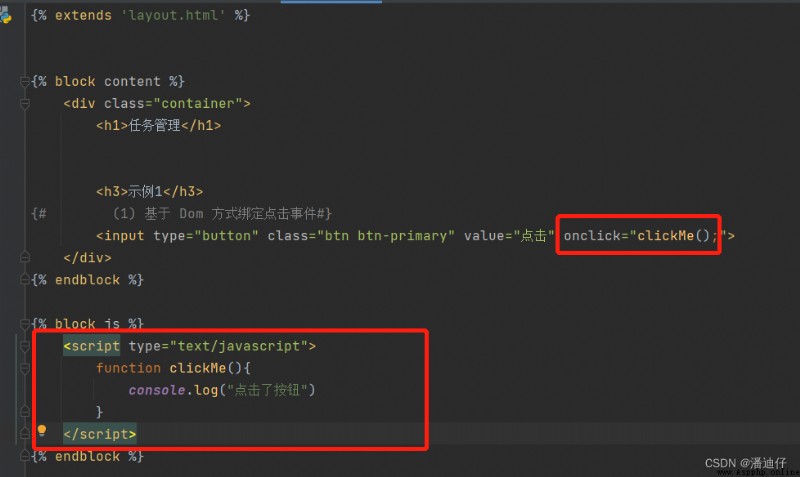
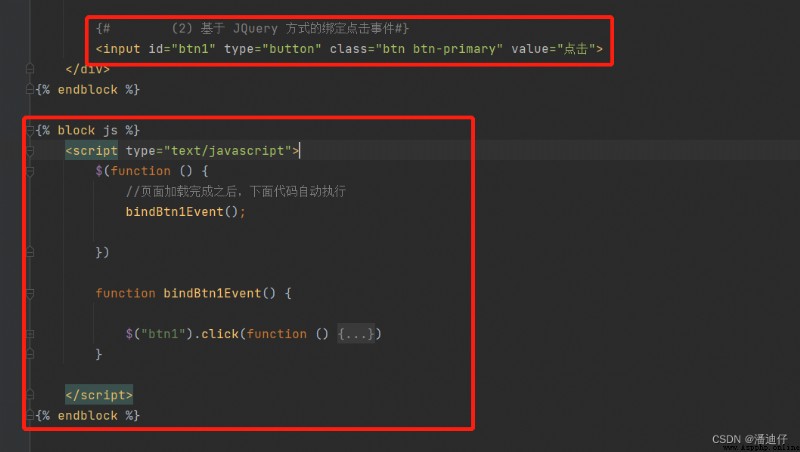
# (2)JavaScript Related knowledge _ be based on Dom Method to bind click events
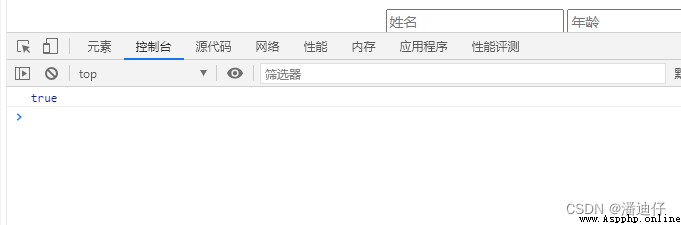
1) be based on Dom Method to bind click events . That is, the method shown in the figure below .( This page is task_list.html , We have defined the related view functions .)
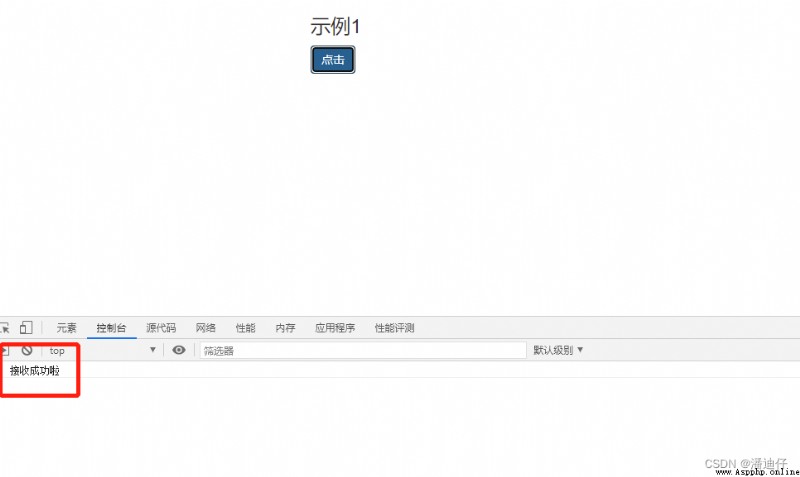
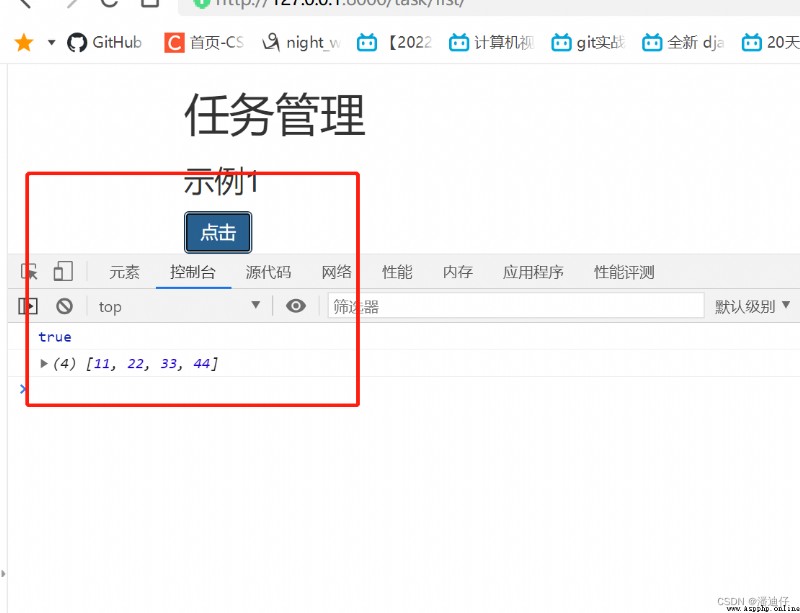
After executing the above code , We can click the click button on the front page , On the console ( Browser's ) Output a click on the button .
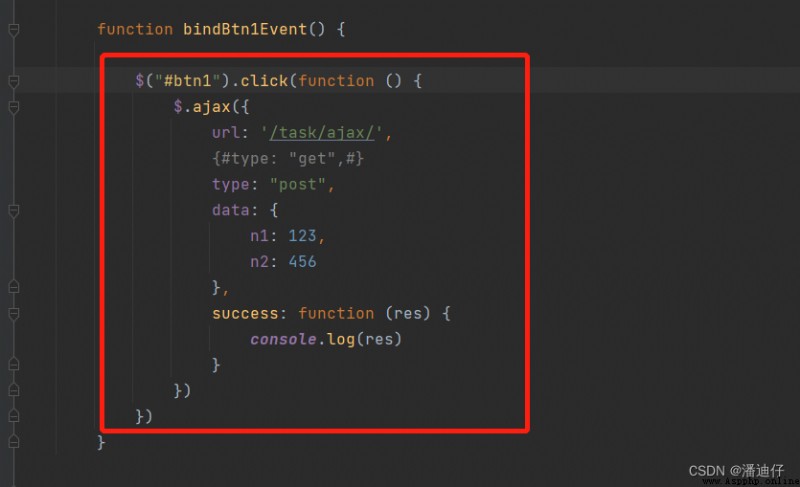
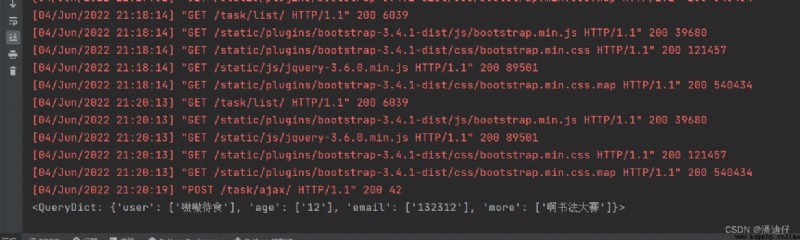
2) If we want to click , Send a request , It needs to be modified js Code for . Before that , We created one in advance url by "/task/ajax/". And the response value given is " The reception was successful ", Then we began to follow the above ajax Requested format and comments , To modify the js Code for . As shown in the figure below .【url There is a hole in the hole , I'll fill the pit later 】
Then we test clicking the button , You can see the return value res :" Received successfully ".
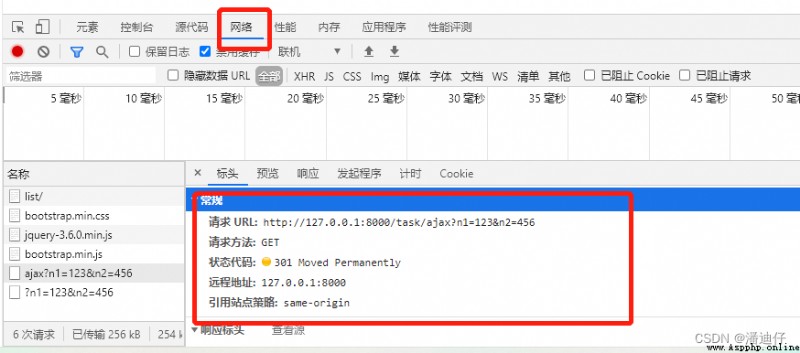
We can check the time of request url, As shown in the figure below
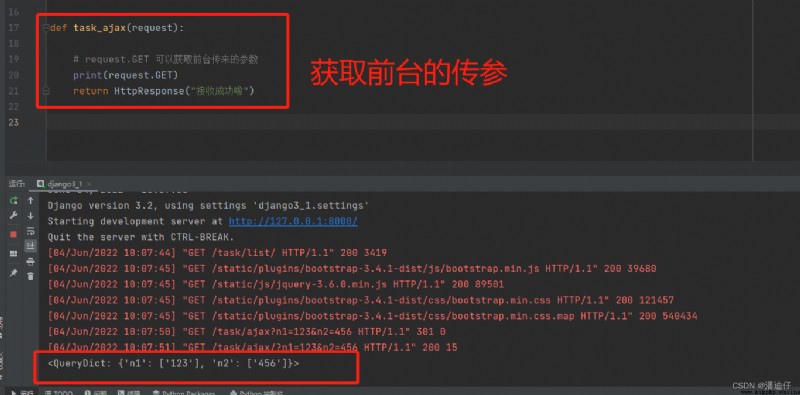
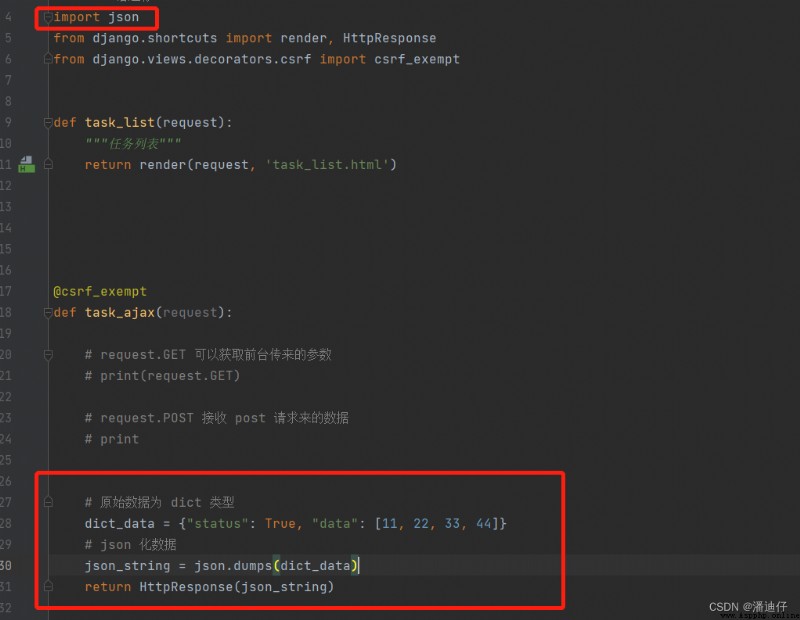
Of course , We can also view functions in the background , namely task_ajax ( The one we asked for url)
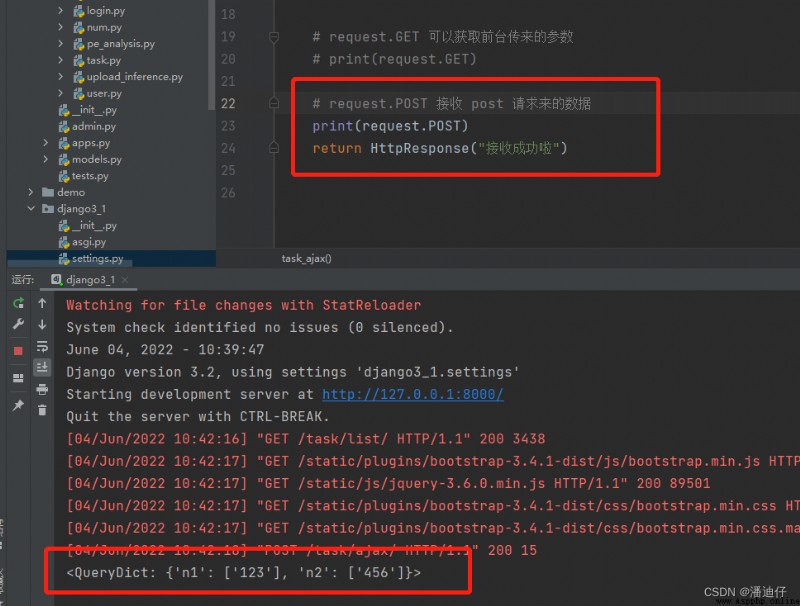
get get Parameters from the request . As shown in the code below .
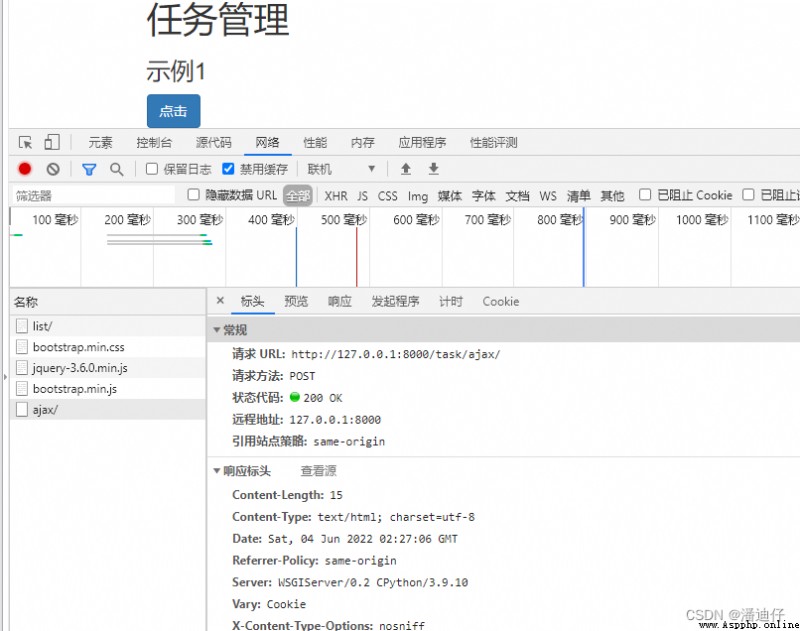
3) If our ajax It uses post request , That is, in the code above , take type: "get" Change to type: "post" , Return to the front page again and click to report an error .
How to exempt csrf_token authentication , Here is a point of knowledge . Import the following packages , How to reference before a function . This is because we were
I also add a knowledge point ,post After the request , We may also have the following problems , That is, the status code is 500 Of , This is because we are ajax Code url: "/task/ajax" no , Need to change to url: "/task/ajax/".
therefore , After the first two problems are solved , We click the button again , It shows that the reception was successful .
such , We can use post The requested parameters .
# (3)JavaScript Related knowledge _ be based on JQuery Method to bind click events
1) be based on JQuery Method to bind click events . That is, in the following way . That is, we put the original onclick Remove the attribute , utilize id Property to bind Events . then js Block of code , By format $(function () { The body of the function }) To write js Code , So this way of writing , When the page is loaded, the contents of the function body will be automatically executed .
2) therefore , We take advantage of auto loading content , We define a function that binds events bindBtn1Event(), The way of definition is function Function name () { The body of the function }, Then the function body content of this function is that it will be found after the page is loaded id Bound button , That is, once a click occurs , Will execute click() Inside ajax Content .
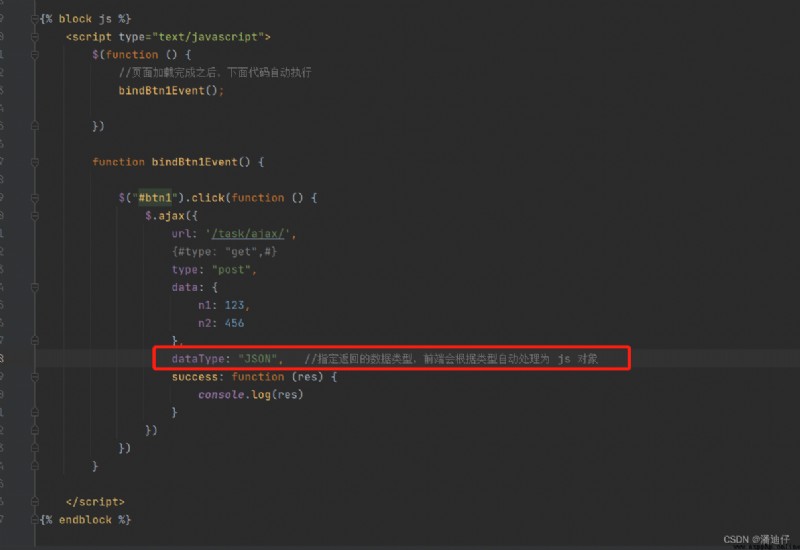
# (4)Json Format
1) If we use JQuery Way to do it ajax If you ask , In general , The background will not return as a page , But rather json Format return data . For example , For example, we python A dictionary generated by the back end is ready to return to the front end , But there is still work to be done here json Standardized data . See the following example for specific methods . The reason json The reason is that json The format returned to the front end enables the front end to further operate on these data .
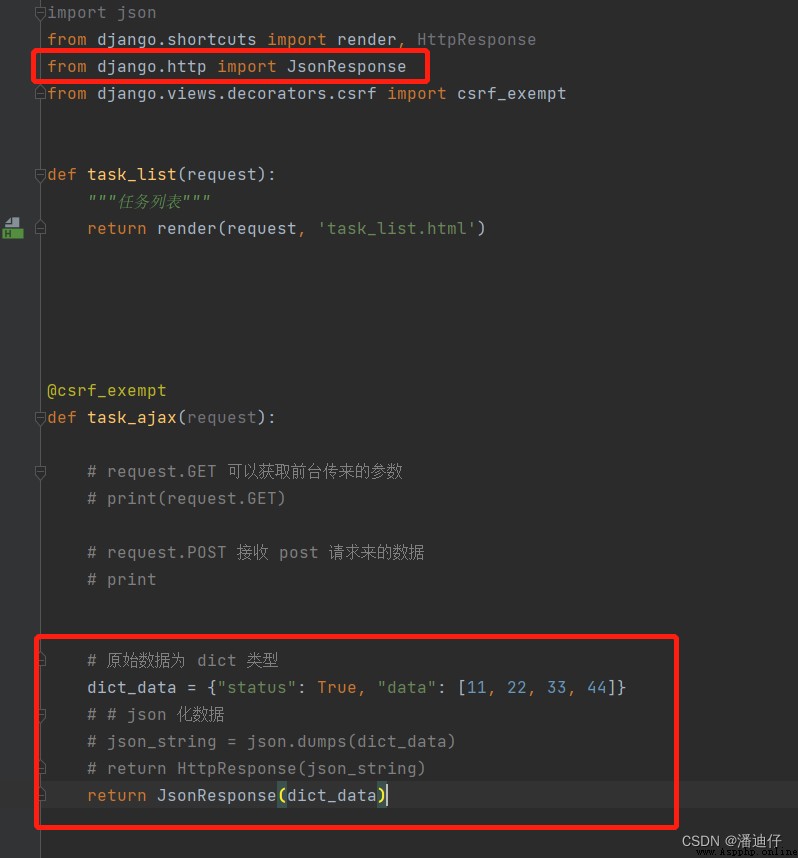
Of course , We can also use it Django A built-in way to write , That is to use JsonResponse Come back to , Then the writing method is as follows . This method is automatic conversion , Above is our manual conversion .
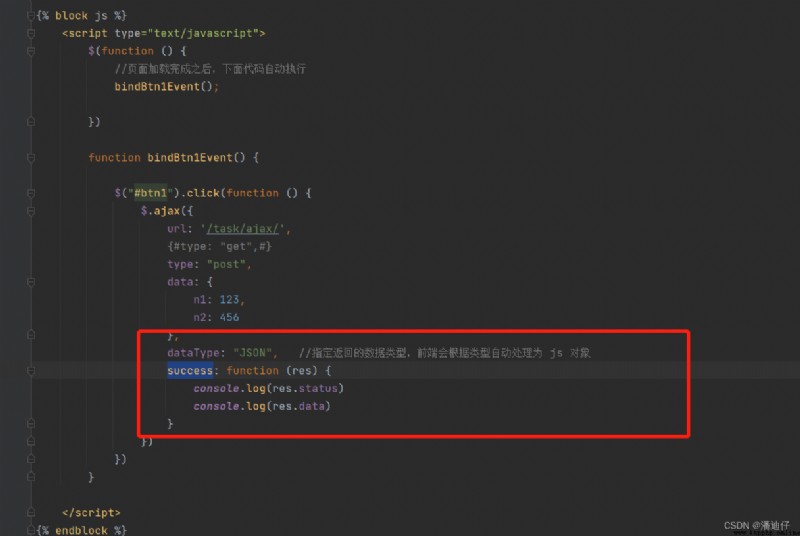
2) We will json After the format content is returned to the front end , So what is actually returned is a string , Therefore, the front-end should focus on this json Format data is inversely sequenced into js The object in it . Here we need to ajax Add an object in the .
Then we can get the value of the data returned from the background . So here's the code :
We go to the front end to trigger the click event , Then you can see that the console outputs the status and data The field distribution corresponds to the value . In fact, for ajax for , The data format of its internal return and processing is json Format .
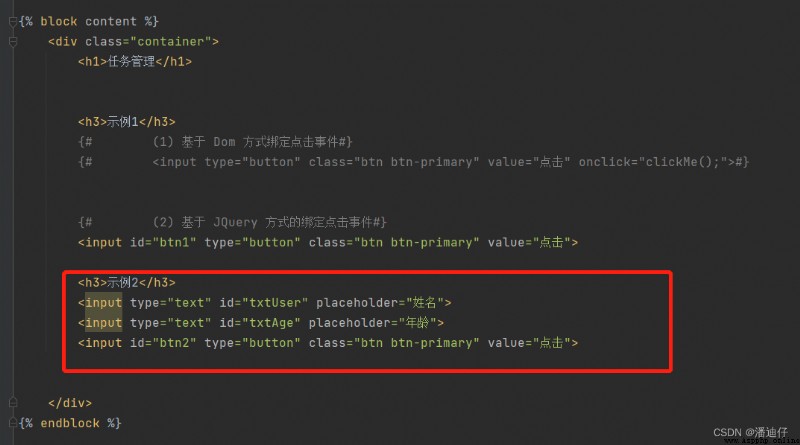
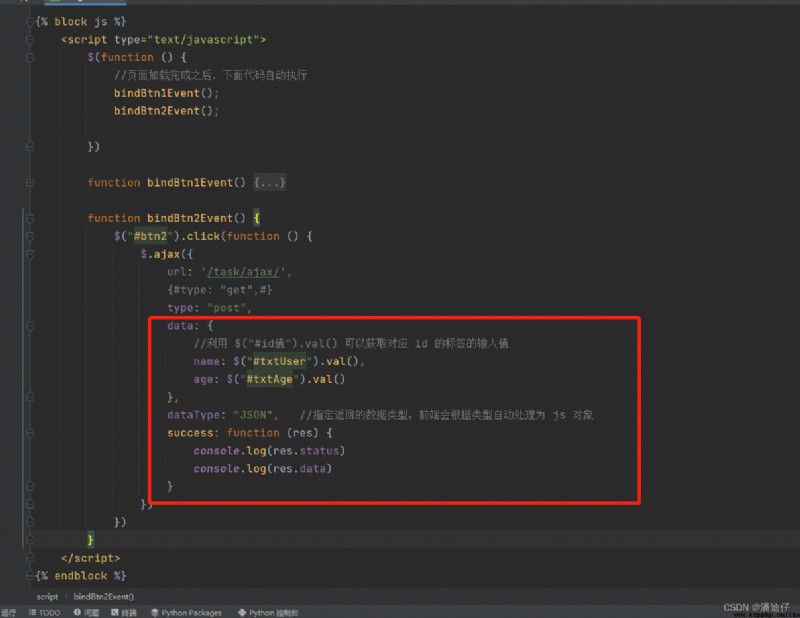
# (5) example 2 , Put the front end of input The contents of are returned to the back end .( utilize ajax)
1) The problem is that we need to change the value in the input box of the foreground , adopt ajax The request is sent to the background . Then we add the corresponding input box in the front end , Then set a new click event . The first is the new html Code .
Based on the above ajax Code , We have the following code . First of all , If we want to be in ajax In the code , Get the contents of the input box , Can take advantage of their id Value to perform a similar indexing effect . namely $("#id value ").val() To get , that $("#id value ") Get the corresponding id The input box of ,.val() The method is to get the contents of this input box .
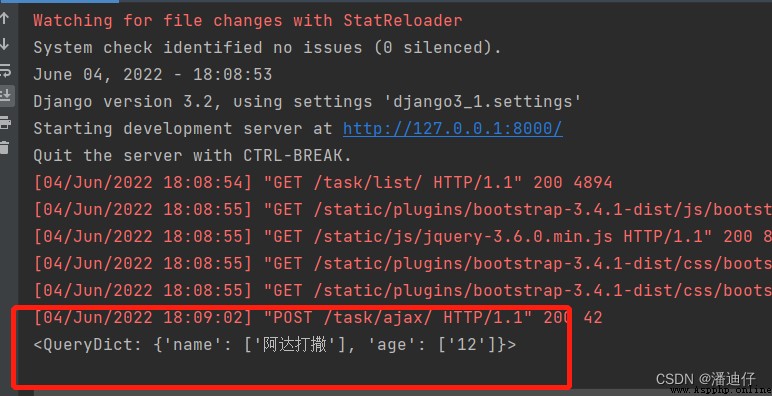
Then we open the front page , Type in the input box , When the click button is triggered , The content is successfully obtained and transferred to the background .
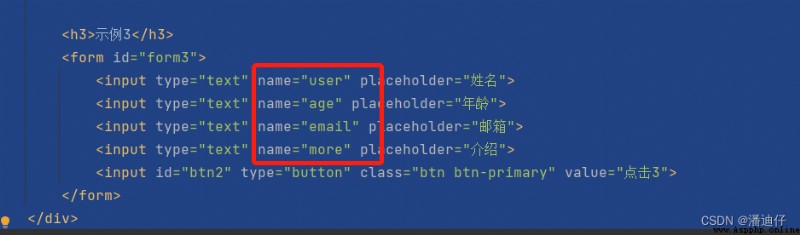
# (6) example 3, If there are many cases in the input box
1) If input The box has many cases , We can use form Tags wrap these input tags . So at this time, the inside input Labels can be ignored id The attribute is , But there must be name attribute . and form The label must be set id attribute .【 The last one input Of id = "btn3", Forget to change 】
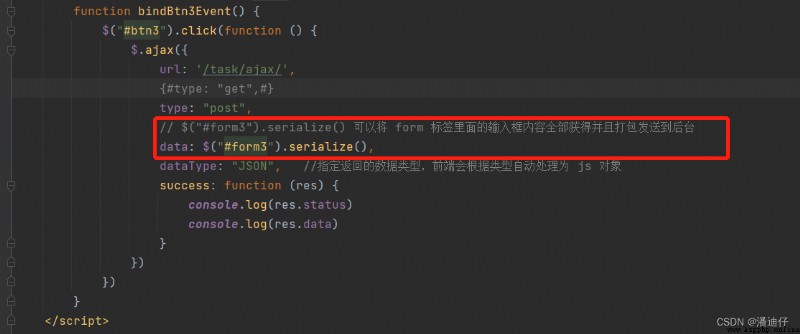
2) And then modify ajax Code for , As shown in the figure below , Code in red box ,$("#form3").serialize() It can be form Internal input The contents of the tag are all obtained and packaged as data , To send to the background .
3) So after we test , Get the result of the figure below . Obviously
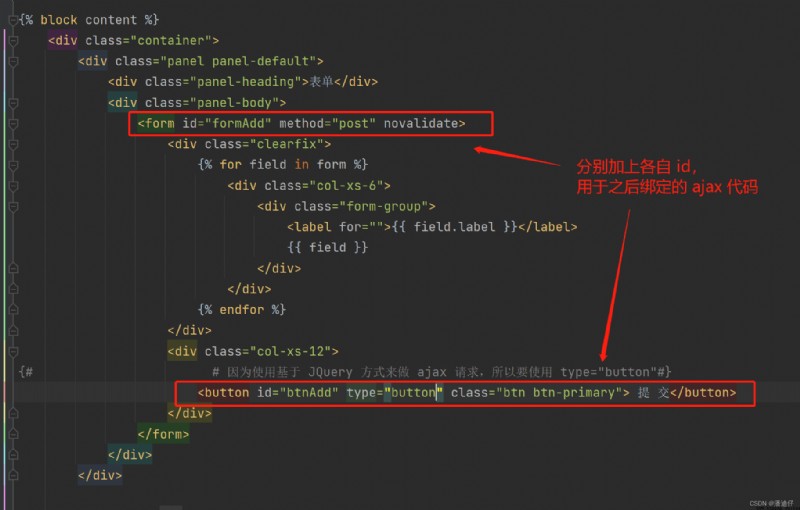
# (1) Case actual combat
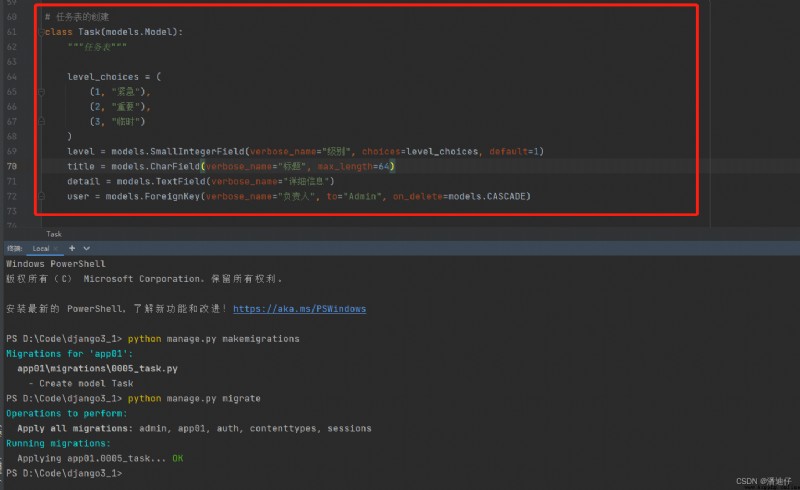
1) Database table creation . The following figure is the code for creating the database table of the task list . about level_choices And the knowledge of foreign keys , You can go to the section of the employee list to explain . We designed the table structure , Then execute the migration command .
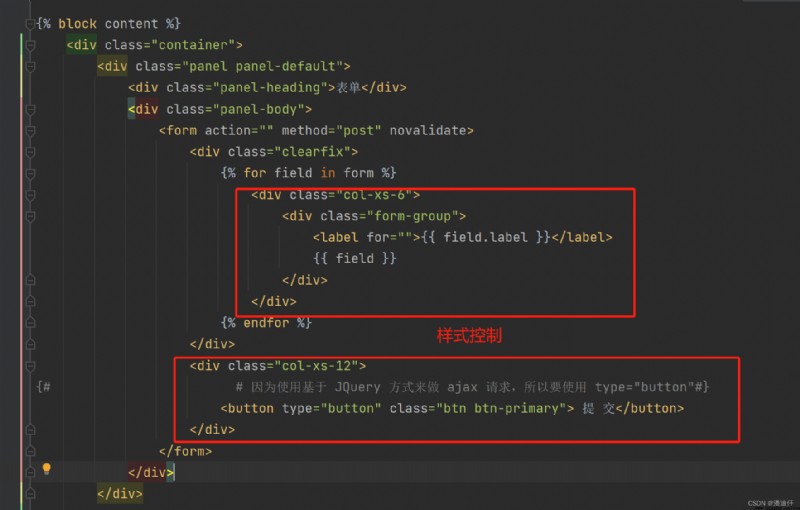
2) Use ModelForm To render the front end . The front-end code is as follows , We also added the corresponding style control code .
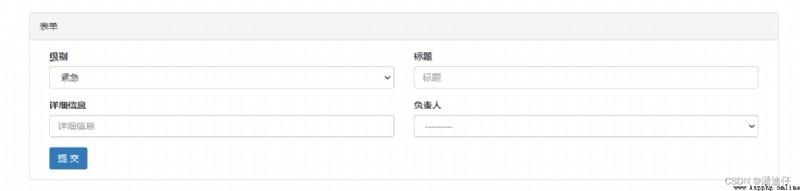
Page effect display .
# (2) Test of case implementation .
1) Front-end html Code .
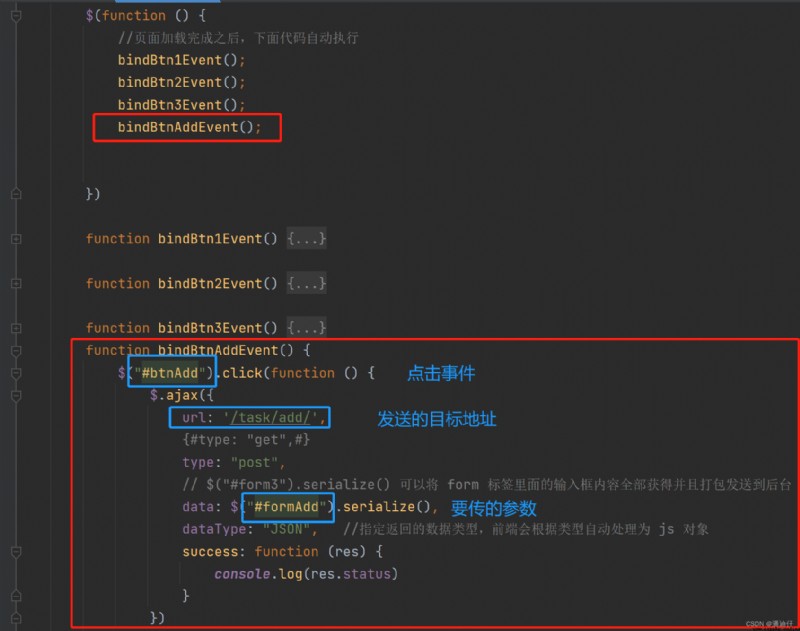
2) be based on JQuery Code for . Remember to review the above , Logic is when the page is rendered , Automatically execute code , If the user triggers a bound event , Execute the corresponding code .
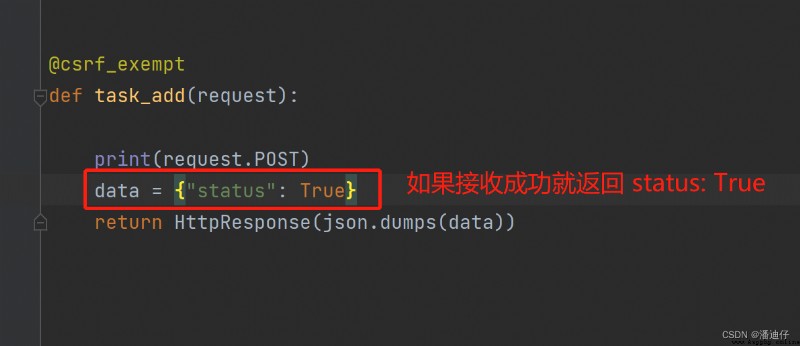
3) The compilation of view function , Here is the preliminary test .
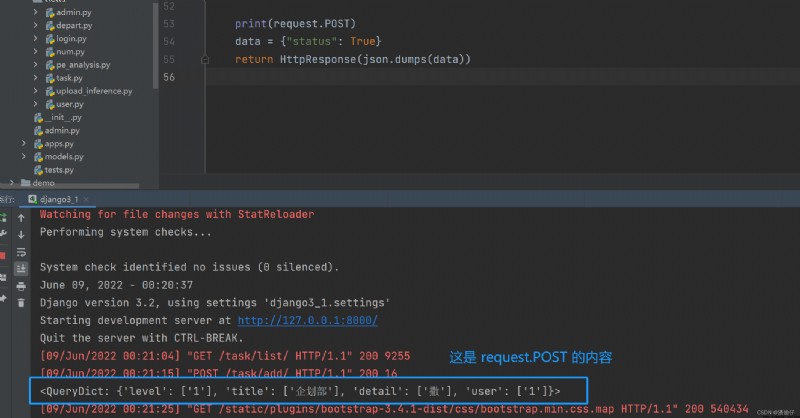
4) Preliminary results view .
The return value received by the front end , namely res.status
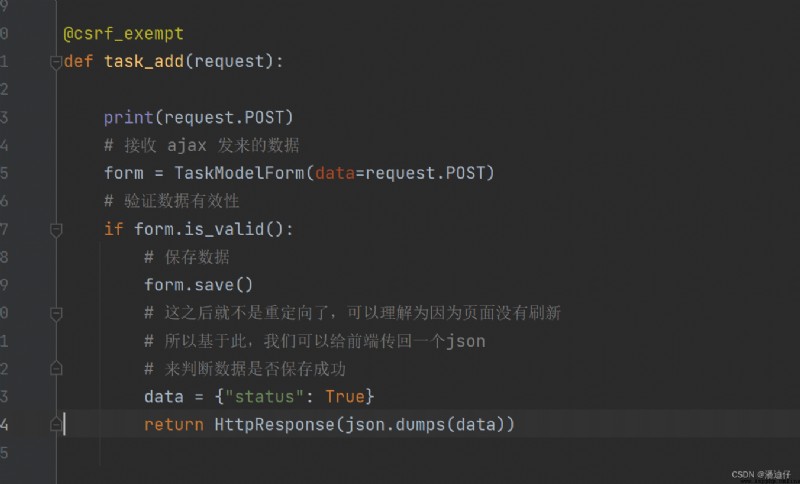
# (3) The case is perfect , Add data checksum error messages
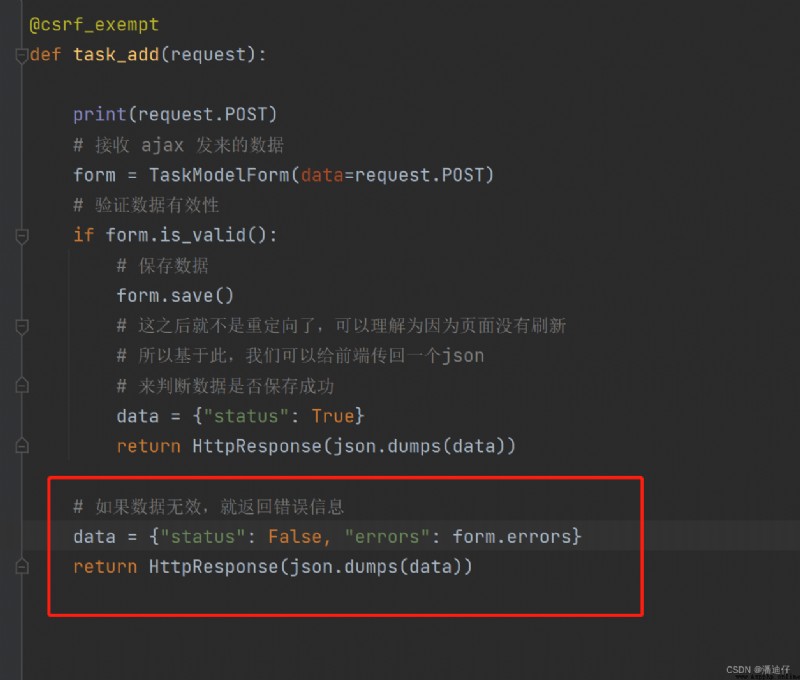
1) Data verification function .
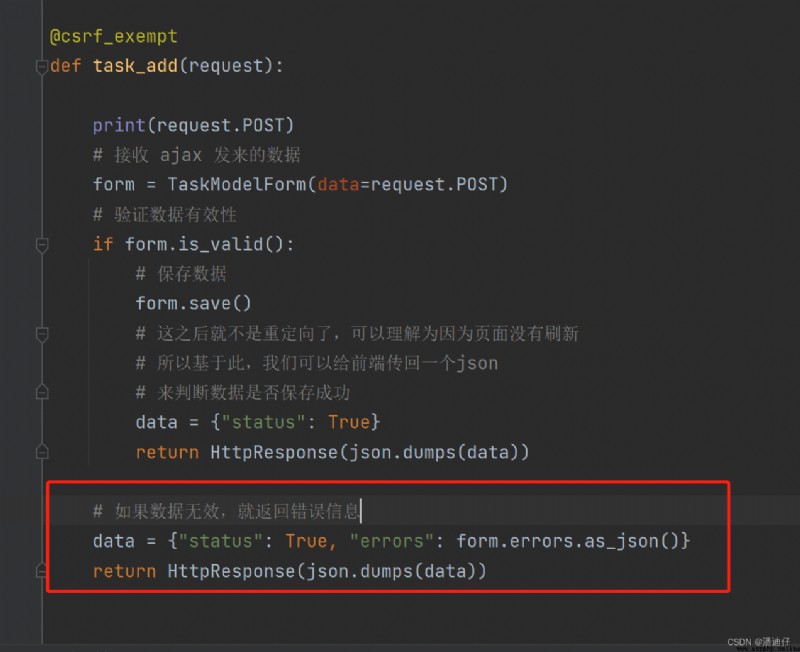
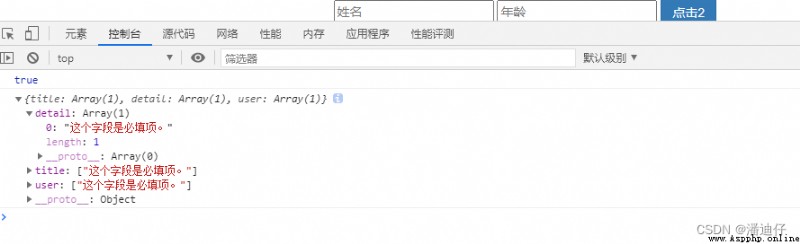
2) Error message problem . We know form.errors It contains all the error messages , If the submitted data is problematic , Then we can use forms.errors.as_json() You can json Is returned to the front end .
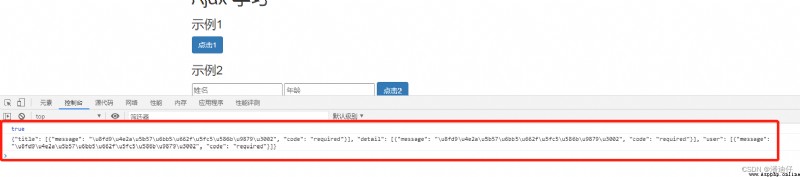
So the front end returns json The data are as follows :
Actually used as_json() Method returns an error message , Not very easy to read , So we cancel this , That's the code above form.errors.as_json() Turn into form.errors, You can see the returned error information, which is more convenient to read .
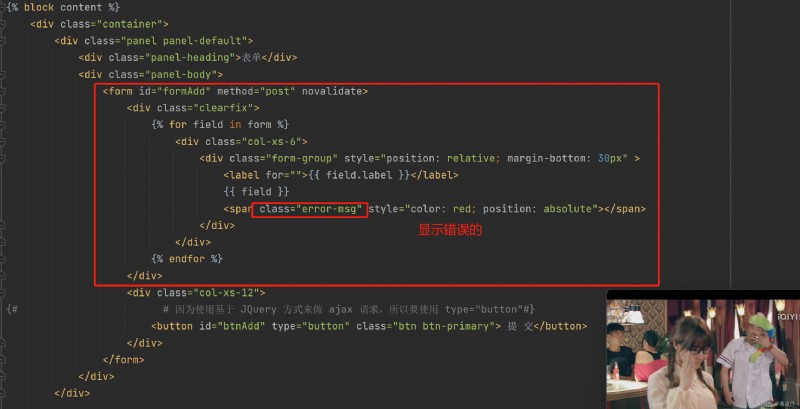
3) Show wrong front end html The code is as follows ,
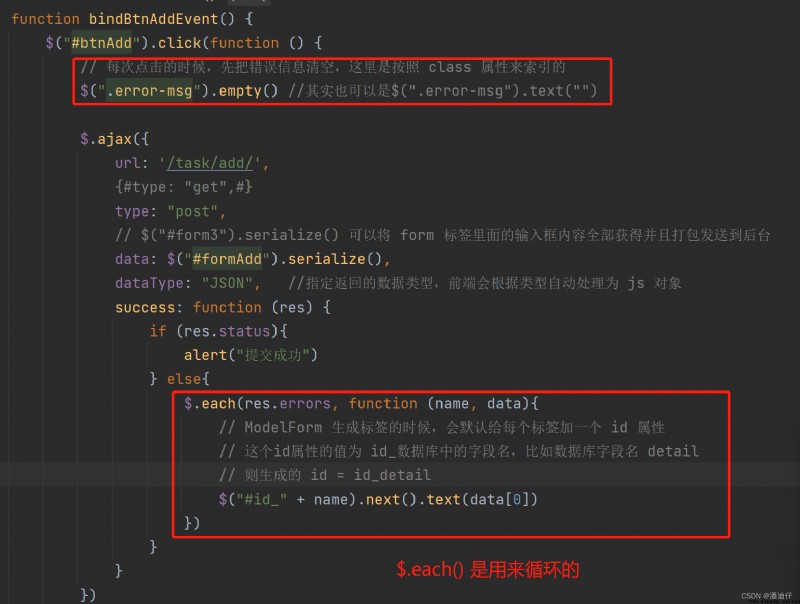
4)js The code is as follows , See the notes in the red box .$("id_" + name) Is the index to this id The label corresponding to the value , that $("id_" + name).next() Is the next tag of the tag , then $("id_" + name).next().text() Is the content of the next label . The reason is data[0] , Because the error message is a list .
5) View function for error messages
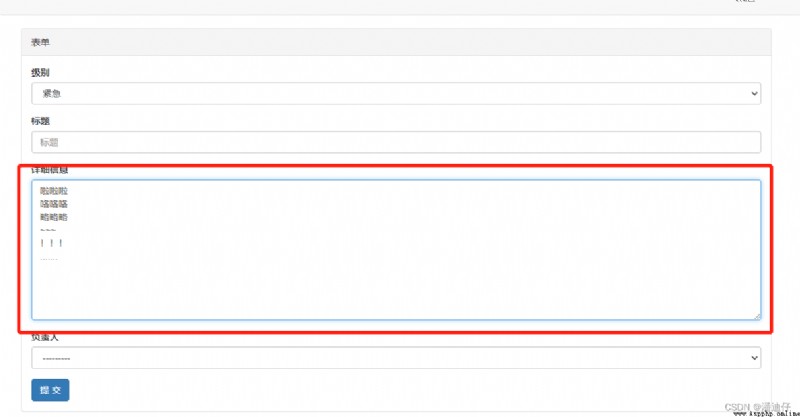
# (1)models.py In the data sheet models.TextField(versbose_name="")
How this database is defined , Is the storage of text . If we use ModelForm() To make it up , Default style widgets = { "detail": forms.Textarea }, Then the front page is like the following figure .
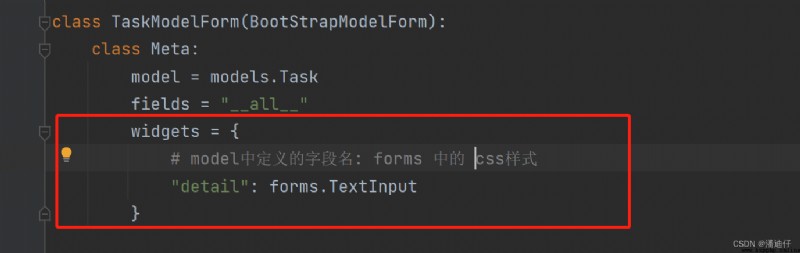
If we want to change to the normal input field type , Then we can also set up widgets To achieve . But you need to import forms modular . Then the definition of the class becomes like this , See the red box , namely widgets = { "detail": forms.TextInput }
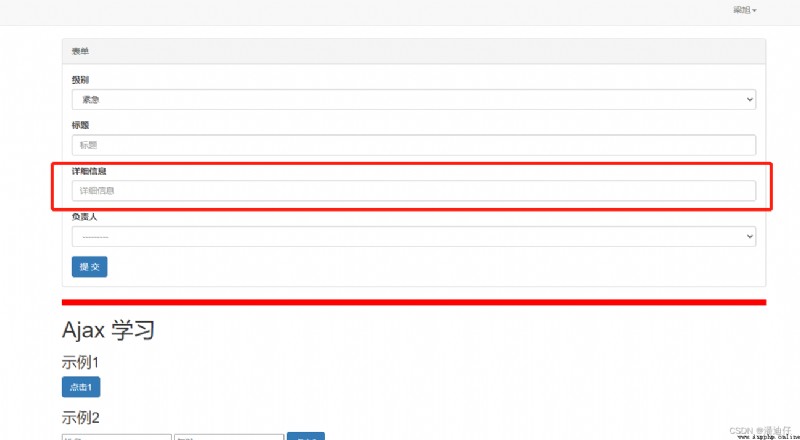
The result is shown in the figure :
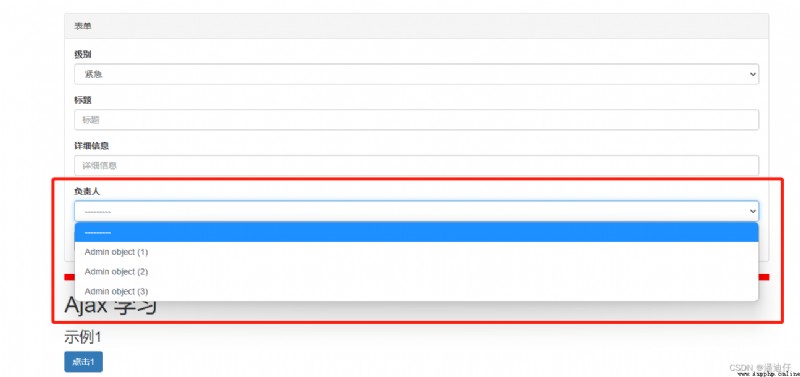
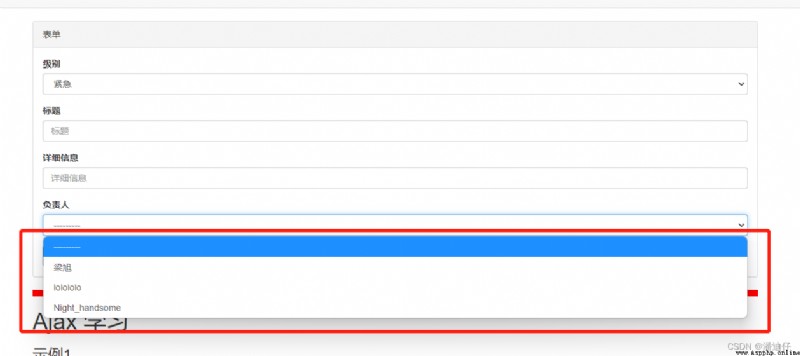
# (2)models.py Next, if foreign keys are involved , How to get the value of a foreign key , Instead of taking objects .
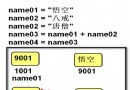
As shown in the figure below , The person in charge actually corresponds to Admin surface , So we use __str__ Method .
To solve this problem , You need to go Admin In the table , Write a method , The following code .
give the result as follows :