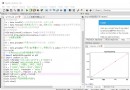
Recently, I have been doing the automation work in the project , In order to get rid of the tedious and repetitive work , Focus on data analysis . Automation python It's better to , But since you have to submit the report ,
You have to be beautiful .pandas Although it's powerful , But I can't be right Excel Complete operation , Present study vba It's too late . So I found this openpyxl package , use python To modify the Excel, Obstruct the level
Co., LTD. , For two days , I stepped into a lot of holes , Fortunately, the automation work has been completed ( At least a few more hours later , A fun ).
Write down the notes of these two days and trample on the pit , Aspect novice hide pit , Also for future reference . If there is a problem , Please forgive me and point out , Thank you very much .
from openpyxl import load_workbook
from openpyxl.styles import colors, Font, Fill, NamedStyle
from openpyxl.styles import PatternFill, Border, Side, Alignment
# Load the file
wb = load_workbook('./5a.xlsx')
The table used in the article is :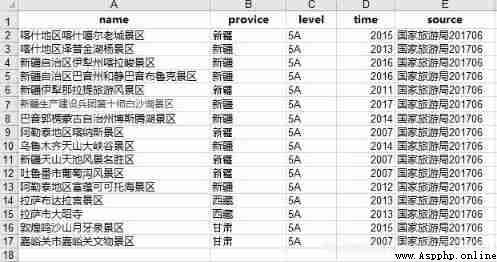
# Read sheetname
print(' Output file all sheet names :\n', wb.sheetnames)
ws = wb['5a']
# Or when you don't know your name
sheet_names = wb.sheetnames
ws2 = wb[sheet_names[0]] # index by 0 For the first watch
print(ws is ws2)
 Output file all sheet names :
['5a']
True
# modify sheetname
ws.title = '5a_'
print(' modify sheetname:\n', wb.sheetnames)
 modify sheetname:
['5a_']
# Create a new sheet
# The new table created must be assigned to an object , Otherwise there are only names but no actual new tables
ws4 = wb.create_sheet(index=0, title='newsheet')
# If you don't write any parameters , By default, it is inserted in the last position and the name is sheet,sheet1... Are arranged in the order
ws5 = wb.create_sheet()
print(' Create a new sheet:\n', wb.sheetnames)
 Create a new sheet:
['newsheet', '5a_', 'Sheet']
# Delete sheet
wb.remove(ws4) # Only... Can be written here worksheet object , Can't write sheetname
print(' Delete sheet:\n', wb.sheetnames)
 Delete sheet:
['5a_', 'Sheet']
# modify sheet Tab background color , The default is white , Set to RRGGBB Pattern
ws.sheet_properties.tabColor = "FFA500"
# Read valid area
print(' The maximum number of columns is :', ws.max_column)
print(' The maximum number of lines is :', ws.max_row)
 The maximum number of columns is : 5
The maximum number of lines is : 17
# Insert rows and columns
ws.insert_rows(1) # Insert a line in the first line
ws.insert_cols(2, 4) # Insert four columns starting from the second column
# Delete rows and columns
ws.delete_cols(6, 3) # From the sixth column (F Column ) Start , Delete 3 Column is (F:H)
ws.delete_rows(3) # Delete the third line
# Read
c = ws['A1']
c1 = ws.cell(row=1, column=2)
print(c, c1)
print(c.value, c1.value)
<Cell '5a_'.A1> <Cell '5a_'.B1>
dth_title Province
# modify
ws['A1'] = ' Name of the scenic spot '
ws.cell(1, 2).value = ' Province '
print(c.value, c1.value)
Name of the scenic spot Province
# Read multiple cells
cell_range = ws['A1':'D5']
colC = ws['C']
col_range = ws['C:D']
row10 = ws[10]
row_range = ws[5:10]
# The returned result is a tuple containing cells
print(type(cell_range))
for i in row10:
print(i) # row10 Only valid cells
<class 'tuple'>
<Cell '5a_'.A10>
<Cell '5a_'.B10>
<Cell '5a_'.C10>
<Cell '5a_'.D10>
<Cell '5a_'.E10>
# Operate according to the row and column
for row in ws.iter_rows(min_row=1, max_row=3,
min_col=1, max_col=2):
for cell in row:
print(cell)
# It can also be used. worksheet.iter_col(), Same usage
<Cell '5a_'.A1>
<Cell '5a_'.B1>
<Cell '5a_'.A2>
<Cell '5a_'.B2>
<Cell '5a_'.A3>
<Cell '5a_'.B3>
# merge cell
ws.merge_cells('F1:G1')
ws['F1'] = ' Merge two cells '
# perhaps
ws.merge_cells(start_row=2, start_column=6, end_row=3, end_column=8)
ws.cell(2, 6).value = ' Merge three cells '
# Cancel merging cells
ws.unmerge_cells('F1:G1')
# perhaps
ws.unmerge_cells(start_row=2, start_column=6, end_row=3, end_column=8)
wb.save('./5a.xlsx')
# Save the previous operation , When saving a file , The file must be closed !!!
Be careful !!!,openpyxl Yes Excel The modification of is not like xlwings The same is true in real time , His revision is Temporarily stored in memory Of , So when
For example, I will insert a new line as the title in the first line , So when I'm new A1 Cell operation , Still in memory A1( Now it is A2) Cells of
The original changes will be overwritten . So save it first , Or plan the change operation from the beginning to avoid such things .( Don't ask me how I know , Are tears o(╥﹏╥)o)
wb = load_workbook('./5a.xlsx') # Read the modified file
ws = wb['5a_']
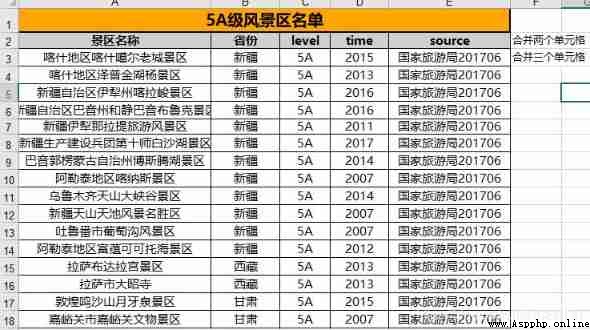
# Let's set a header
ws.insert_rows(1) # Insert a new line in the first line
ws.merge_cells('A1:E1') # merge cell
a1 = ws['A1']
ws['A1'] = '5A List of first-class scenic spots '
# Set the font
ft = Font(name=' Microsoft YaHei ', color='000000', size=15, b=True)
""" name: Font name color: The color is usually RGB or aRGB Hexadecimal value b(bold): In bold (bool) i(italic): tilt (bool) shadow: shadow (bool) underline: Underline (‘doubleAccounting’, ‘single’, ‘double’, ‘singleAccounting’) charset: Character set (int) strike: Delete line (bool) """
a1.font = ft
# Set text alignment
ali = Alignment(horizontal='center', vertical='center')
""" horizontal: Horizontal alignment ('centerContinuous', 'general', 'distributed', 'left', 'fill', 'center', 'justify', 'right') vertical: The vertical alignment ('distributed', 'top', 'center', 'justify', 'bottom') """
a1.alignment = ali
# Set hatch
fill = PatternFill('solid', fgColor='FFA500')
# Color generally uses hexadecimal RGB
# 'solid' Is the hatch type , Refer to the documentation for details
a1.fill = fill
openpyxl.styles.fills Module parameter document
# Set borders
bian = Side(style='medium', color='000000') # Set border style
""" style: Style of border line {'dotted','slantDashDot','dashDot','hair','mediumDashDot', 'dashed','mediumDashed','thick','dashDotDot','medium', 'double','thin','mediumDashDotDot'} """
border = Border(top=bian, bottom=bian, left=bian, right=bian)
""" top( On ),bottom( Next ),left( Left ),right( Right ): Must be Side type diagonal: Oblique line side type diagonalDownd: Right slash bool diagonalDown: Left slash bool """
# a1.border = border
for item in ws['A1:E1'][0]: # Remove each of the tuples cell Change the style
item.border = border
wb.save('./5a.xlsx') # Save changes
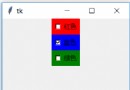
Again, pay attention to !!!:
a1.border = border, Otherwise, it will only be as shown in the following figure ,B1:E1 Cell No line . Personally, I think it is because the wireframe involves changes to the borders of adjacent cells, so you need to modify each cell separately .ws['A1:E1'].border = border, We can see from the previous content ,openpyxl Multiple cells of are actually a tuple , Tuples are not style The method of , So we must change them one by one !! In fact, the government has other ways , Later on .
# Now let's set up the entire table
# Read
wb = load_workbook('./5a.xlsx')
ws = wb['5a_']
# Read data table range
rows = ws.max_row
cols = ws.max_column
# typeface
font1 = Font(name=' Microsoft YaHei ', size=11, b=True)
font2 = Font(name=' Microsoft YaHei ', size=11)
# Frame
line_t = Side(style='thin', color='000000') # Thin border
line_m = Side(style='medium', color='000000') # Thick border
border1 = Border(top=line_m, bottom=line_t, left=line_t, right=line_t)
# The edge adjacent to the title is set as the title
border2 = Border(top=line_t, bottom=line_t, left=line_t, right=line_t)
# fill
fill = PatternFill('solid', fgColor='CFCFCF')
# alignment
alignment = Alignment(horizontal='center', vertical='center')
# Package styles and name them
sty1 = NamedStyle(name='sty1', font=font1, fill=fill,
border=border1, alignment=alignment)
sty2 = NamedStyle(name='sty2', font=font2, border=border2, alignment=alignment)
for r in range(2, rows+1):
for c in range(1, cols):
if r == 2:
ws.cell(r, c).style = sty1
else:
ws.cell(r, c).style = sty2
wb.save('./5a.xlsx')
about , Set the title style , In fact, the official also gave a Custom function , After setting the range , Cells in the range are merged , And apply styles , It's like a single cell equally . I won't go into details here , You can have a look if you are interested . Very practical .