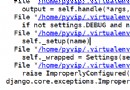
Be careful : I use virtual machines , Make sure that the virtual machine can access the network before operation .
1、 install python3.9.0 Interpreter , Configure environment variables
2、 Configure virtual environment
# Update software source
$~ sudo apt update
$~ sudo apt install build-essential zlib1g-dev libncurses5-dev libgdbm-dev libnss3-dev libssl-dev libreadline-dev libffi-dev wget# Download the compressed package on the official website , I downloaded it to my home directory
$~ wget https://www.python.org/ftp/python/3.9.0/Python-3.9.0.tgz# decompression
$~ sudo tar -xvzf Python-3.9.0.tgz
# Enter the python Folder
$~ cd Python-3.9.0# Appoint python Installation position
$~ ./configure --with-ssl prefix=/opt/python39# compile
$~ make
# Compilation and installation
$~ sudo make install
When the system is looking for a program , It will look for... From the current directory and environment variables . Programs like those that need to be found globally for any purpose , You need to configure the path to the environment variable , So you can find the program in any directory .
The environment variable is to facilitate us to quickly find the program to start , Otherwise, we need to go to the program installation location to start .
If you don't give python3.9.0 Configure environment variables , We can't start anywhere in the terminal python3.9.0 Interpreter , Need to go to /opt/python39/bin/ Catalog , Input python3 start-up python3.9.0 Interpreter .
#1、 We python3.9.0 The installation to /opt/python39 Under the table of contents
#2、 View environment variables
echo $PATH
# View all environment variables : /usr/sbin/:... Copy the environment variables
#3、 Establish a soft connection , Namely windows Shortcut to
ln s /opt/python39/bin/python3.9 /opt/python39/bin/python
or , Direct copy python3.9, The name is set to python
cd /opt/python39/bin
cp python.9 python
#4、 Set the environment variable ,
sudo vi /etc/profile
# Add... At the end , Input o Enter insertion mode
PATH=/opt/python39/bin/: Splice the path found in step 2
perhaps
PATH = /opt/python39/bin/:$PATH
# For seeing this way , When adding again , Just add , Don't delete other
preservation : According to the first esc, Input :wq enter
verification : Input python 、python3 The launched interpreters are python3.9.0
A virtual environment : We can deploy multiple services on one server , Different services require different packages , In order to deploy without unnecessary packages , One project uses one environment . We need to deploy multiple environments on the server , We do this through virtual environments .
cd ~ Create a folder under the home directory to store the virtual environment , .virtualenv Folder
#1 download virtualenv Dependency needed
sudo apt install virtualenv
#2 virtualenv It's not an official bag , need pip install
pip3 install virtualenv
pip3 install virtualenvwrapper
#3 To home Create under directory .virtualenv Folder
sudo mkdir $HOME/.virtualenv
#4 open ~/.bashrc file , And add the following
# Specify the way to store the virtual environment
vi ~/.bashrc
Add the following two : The path where the virtual environment is stored
export WORKON_HOME=$HOME/.virtualenvs
source ~/.local/bin/virtualenvwrapper.sh
#5 function
source ~/.bashrc#6 Find the environment virtualenvwrapper.sh The position of
sudo find / -name virtualenvwrapper.sh
# Mine is :/home/liuhaizhang/.local/bin/virtualenvwrapper.shCommands for creating virtual environments
# You need to specify the python edition , If not specified , The default installation is python2 Virtual environment for
1、python2 Environmental Science
mkvirtualenv Virtual environment name
2、python3 Environmental Science# Here, you can use the environment variable , first python3 To build a virtual environment
mkvirtualenv -p python3 Virtual environment name
Appoint python Interpreter to create a virtual environment :
mkvirtualenv -p /usr/bin/python3.6 python36_django # Specify the interpreter to create a virtual environment , The name of the virtual environment#3、 Common commands of virtual environment
View the commands of the virtual environment :
workon two tab keyUsing virtual environments :
workon Virtual environment name
Exit virtual environment :
deactivate
adopt which python3.6 Check the system's own python3.6 Installation position , You can use it to create virtual environments
1、 download linux The professional version of this edition , Download from the official website linux The version is just
2、 Will compress the package , Move to ~ Home directory ( Home directory ) :
~$ mv pycharm-professional-2022.1.2.tar.gz ~
3、 Enter the home directory :
~$ cd ~
4、 decompression :
~$ tar -xvzf pycharm-professional-2022.1.2.tar.gz
5、 Move the unzipped folder to opt after
~$ mv pycharm-2022.1.2 /opt/
6、 Switch to /opt Catalog
~$ cd /opt/
7、 Get into pycharm-2022.1.2
~$ cd pycharm-2022.1.2
8、 Enter into pycharm The folder bin Folder :
~$ cd /opt/pycharm-2022.1.2/bin
9、 start-up pycharm,
~$ ./pycharm.sh10、 Enter activation code 、
Create a desktop shortcut : Click on Tools -Create Desktop Entry You can quickly create .
Select virtual environment :
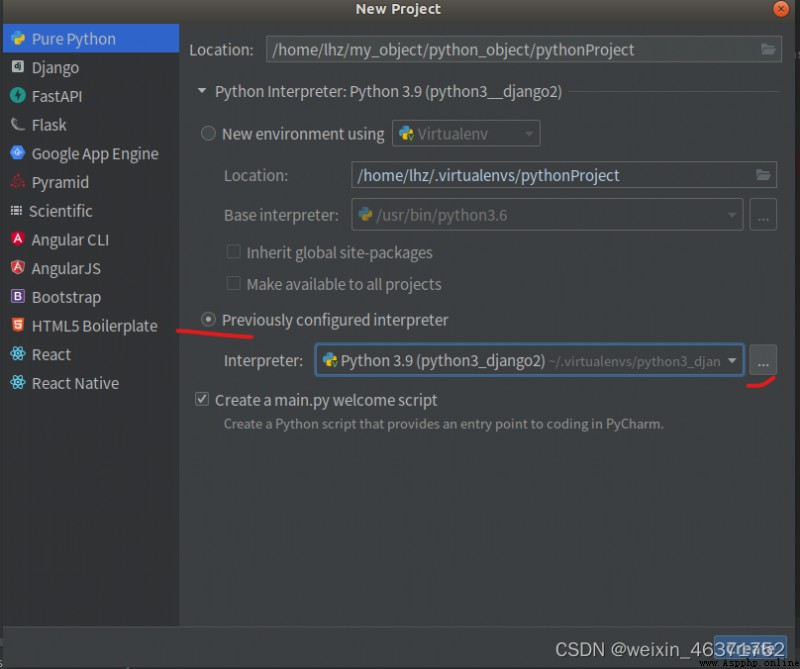
Click on ... , Select... Under the home directory .virtualenv Select a virtual environment , Get into bin Catalog , choice python.
Create a new project , Just use the specified It's a virtual environment .