findHomography(srcPoints, dstPoints, method=None, ransacReprojThreshold=None, mask=None, maxIters=None, confidence=None)
srcPoints: The coordinate matrix of the midpoint of the source plane ;
dstPoints: Coordinate matrix of the midpoint of the target plane ;
method: The method used to calculate the homography matrix . Different methods corresponding to different parameters , As follows :
0: Using the conventional method of all points ;
RANSAC: be based on RANSAC Robust algorithm ;
LMEDS: Minimum median robust algorithm ;
RHO: be based on PROSAC Robust algorithm ;
ransacReprojThreshold: The maximum allowable re projection error threshold for treating point pairs as interior points ( Only used for RANSAC and RHO Method ) if srcPoints and dstPoints It's in pixels , This parameter is usually set to 1 To 10 Within the scope of .
mask: Optional output mask matrix , Usually by robust algorithm (RANSAC or LMEDS) Set up . Please note that , The input mask matrix does not need to be set ;
maxIters:RANSAC The maximum number of iterations of the algorithm , The default value is 2000;
confidence: Degree of confidence , The value range is 0 To 1;
Perspective transformation (Perspective Transformation) It's projecting the image onto a new view plane (Viewing Plane), Also called projection mapping (Projective Mapping)
perspectiveTransform(src, m, dst=None)
Src: Enter a two channel or three channel floating-point array ; Each element is a two-dimensional transformation / Three dimensional vector .M:3x3 or 4x4 Floating point conversion matrix .Dst: And src The same size and type param dst The output array .
notes :perspectiveTransform() transport ⼊⾄ Don't need 4 A little bit , And the coordinate matrix of the point is (-1,1,2) namely n individual ⼀⾏ Two column coordinate matrix , Two columns represent the horizontal and vertical coordinates , It is equivalent to homogenizing coordinates , And H Multiplication of matrices
import os
import cv2
import numpy as np
# Read and zoom pictures
img1=cv2.imread('images/img1.jpg')
img1=cv2.resize(src=img1,dsize=(450,450))
gray1=cv2.cvtColor(src=img1,code=cv2.COLOR_BGR2GRAY)
img2=cv2.imread('images/img2.jpg')
img2=cv2.resize(src=img2,dsize=(450,450))
gray2=cv2.cvtColor(src=img2,code=cv2.COLOR_BGR2GRAY)
# establish SIFT
sift=cv2.xfeatures2d.SIFT_create()
# Calculate feature points and description points
kp1,des1=sift.detectAndCompute(gray1,None)
kp2,des2=sift.detectAndCompute(gray2,None)
# Use KDTREE Algorithm , The tree hierarchy uses 5
index_params=dict(algorithm=1,trees=5)
search_params=dict(checks=50)
# Create matchers
flann=cv2.FlannBasedMatcher(index_params,search_params)
# Feature point matching
match=flann.knnMatch(des1,des2,k=2)
print('mathc: {}'.format(match))
# Draw matching feature points
good=[]
for i ,(m,n) in enumerate(match):
if m.distance<0.7*n.distance:
good.append(m)
# When the matching item is greater than 4 when
if len(good)>=4:
# Find homography matrix
srcPoints=np.float32([kp1[m.queryIdx].pt for m in good]).reshape(-1,1,2)# Convert to n Elements of the line , One element per line , And this element consists of two values
dstPoints=np.float32([kp2[m.trainIdx].pt for m in good]).reshape(-1,1,2)
# Get homography matrix
H,_=cv2.findHomography(srcPoints=srcPoints,dstPoints=dstPoints,method=cv2.RANSAC,ransacReprojThreshold=5.0)
# The four corners of the graph to search
h,w=np.shape(img1)[0],np.shape(img1)[1]
pts=np.float32([[0,0],[0,h-1],[w-1,h-1],[w-1,0]]).reshape(-1,1,2)
dst=cv2.perspectiveTransform(src=pts,m=H)
# Draw polygon
cv2.polylines(img=img2,pts=[np.int32(dst)],isClosed=True,color=(0,255,0))
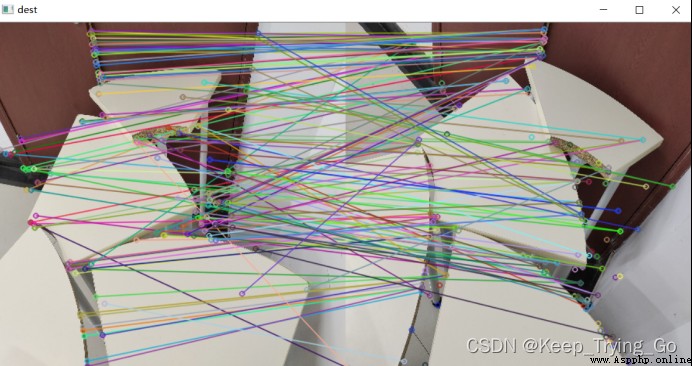
dest=cv2.drawMatchesKnn(img1=img1,keypoints1=kp1,img2=img2,keypoints2=kp2,matches1to2=[good],outImg=None,matchColor=(0,255,0))
cv2.waitKey(0)
cv2.destroyAllWindows()
if __name__ == '__main__':
print('Pycharm')