In the past two years, the requirements and difficulties of graduation design and graduation defense have been increasing , The traditional design topic lacks innovation and highlights , Often fail to meet the requirements of graduation defense , In the past two years, younger students and younger students have been telling their elders that the project system they have built cannot meet the requirements of teachers .
In order that everyone can pass BiShe smoothly and with the least energy , Senior students share high-quality graduation design projects , What I want to share today is
Realization of mathematical formula recognition algorithm based on deep learning
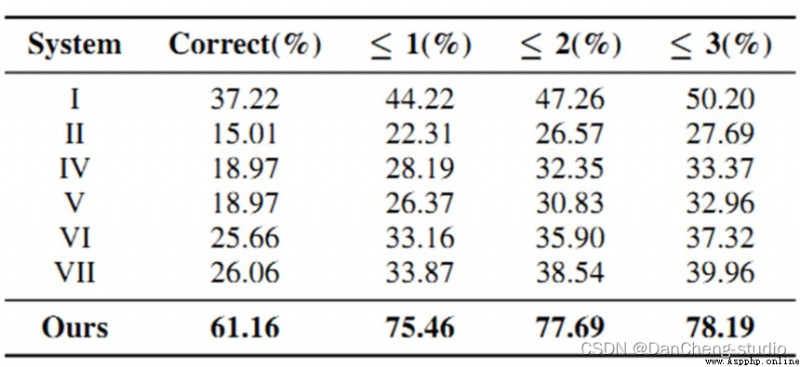
The senior here gives a comprehensive score for a topic ( Each full marks 5 branch )
🧿 Topic selection guidance , Project sharing :
https://gitee.com/dancheng-senior/project-sharing-1/blob/master/%E6%AF%95%E8%AE%BE%E6%8C%87%E5%AF%BC/README.md
Handwritten mathematical formula recognition is more traditional OCR The problem is , It is a more complex two-dimensional handwriting recognition problem , Its internal complex two-dimensional spatial structure makes it difficult to be analyzed , The recognition effect of traditional methods is poor . With the successful application of deep learning in various fields , End to end offline mathematical formula algorithm based on deep learning , Compared with traditional methods, it has been significantly improved in the public data set , It opens up a new framework for mathematical formula recognition . However, online handwritten mathematical formula recognition framework has not been proposed , The paper TAP It is the first end-to-end online handwritten mathematical formula recognition model based on deep learning , And according to the task characteristics of mathematical formula recognition, a variety of optimization methods are proposed .
Formula recognition is OCR A very challenging job in the field , The difficulty of the work is that it is a two-dimensional data , Therefore, traditional CRNN For identification .
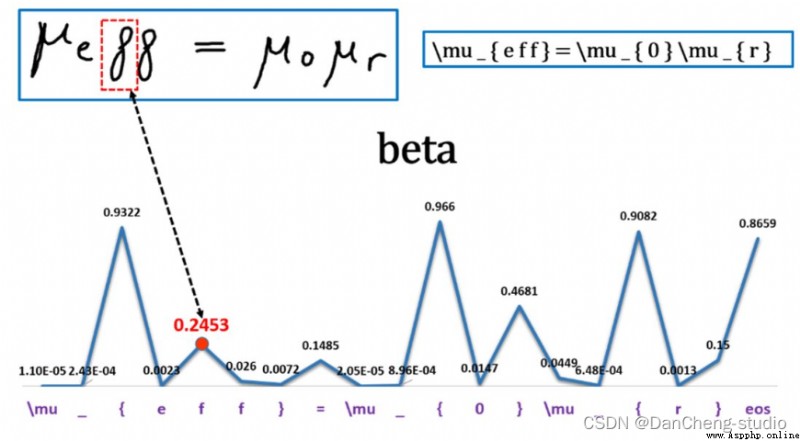
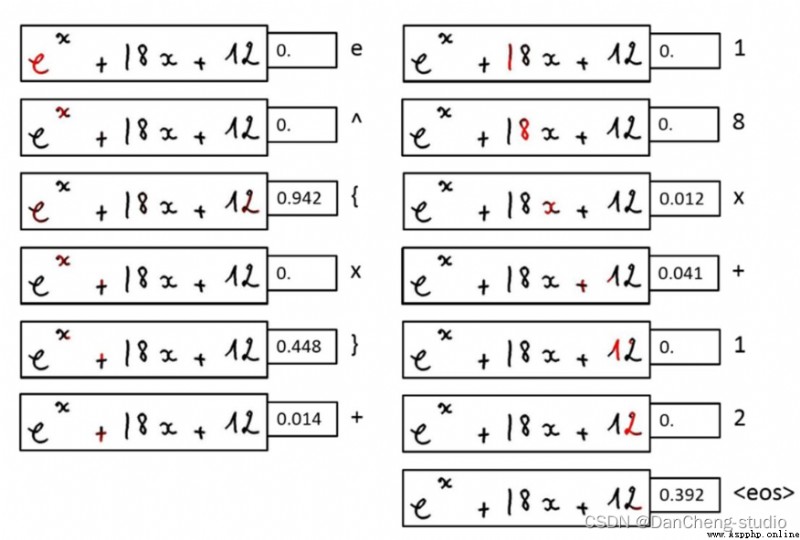
Here is a simple demonstration of the effect


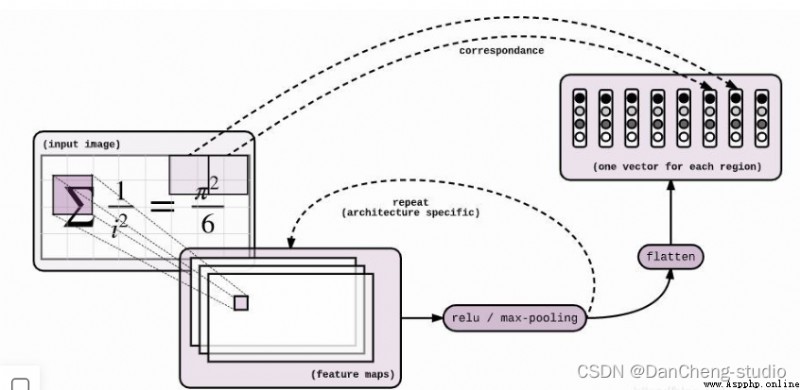
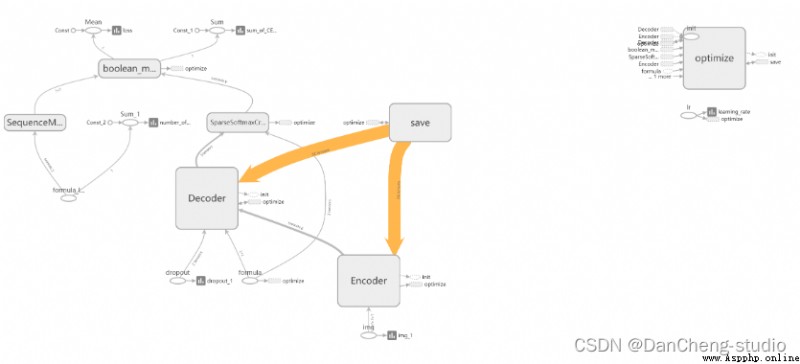
The neural network model is Seq2Seq + Attention + Beam Search.Seq2Seq Of Encoder yes CNN,Decoder yes LSTM.Encoder and Decoder Insert between Attention layer , The specific operation is as follows :Encoder To Decoder There is a flattening process ,Attention It is inserted here . The visualization results of the specific model are as follows
class Encoder(object):
"""Class with a __call__ method that applies convolutions to an image"""
def __init__(self, config):
self._config = config
def __call__(self, img, dropout):
"""Applies convolutions to the image Args: img: batch of img, shape = (?, height, width, channels), of type tf.uint8 tf.uint8 because 2^8 = 256, So the element value range [0, 255], Linear compression to [-1, 1] Up is img = (img - 128) / 128 Returns: the encoded images, shape = (?, h', w', c') """
with tf.variable_scope("Encoder"):
img = tf.cast(img, tf.float32) - 128.
img = img / 128.
with tf.variable_scope("convolutional_encoder"):
# conv + max pool -> /2
# 64 individual 3*3 filters, strike = (1, 1), output_img.shape = ceil(L/S) = ceil(input/strike) = (H, W)
out = tf.layers.conv2d(img, 64, 3, 1, "SAME", activation=tf.nn.relu)
image_summary("out_1_layer", out)
out = tf.layers.max_pooling2d(out, 2, 2, "SAME")
# conv + max pool -> /2
out = tf.layers.conv2d(out, 128, 3, 1, "SAME", activation=tf.nn.relu)
image_summary("out_2_layer", out)
out = tf.layers.max_pooling2d(out, 2, 2, "SAME")
# regular conv -> id
out = tf.layers.conv2d(out, 256, 3, 1, "SAME", activation=tf.nn.relu)
image_summary("out_3_layer", out)
out = tf.layers.conv2d(out, 256, 3, 1, "SAME", activation=tf.nn.relu)
image_summary("out_4_layer", out)
if self._config.encoder_cnn == "vanilla":
out = tf.layers.max_pooling2d(out, (2, 1), (2, 1), "SAME")
out = tf.layers.conv2d(out, 512, 3, 1, "SAME", activation=tf.nn.relu)
image_summary("out_5_layer", out)
if self._config.encoder_cnn == "vanilla":
out = tf.layers.max_pooling2d(out, (1, 2), (1, 2), "SAME")
if self._config.encoder_cnn == "cnn":
# conv with stride /2 (replaces the 2 max pool)
out = tf.layers.conv2d(out, 512, (2, 4), 2, "SAME")
# conv
out = tf.layers.conv2d(out, 512, 3, 1, "VALID", activation=tf.nn.relu)
image_summary("out_6_layer", out)
if self._config.positional_embeddings:
# from tensor2tensor lib - positional embeddings
# Embed location information (positional)
# There will be a flatten The process of , Will lose location information , So now we must embed the location information
# There are many ways to embed , For example, add , ride , Zoom and so on , Here we use tensor2tensor The implementation of the
out = add_timing_signal_nd(out)
image_summary("out_7_layer", out)
return out
The part of senior encoding adopts the traditional convolutional neural network , The network mainly includes 6 layers , The resulting [N x H x W x C ] Characteristics of size .
among :N Representing data batch Count ;W、H Indicates the size of the output , here W,H It's not fixed , From the input of the data set, our input is fixed buckets, How to solve the problem of obtaining different decoding dimensions will be discussed later ;
C Is the number of channels entered , The final number of channels obtained here is 512.
When we get the characteristic graph , We need to do reshape Operate to flatten the feature map , The specific operation of the code is as follows :
N = tf.shape(img)[0]
H, W = tf.shape(img)[1], tf.shape(img)[2] # image
C = img.shape[3].value # channels
self._img = tf.reshape(img, shape=[N, H*W, C])
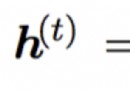
When we are decoding , We can directly use seq2seq To get the results we want , This result may not meet our expectations . Because this process will correspondingly lose some location information .
Location information embedding (Positional Embeddings)
Through the embedding of location information , I don't need to add additional parameters , By calculation 512 Dimension vector to represent the position information of the picture . The specific calculation formula is as follows :

among :p For location information ;f Is the frequency parameter . From the above formula, we can get , The relative position information of pixels in the image can be determined by sin() or cos Express .
We know ,sin(a+b) or cos(a+b) May by cos(a)、sin(a)、cos(b) as well as sin(b) Equal representation . in other words sin(a+b) or cos(a+b) And cos(a)、sin(a)、cos(b) as well as sin(b) Linear correlation , This can also be seen from the relative position of the active pixel 、 Cosine information to equivalent calculate the embedding of relative position information .
This calculation process is in tensor2tensor Library has been implemented , Now let's see how the code embeds location information . The code implementation is located in :/model/components/positional.py.
def add_timing_signal_nd(x, min_timescale=1.0, max_timescale=1.0e4):
static_shape = x.get_shape().as_list() # [20, 14, 14, 512]
num_dims = len(static_shape) - 2 # 2
channels = tf.shape(x)[-1] # 512
num_timescales = channels // (num_dims * 2) # 512 // (2*2) = 128
log_timescale_increment = (
math.log(float(max_timescale) / float(min_timescale)) /
(tf.to_float(num_timescales) - 1)) # -0.1 / 127
inv_timescales = min_timescale * tf.exp(
tf.to_float(tf.range(num_timescales)) * -log_timescale_increment) # len == 128 Calculation 128 Frequency information in three dimensional directions
for dim in range(num_dims): # dim == 0; 1
length = tf.shape(x)[dim + 1] # 14 Get the width of the feature map / high
position = tf.to_float(tf.range(length)) # len == 14 Calculation x or y Location information of direction [0,1,2...,13]
scaled_time = tf.expand_dims(position, 1) * tf.expand_dims(
inv_timescales, 0) # pos = [14, 1], inv = [1, 128], scaled_time = [14, 128] Calculate the product of frequency information and location information
signal = tf.concat([tf.sin(scaled_time), tf.cos(scaled_time)], axis=1) # [14, 256] Merge the position information vectors in two directions
prepad = dim * 2 * num_timescales # 0; 256
postpad = channels - (dim + 1) * 2 * num_timescales # 512-(1;2)*2*128 = 256; 0
signal = tf.pad(signal, [[0, 0], [prepad, postpad]]) # [14, 512] Fill in the upper, lower, left and right of the matrix respectively 0
for _ in range(1 + dim): # 1; 2
signal = tf.expand_dims(signal, 0)
for _ in range(num_dims - 1 - dim): # 1, 0
signal = tf.expand_dims(signal, -2)
x += signal # [1, 14, 1, 512]; [1, 1, 14, 512]
return x
Get the formula picture x,y After the position information of the direction , Just add it to the original feature image .
🧿 Topic selection guidance , Project sharing :
https://gitee.com/dancheng-senior/project-sharing-1/blob/master/%E6%AF%95%E8%AE%BE%E6%8C%87%E5%AF%BC/README.md

🧿 Topic selection guidance , Project sharing :
https://gitee.com/dancheng-senior/project-sharing-1/blob/master/%E6%AF%95%E8%AE%BE%E6%8C%87%E5%AF%BC/README.md