In the past two years, the requirements and difficulties of graduation design and graduation defense have been increasing , The traditional design topic lacks innovation and highlights , Often fail to meet the requirements of graduation defense , In the past two years, younger students and younger students have been telling their elders that the project system they have built cannot meet the requirements of teachers .
In order that everyone can pass BiShe smoothly and with the least energy , Senior students share high-quality graduation design projects , What I want to share today is
Research and implementation of animal recognition algorithm based on deep learning
The senior here gives a comprehensive score for a topic ( Each full marks 5 branch )
🧿 Topic selection guidance , Project sharing :
https://gitee.com/dancheng-senior/project-sharing-1/blob/master/%E6%AF%95%E8%AE%BE%E6%8C%87%E5%AF%BC/README.md
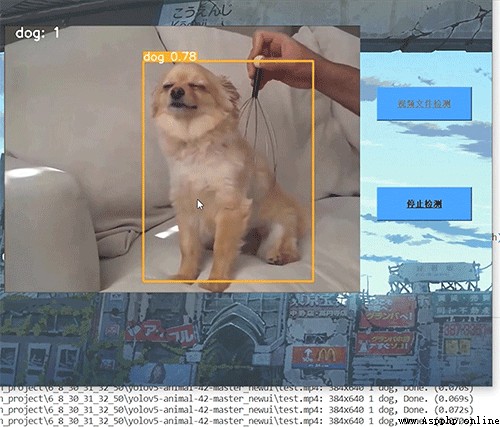
The dynamic detection effect realized by the seniors , The accuracy is still very high !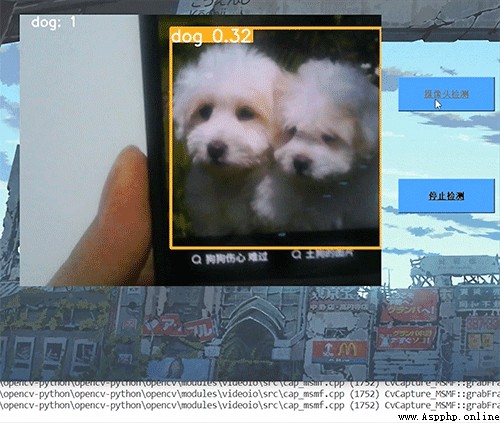
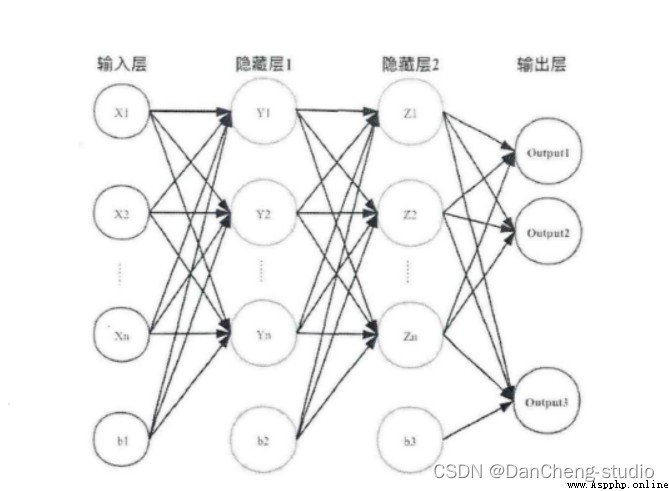
Inspired by the interconnection pattern of human brain synaptic structures , Neural network is an important part of artificial intelligence , Process information in a distributed way , It can solve complex nonlinear problems , In terms of structure , Mainly including the input layer 、 Hidden layer 、 The output layer is composed of three structures . Each node is called a neuron , There are corresponding weight parameters , Some neurons are biased , When entering data x After entering , For passing neurons, we will do something similar :y=w*x+b Calculation of linear function of , among w Is the weight of the neuron at this position ,b Is the offset function . Through the logical operation of each layer of neurons , Input the result into the activation function of the last layer , Finally, we get the output output.
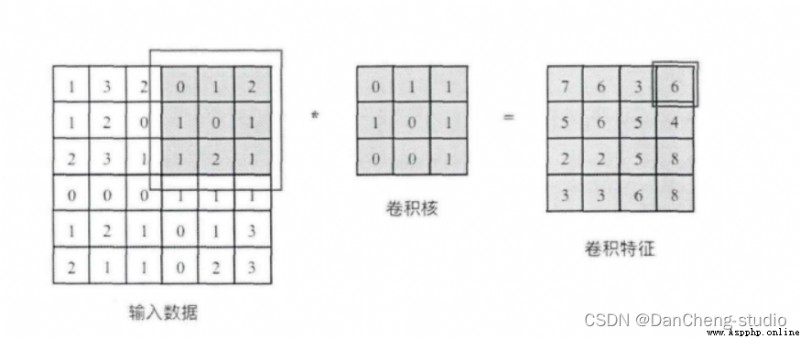
Convolution kernel is equivalent to a sliding window , Schematic diagram 3x3 The convolution kernels of size are crossed in turn 6x6 The corresponding area in the input data of size , And slide over the region with the convolution kernel to do matrix point multiplication , Fill the results in the corresponding positions in order to get the right 4x4 Convolution characteristic graph of size , For example, draw to the upper right corner 3x3 When the area is circled , There will be 0x0+1x1+2x1+1x1+0x0+1x1+1x0+2x0x1x1=6 Calculation operation of , And fill the obtained value into the upper right corner of the convolution feature .
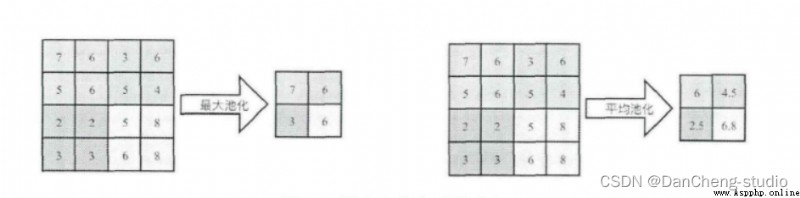
Pooling operation is also called downsampling , Extracting the main features of the network can achieve the effect of spatial invariance at the same time , Effectively reduce network parameters , Therefore, the computational complexity of the network is simplified , Prevent over fitting phenomenon . In practice, two methods of maximum pooling or average pooling are often used , As shown in the figure below . Although pooling can effectively reduce the number of parameters , But excessive pooling will also lead to the loss of some picture details , Therefore, when building the network, we should adjust the pooling operation according to the actual situation .
Activation functions can be roughly divided into two types , In the early stage of convolutional neural network , Use the more traditional saturation activation function , It mainly includes sigmoid function 、tanh Functions, etc ; With the development of neural network , Researchers found the weakness of saturation activation function , And for its potential problems , The unsaturated activation function is studied , It mainly contains ReLU Functions and their variants
Play a role in the whole network structure “ classifier ” The role of , Through the front convolution 、 Pooling layer 、 After activating the function layer , The network has carried out feature extraction on the original data of the input picture , And map it to the hidden feature space , The full connection layer will be responsible for mapping the learned features from the hidden feature space to the sample tag space , Generally, it includes the location information of the extracted feature on the picture and the probability of the category to which the feature belongs . Visualize the information of hidden feature space , It is also an important part of image processing .
class CNN(tf.keras.Model):
def __init__(self):
super().__init__()
self.conv1 = tf.keras.layers.Conv2D(
filters=32, # Convolution layer neurons ( Convolution kernel ) number
kernel_size=[5, 5], # Feel the size of the field
padding='same', # padding Strategy (vaild or same)
activation=tf.nn.relu # Activation function
)
self.pool1 = tf.keras.layers.MaxPool2D(pool_size=[2, 2], strides=2)
self.conv2 = tf.keras.layers.Conv2D(
filters=64,
kernel_size=[5, 5],
padding='same',
activation=tf.nn.relu
)
self.pool2 = tf.keras.layers.MaxPool2D(pool_size=[2, 2], strides=2)
self.flatten = tf.keras.layers.Reshape(target_shape=(7 * 7 * 64,))
self.dense1 = tf.keras.layers.Dense(units=1024, activation=tf.nn.relu)
self.dense2 = tf.keras.layers.Dense(units=10)
def call(self, inputs):
x = self.conv1(inputs) # [batch_size, 28, 28, 32]
x = self.pool1(x) # [batch_size, 14, 14, 32]
x = self.conv2(x) # [batch_size, 14, 14, 64]
x = self.pool2(x) # [batch_size, 7, 7, 64]
x = self.flatten(x) # [batch_size, 7 * 7 * 64]
x = self.dense1(x) # [batch_size, 1024]
x = self.dense2(x) # [batch_size, 10]
output = tf.nn.softmax(x)
return output
We choose the present YOLO The latest convolutional neural network YOLOv5 To carry out flame identification detection .6 month 9 Japan ,Ultralytics The company opened source YOLOv5, From the last time YOLOv4 Less than 50 God . And this time YOLOv5 Is completely based on PyTorch Realized ! We are still right YOLOv4 Various high-end operations 、 When amazed by the rich experimental comparison ,YOLOv5 It also brings stronger real-time target detection technology . According to the official number , The current version of YOLOv5 The reasoning time of each image is the fastest 0.007 second , The second 140 frame (FPS), but YOLOv5 The weight file size is only YOLOv4 Of 1/9.
There are two kinds of target detection architectures , One is two-stage, One is one-stage, The difference is that two-stage Yes region proposal The process , Similar to an audition process , The network generates locations and categories based on candidate areas , and one-stage Generate locations and categories directly from pictures . What I mentioned today YOLO It's a kind of one-stage Method .YOLO yes You Only Look Once Abbreviation , It means that the neural network only needs to look at the picture once , You can output the results .YOLO A total of five versions have been released , among YOLOv1 Laid the foundation of the whole series , The following series is an improvement on the basis of the first edition , To improve performance .
YOLOv5 Yes 4 The performance of versions is shown in the figure :

YOLOv5 It is a single-stage target detection algorithm , The algorithm YOLOv4 Some new improvement ideas are added on the basis of , Its speed and accuracy have been greatly improved . The main improvement ideas are as follows :
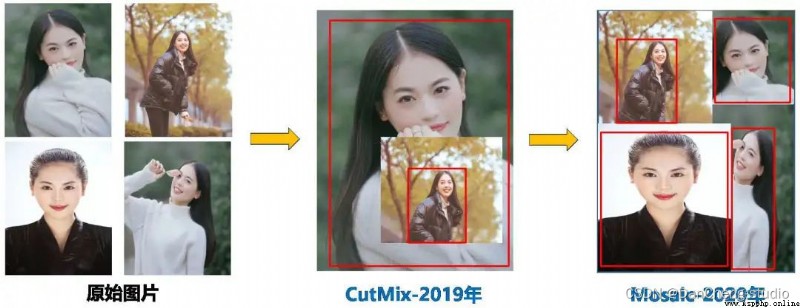
In the model training phase , Some improvement ideas are put forward , It mainly includes Mosaic Data to enhance 、 Adaptive anchor frame calculation 、 Adaptive image scaling ;
Integrate some new ideas in other detection algorithms , It mainly includes :Focus Structure and CSP structure ;
In the field of target detection , In order to better extract fusion features , Usually in Backbone And output layer , Some layers will be inserted , This part is called Neck.Yolov5 Added in FPN+PAN structure , It is equivalent to the neck of the target detection network , It's also very important .

FPN+PAN Structure

This is the combination of operations ,FPN Layers convey strong semantic features from top to bottom (High-Level features ), The feature pyramid conveys strong positioning features from bottom to top (Low-Level features ), Two by two , Feature aggregation of different detection layers from different backbone layers .
FPN+PAN Reference is 18 year CVPR Of PANet, At that time, it was mainly used in the field of image segmentation , but Alexey Apply it to Yolov4 in , Further improve the ability of feature extraction .
The anchor frame mechanism of the output layer is similar to YOLOv4 identical , The main improvement is the loss function in training GIOU_Loss, And prediction box screening DIOU_nms.
about Head part , You can see that the characteristic diagram at the three purple arrows is 40×40、20×20、10×10. And finally Prediction Used in forecasting 3 A feature map :
①==>40×40×255
②==>20×20×255
③==>10×10×255

Related codes
class Detect(nn.Module):
stride = None # strides computed during build
onnx_dynamic = False # ONNX export parameter
def __init__(self, nc=80, anchors=(), ch=(), inplace=True): # detection layer
super().__init__()
self.nc = nc # number of classes
self.no = nc + 5 # number of outputs per anchor
self.nl = len(anchors) # number of detection layers
self.na = len(anchors[0]) // 2 # number of anchors
self.grid = [torch.zeros(1)] * self.nl # init grid
self.anchor_grid = [torch.zeros(1)] * self.nl # init anchor grid
self.register_buffer('anchors', torch.tensor(anchors).float().view(self.nl, -1, 2)) # shape(nl,na,2)
self.m = nn.ModuleList(nn.Conv2d(x, self.no * self.na, 1) for x in ch) # output conv
self.inplace = inplace # use in-place ops (e.g. slice assignment)
def forward(self, x):
z = [] # inference output
for i in range(self.nl):
x[i] = self.m[i](x[i]) # conv
bs, _, ny, nx = x[i].shape # x(bs,255,20,20) to x(bs,3,20,20,85)
x[i] = x[i].view(bs, self.na, self.no, ny, nx).permute(0, 1, 3, 4, 2).contiguous()
if not self.training: # inference
if self.onnx_dynamic or self.grid[i].shape[2:4] != x[i].shape[2:4]:
self.grid[i], self.anchor_grid[i] = self._make_grid(nx, ny, i)
y = x[i].sigmoid()
if self.inplace:
y[..., 0:2] = (y[..., 0:2] * 2 - 0.5 + self.grid[i]) * self.stride[i] # xy
y[..., 2:4] = (y[..., 2:4] * 2) ** 2 * self.anchor_grid[i] # wh
else: # for YOLOv5 on AWS Inferentia https://github.com/ultralytics/yolov5/pull/2953
xy = (y[..., 0:2] * 2 - 0.5 + self.grid[i]) * self.stride[i] # xy
wh = (y[..., 2:4] * 2) ** 2 * self.anchor_grid[i] # wh
y = torch.cat((xy, wh, y[..., 4:]), -1)
z.append(y.view(bs, -1, self.no))
return x if self.training else (torch.cat(z, 1), x)
def _make_grid(self, nx=20, ny=20, i=0):
d = self.anchors[i].device
if check_version(torch.__version__, '1.10.0'): # torch>=1.10.0 meshgrid workaround for torch>=0.7 compatibility
yv, xv = torch.meshgrid([torch.arange(ny).to(d), torch.arange(nx).to(d)], indexing='ij')
else:
yv, xv = torch.meshgrid([torch.arange(ny).to(d), torch.arange(nx).to(d)])
grid = torch.stack((xv, yv), 2).expand((1, self.na, ny, nx, 2)).float()
anchor_grid = (self.anchors[i].clone() * self.stride[i]) \
.view((1, self.na, 1, 1, 2)).expand((1, self.na, ny, nx, 2)).float()
return grid, anchor_grid
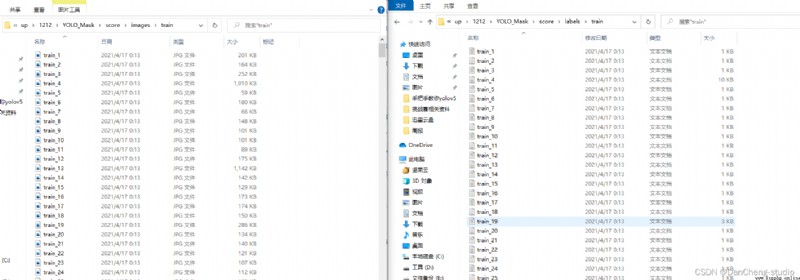
At present, there is no ready-made data set for flame data in multi-source scenes , We use the Python Crawlers use keywords to obtain image data on the Internet , Crawling data includes flames in indoor scenes 、 Office buildings and houses burn 、 Pictures of flames in scenes such as forest fire and vehicle burning . After screening, leave 3000 A picture of good quality is made into VOC Format experimental data set .
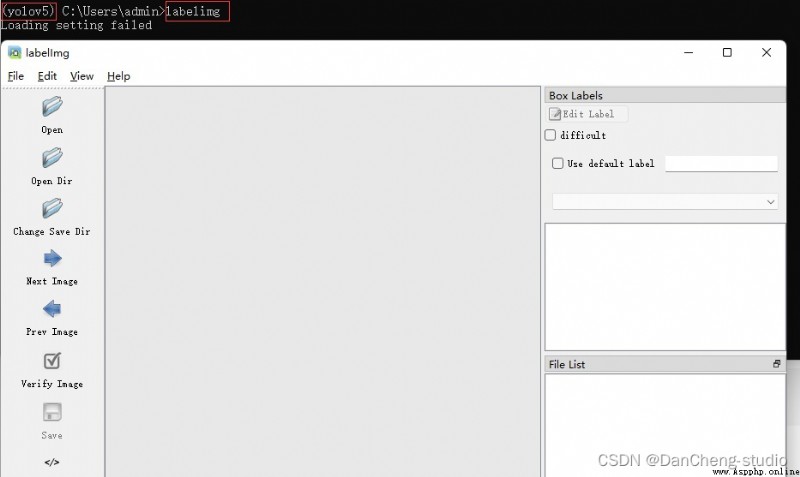
There are many deep learning image annotation software , According to different classification standards, there are many types , This article USES the LabelImg Single machine labeling software for labeling .LabelImg It is based on the annotation method of corners to generate bounding boxes , Mark the picture to get xml Format label file , Because the bounding box has a great impact on the detection accuracy, manual annotation is adopted , No automatic labeling software is used .
Considering that some friends don't have enough time , Bloggers provide labeled data sets and trained models , Please contact .
adopt pip Command to install
pip install labelimg
Enter... On the command line labelimg You can open
Open the folder you need to label , Click the red box area to switch the annotation format , We need to yolo Format , So switch to yolo

Click on Create RectBo -> Drag the mouse box to select the target -> Label -> Click on ok
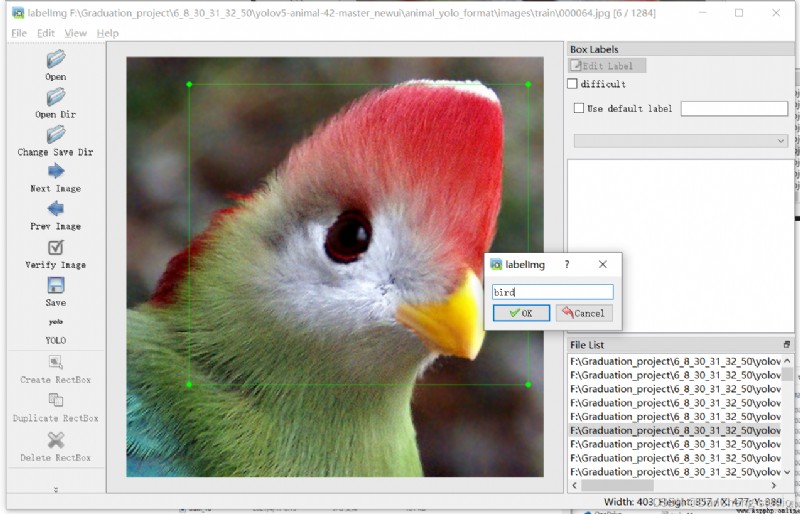
Click on save, preservation txt.
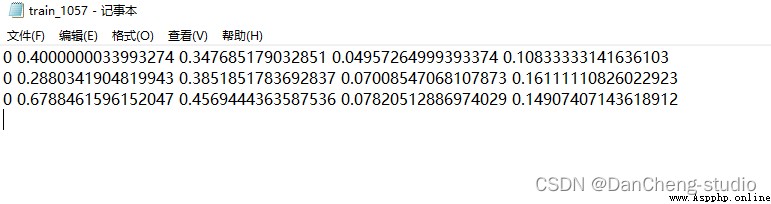
Open the specific annotation file , You will see the following ,txt Each line in the file represents a target , Distinguish by spaces , Each represents the category of the target id, The center point after normalization x coordinate 、y coordinate 、 Of the target box w and h.
The pre training model and data set are ready , You can start training your yolov5 Target detection model , The training target detection model needs to be modified for two reasons yaml Parameters in the file . One is data The corresponding... In the directory yaml file , One is model Corresponding... Under the directory file yaml file .
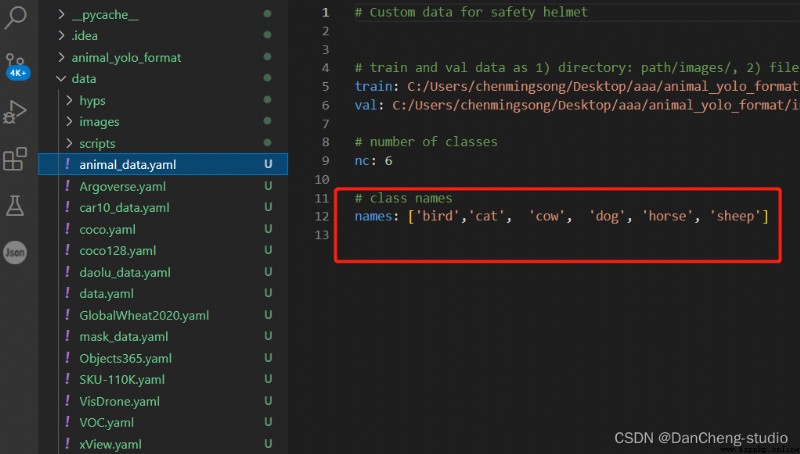
modify data The corresponding... In the directory yaml file . Find the... In the catalog voc.yaml file , Make a copy of the document , Rename the copied file , Preferably related to the project , This is convenient for later operation . I'll change it here to animal_data.yaml.
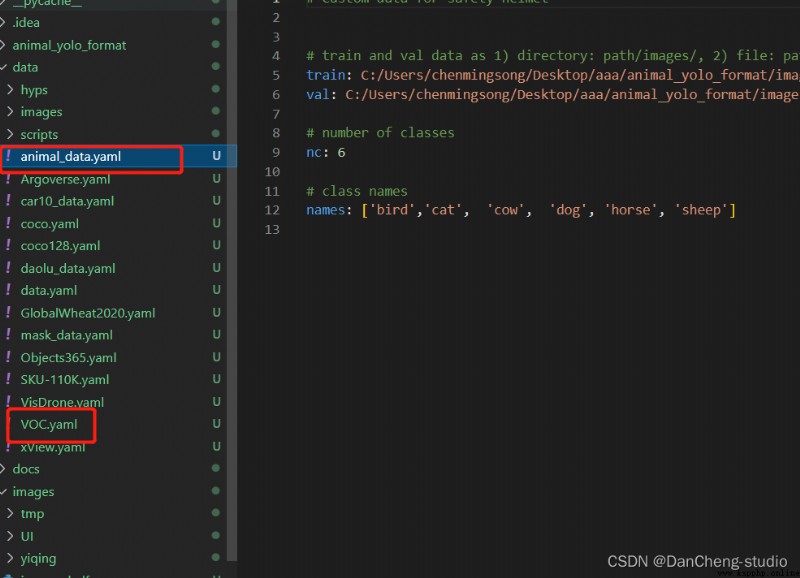
Open this folder and modify the parameters , The number of categories to be detected , There are 6 Animals , So fill in 6; Finally, fill in the name of the category to be identified ( Must be in English , Otherwise, it will be garbled and can't be recognized ). Come here and data In the catalog yaml The file will be modified .
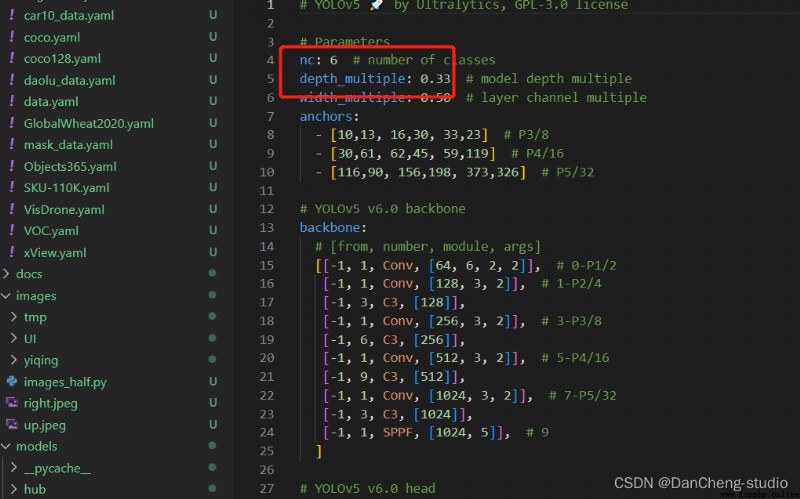
Because the project uses yolov5s.pt This pre training weight , So use models In the catalog yolov5s.yaml Corresponding parameters in the file ( Because different pre training weights correspond to different network layers , Therefore, using the wrong pre training weight will report an error ). Same as above data In the catalog yaml file , We'd better yolov5s.yaml Make a copy of the document , And then rename it
open yolov5s.yaml file , It is mainly modified after going in nc Use this parameter to modify the category , Just modify the numbers in the figure , Here are two categories to identify .
thus , The corresponding configuration parameters can be modified .
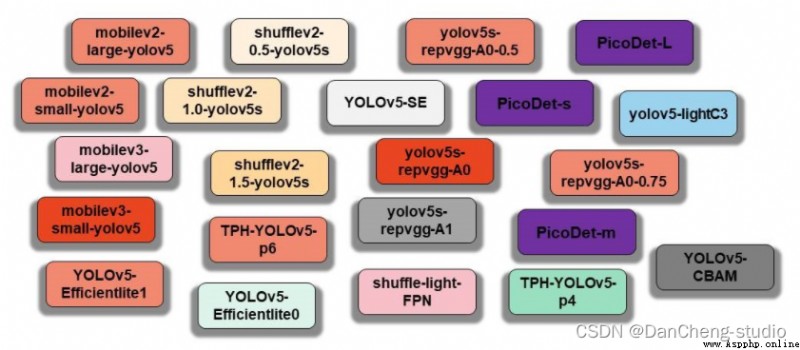
The types of models currently supported are as follows :
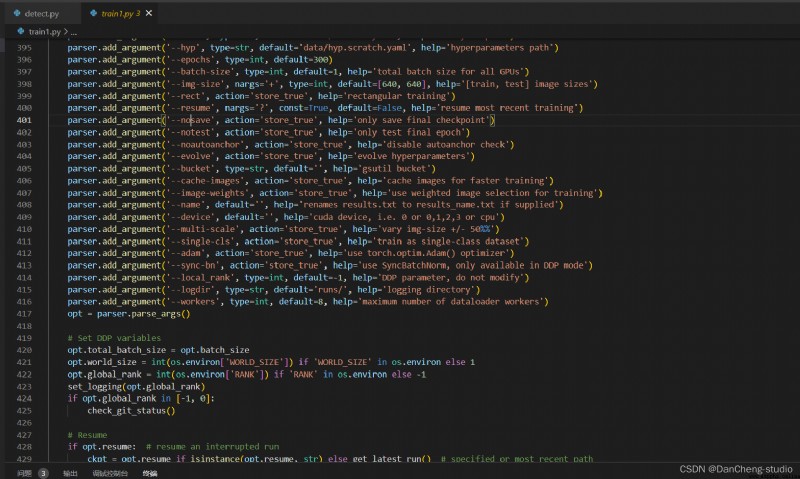
If the above data set and two yaml If the parameters of the file are modified , You can start yolov5 Of training . First we find train.py This py file .
Then find the entry of the main function , There are the main parameters of the model . modify train.py Medium weights、cfg、data、epochs、batch_size、imgsz、device、workers Equal parameter
thus , Can run train.py Function trains its own model .
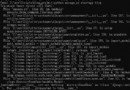
After the training code is successfully executed, the following information will be output in the command line , The next step is to wait for the end of the model training .

We have achieved image detection , Video detection and camera real-time detection interface , use Pyqt Self made simple UI
# Part of the code
from PyQt5 import QtCore, QtGui, QtWidgets
class Ui_Win_animal(object):
def setupUi(self, Win_animal):
Win_animal.setObjectName("Win_animal")
Win_animal.resize(1107, 868)
Win_animal.setStyleSheet("QString qstrStylesheet = \"background-color:rgb(43, 43, 255)\";\n"
"ui.pushButton->setStyleSheet(qstrStylesheet);")
self.frame = QtWidgets.QFrame(Win_animal)
self.frame.setGeometry(QtCore.QRect(10, 140, 201, 701))
self.frame.setFrameShape(QtWidgets.QFrame.StyledPanel)
self.frame.setFrameShadow(QtWidgets.QFrame.Raised)
self.frame.setObjectName("frame")
self.pushButton = QtWidgets.QPushButton(self.frame)
self.pushButton.setGeometry(QtCore.QRect(10, 40, 161, 51))
font = QtGui.QFont()
font.setBold(True)
font.setUnderline(True)
font.setWeight(75)
self.pushButton.setFont(font)
self.pushButton.setStyleSheet("QPushButton{background-color:rgb(151, 191, 255);}")
self.pushButton.setObjectName("pushButton")
self.pushButton_2 = QtWidgets.QPushButton(self.frame)
self.pushButton_2.setGeometry(QtCore.QRect(10, 280, 161, 51))
font = QtGui.QFont()
font.setBold(True)
font.setUnderline(True)
font.setWeight(75)
self.pushButton_2.setFont(font)
self.pushButton_2.setStyleSheet("QPushButton{background-color:rgb(151, 191, 255);}")
self.pushButton_2.setObjectName("pushButton_2")
self.pushButton_3 = QtWidgets.QPushButton(self.frame)
self.pushButton_3.setGeometry(QtCore.QRect(10, 500, 161, 51))
QtCore.QMetaObject.connectSlotsByName(Win_animal)


🧿 Topic selection guidance , Project sharing :
https://gitee.com/dancheng-senior/project-sharing-1/blob/master/%E6%AF%95%E8%AE%BE%E6%8C%87%E5%AF%BC/README.md